Test Version for PCB v 3.7 with HA Support and Other Features

I just published a snapshot test version for all people with the legacy DIY Pro with board 3.7.
(Earlier PCB versions are still work in progress and will follow).

You can flash it from this page:
The AirGradient DIY Air Quality Sensor (Pro Presoldered-Version, PCB Version 3.7)

And press the blue button “Flash Beta Firmware”. Please note that you need to plug the cable directly into the D1 mini (thus you need to open your enclosure).

Tested and Working

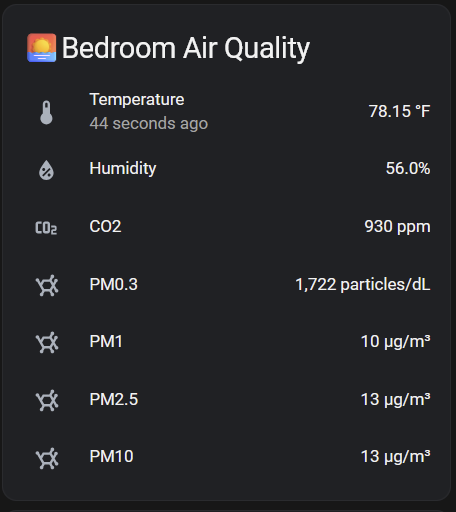
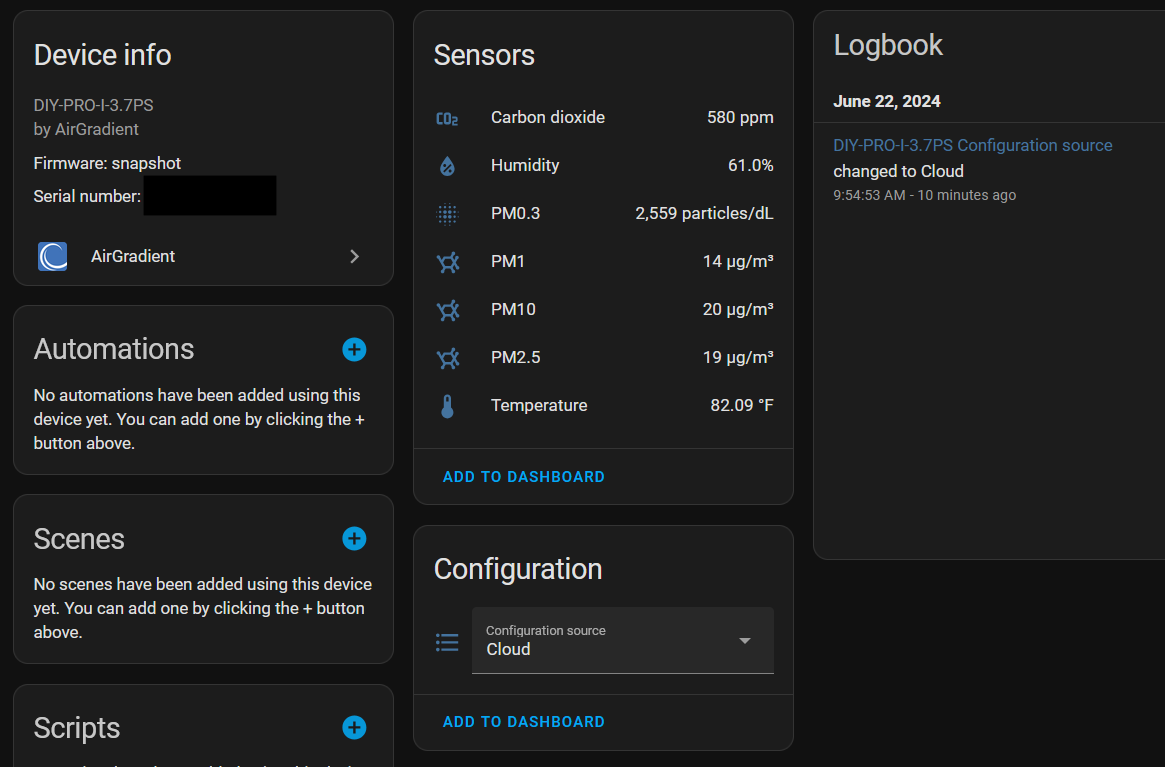
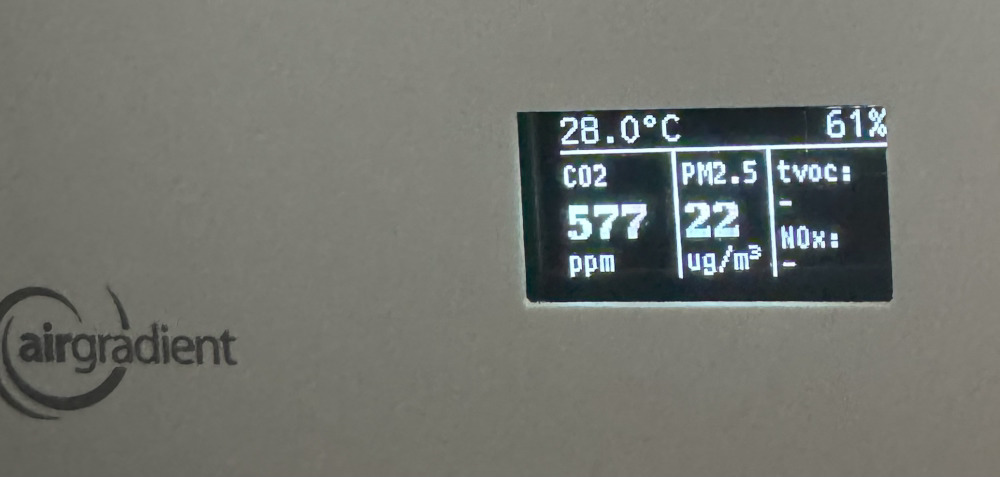
  1. SHT3x and SHT4x supported
  2. Forced CO2 calibration supported from AirGradient dashboard
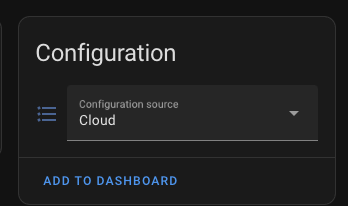
  3. Configuration from AirGradient dashboard supported (e.g. Temperature / Fahrenheit, US AQI / ug/m3)
  4. Display brightness supported
  5. Local server / local configuration
  6. HA local integration supported. (see notes below)

Not tested (yet)

  • MQTT support

Not implemented

  • Push Button Functionality
  • Over the Air Updates

Breaking Change:
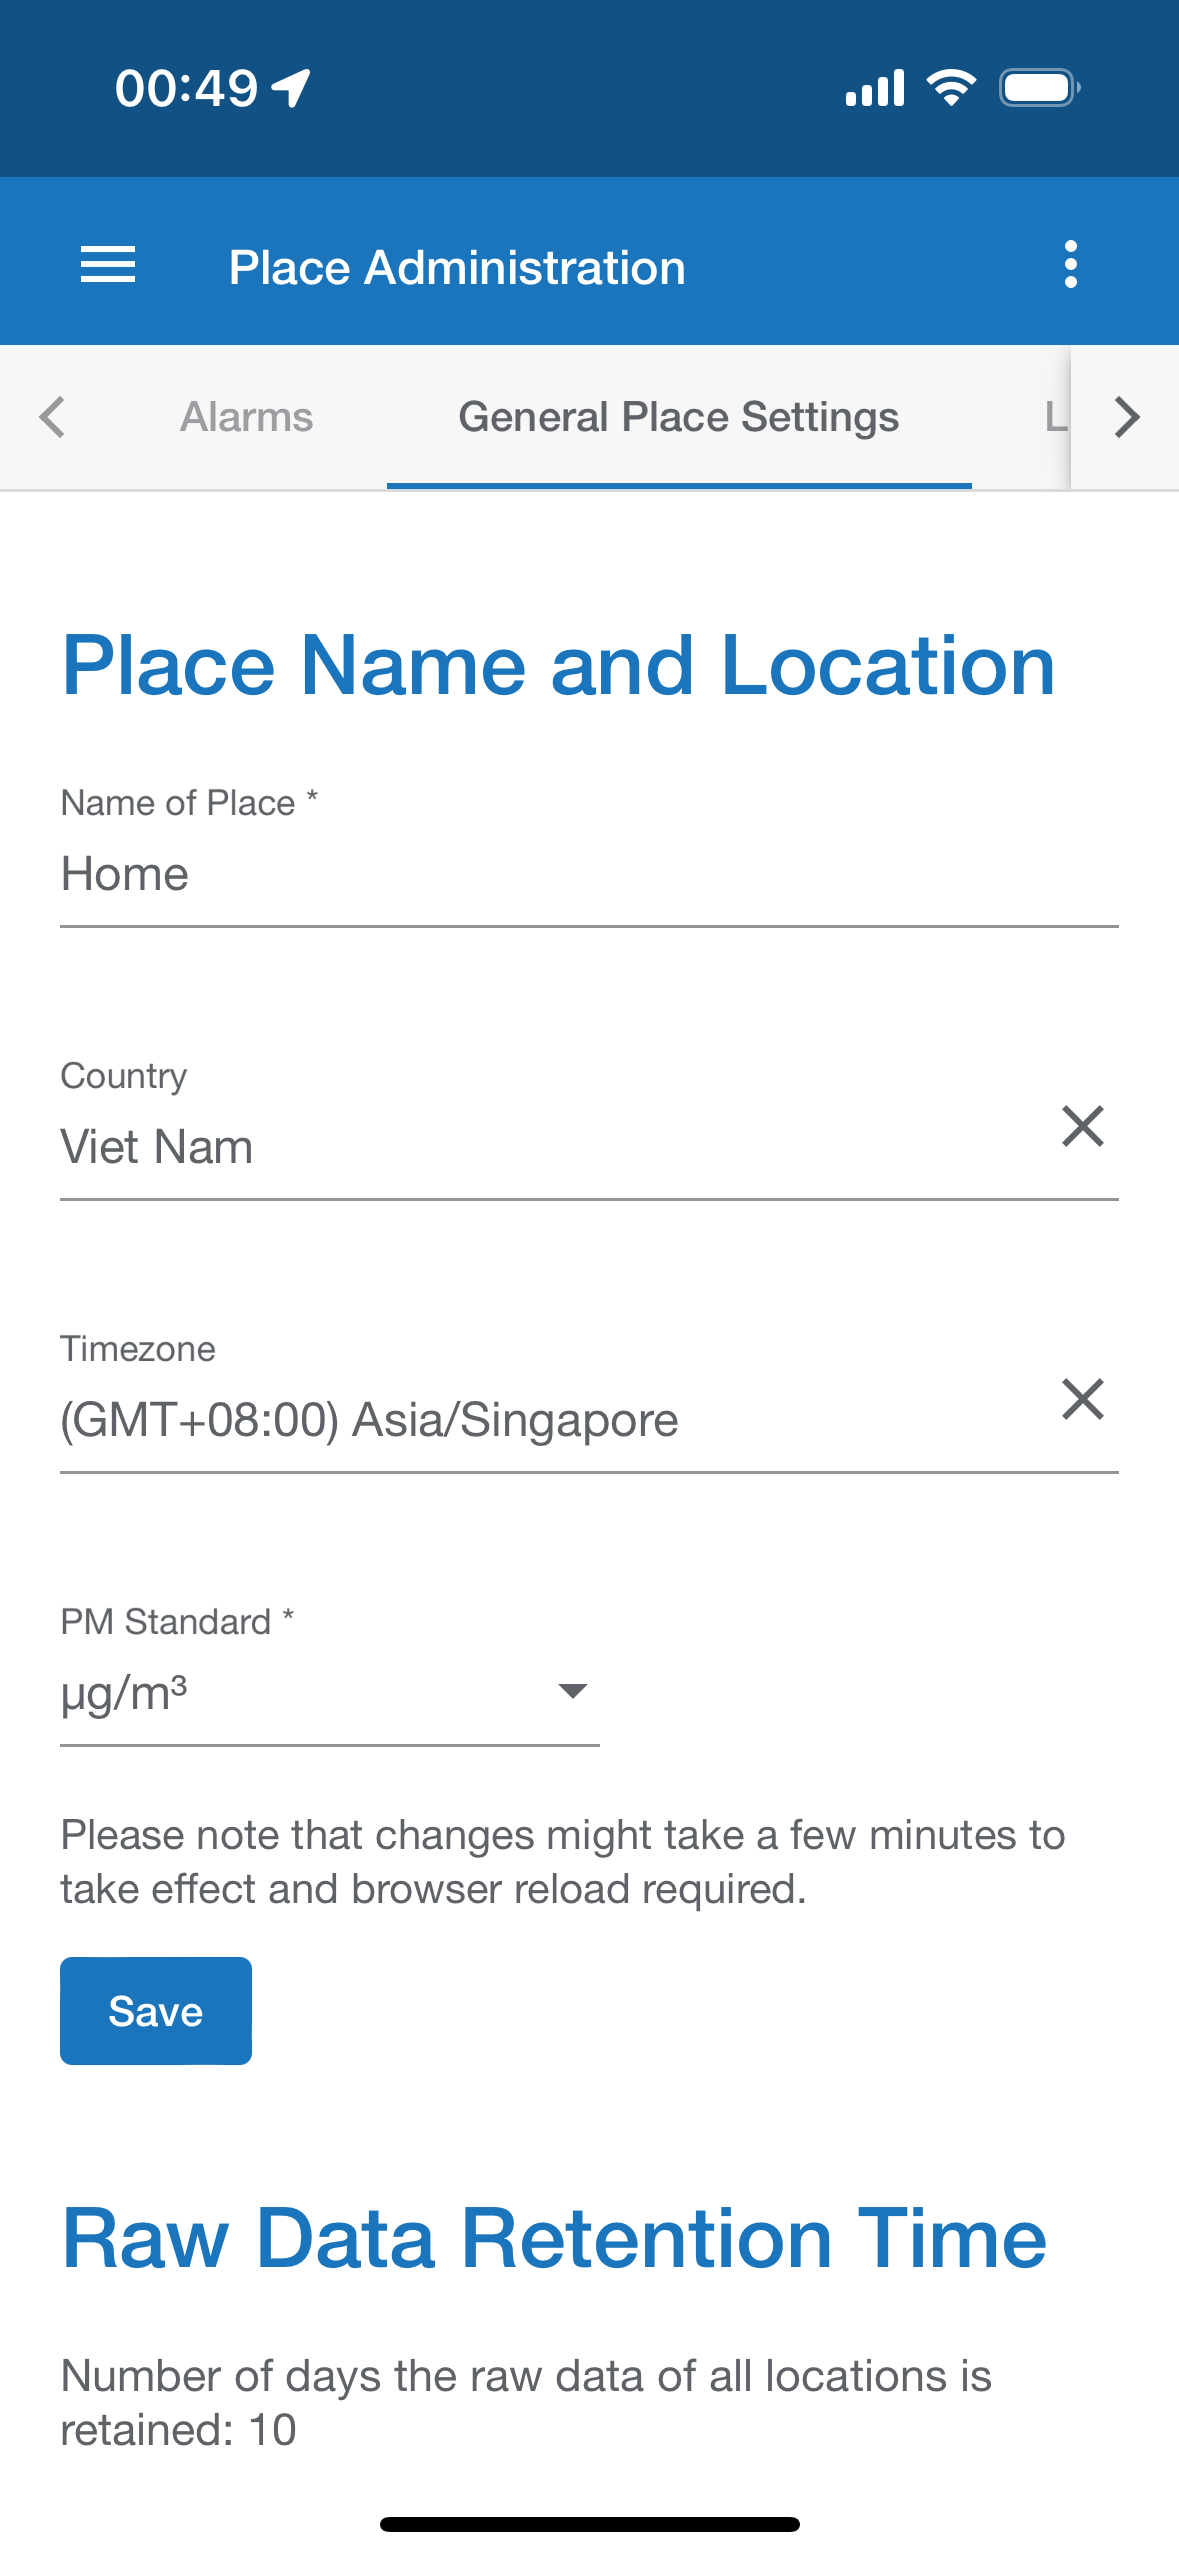
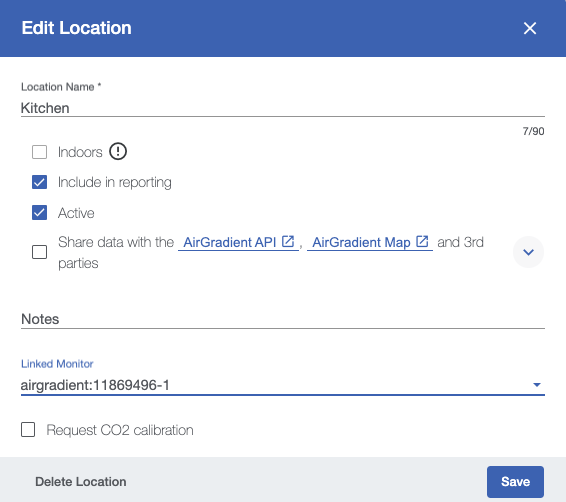
Serialnumber is now 12 digits. So you need to set it up again as new hardware on the AirGradient dashboard and then link the exsting location to the new hardware.

Go to: AirGradient then click “Add new”
image

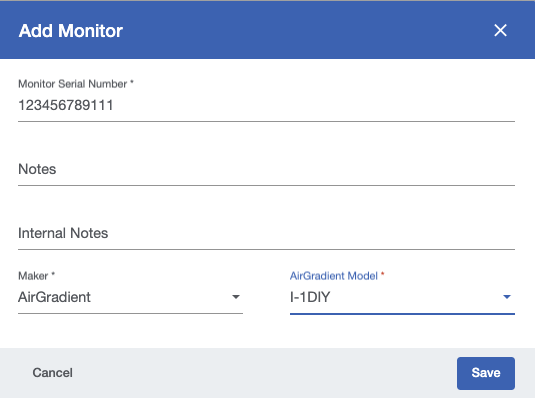
Then change the Linked Monitor in Location Settings to the new serial number
https://app.airgradient.com/settings/location

Please report any questions / probelems here.

Home Assistant
Local Home Assistant is Supported but note the following:

  • You need to have the latest Home Assistant version installed (2024.6)

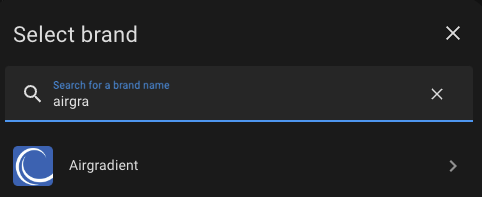
  • Auto discovery does not work. To add the AirGradient device go to: Settings, Devices & Services then click on the blue “Add Integration”
    image

  • Then search for “AirGradient”
    image

  • Then as host put in:
    image
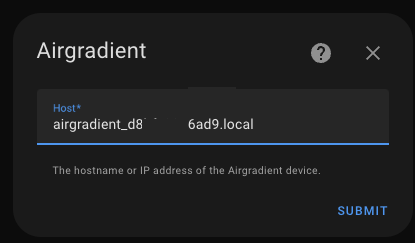
    “airgradient_d8…d9.local” with the complete serial number of your monitor. It is displayed during boot.

  • Then in the settings, set the monitor to accept cloud configuration:
    image

(there is an error currently returned when changing this setting but it still works).

2 Likes

I updated my 3.7 Airgradient to the beta firmware. Updated fine, connected to Home Assistant no problems. Online dashboard works great too.

The physical button on the PCB doesn’t work, so we can’t switch the included display’s temperature measurement to F or air quality measurement to US AQI. I know you say this should be inherited from the cloud config, but it isn’t. I set the config location to the cloud multiple times, and it does pop-up the error you expected, but when I refresh the page it still says local.

Edit: Just came back to it and it does show as using the cloud config in HA device properties now, but that didn’t actually fix anything.

We also can’t switch the screen orientation, although I don’t need that personally. Additionally the built-in display shows tvoc and nox, even though I don’t have that module. Would like to disable that part if possible.

Is there some way of outputting US AQI to Home Assistant, ideally in addition to PM2.5? If not I can probably do it through these instructions but they aren’t exactly elegant.

(Note, my area is going through a heatwave so all windows are closed thus the high CO2.)

Make sure that you switch to cloud config in the home assistant configuration. Then it should work.

1 Like

Definitely shows as cloud now, but not outputting AQI to Home Assistant. Also the included OLED display still shows degrees in Celsius and no AQI.

I fully agree Celsius is better and I use it for cooking and tech, but for some reason I just can’t wrap my head around it for ambient temperature.

I also tried switching the PM in ug/m3 toggle in the online dashboard, restarting the Airgradient integration, switching it back, and restarting again. That also didn’t get it working in degrees F and US AQI.

(My window is open now, for anyone interested why the readings changed.)

image

I’m coming from ESPHome on the D1 Mini. When I connect the board, I see COM8 show up in Windows 11, but when I try to select it to flash the beta firmware, I get an error:

Failed to execute ‘open’ on ‘SerialPort’: Failed to open serial port.

I’ve tried holding the button on the board while connecting the USB cable but no luck. Restarted browser several times. Will try restarting the computer next.

In “windows 11”? I did it inside Google Chrome. Firefox did not work when I gave it a shot. Also I assume you know this as you already flashed to ESPhome but you need to plug-in to the D1 inside the enclosure, not the main plug on the rear.

You could also try this: failed to execute 'open' on 'serialport': failed to open serial port. · Issue #4525 · esphome/issues · GitHub

I’m using Edge, which should be the same, but I could try Firefox or Chrome.

Using the link @Henri provided, I was able to download the 3.5 driver for CH340 here
Shotech Steffen Hofmann - CH340G
This allowed me to flash it.

1 Like

Awesome, happy to have helped!

I don’t see any “Add new” button on this page. So I tried adding it as a whole new Monitor under Menu>Connect a Monitor but I had to create a new location as part of that process. Now when I try to edit the existing Location, I don’t have the new full MAC address entry as one I can select.

Would it not be possible to just use the Edit Hardware option to change the serial number from 6 digits to the full one and not have to edit the Location at all?
Edit: I guess not, as when I tried it, I get “Seem like something is wrong on the server, try again later, please.”

Excellent point, I should have mentioned it too. “Add new” didn’t work for me either, so I simply went to hardware, three dots, edit monitor and changed the serial number there. This did not error-out for me. The location already inherited the new serial and did not need to be changed so those instructions are wrong also.

For what it is worth, I’m using a V3.3 board, as I don’t have a 3.7, but the primary difference is the lack of a physical button, but I don’t need that button. A few observations

  • I get an error that SHT was not found. This device does have one installed and it was working in ESPHome. It has sht40 installed.
  • The display needs to be rotated 180 for this board and configuration, but that is likely due to me not using a supported board. But there are 3.3 boards out in the wild, so having support for them is desired.

I think you change it at the wrong place. For the configuration you need to change under Administration, Place Settings and the 2nd tab:

https://app.airgradient.com/settings/place?tab=1

Here you can set US AQI and the temperature unit. After around a minute this settings should be reflected on the display of the monitor.

1 Like

Editing the serial number is not allowed due to some backend restrictions. This is why the new one needs to be created.

I will check regarding the Add New button tomorrow.

Weird! Changing the serial seemed to work for me.

Will check out the locale when I get home and report back. Thanks again for deciding to update these devices.

Edit: Changing the locale in the proper spot worked perfectly in the built-in display, thank you! Did not change it in Home Assistant though, maybe AQI could be exposed as a separate entity?

Great that the configuration from cloud now works.

In one of the next updates I believe we will have the US AQI conversion as an additional entity.

1 Like

I can also confirm that this works on a DIY PCB v3.3 with SGP41 added. In the Dashboard I was able to go to Hardware > Actions > Edit Monitor and update the Serial Number with the newer longer one and Model to I-1DIY. After a few minutes the monitor was Connected. I’ve also added it successfully to HomeAssistant. I’ll let it collect some data and see how it looks compared to when it was running ESPHome. Thanks for making this possible.

1 Like

No issues with it saying that SHT not detected? If I plug into the D1 itself, SHT is detected, but if I use a USB-C power supply to the board, most of the time SHT is not detected.

I opened an Issue on the GitHub, but possible it is just my board.

Mine is an SHT3x on a v3.3 board and did not get any errors powering it via the D1 or the USB-C on the board itself. I just closed up the case and put it back in its spot and still getting temperature and humidity readings.

@Achim_AirGradient
I just use another D1 mini to flash the v3.7 beta firmware on the current v3.7 PCB successful with the common findings as below.

  • The physical button on the PCB doesn’t work,

  • I don’t see any “Add new” button on the page re-directed. So I tried adding it as a whole new Monitor under Menu>Connect a Monitor and create a new location for beta testing.

  • Mine is an SHT4x on a v3.7 board and I get the errors of not detect SHT sensor when the 1st Boot after FW flashed with powering it via the D1 mini board.
    After the Wifi connected, this error is gone during the booting process. Temp and Hum is reported normally via the USB-C on the V3.7 board itself.

  • Following the steps provided the monitor is added to Home Assistant success and working normally.

Do you have Arduino IDE script file (.ino) of that beta firmware for reference?
I will try to modify it to add Apple HomeKit integrations.
I have modified the current official v3,7 firmware to add the Apple HomeKit integrations success.

1 Like

@Achim_AirGradient
Flashed a spare D1 mini with the Beta FW. Flashing went without issues.
Had to look for wifi password (cleanair) in the ‘AirGradient ONE Indoor’ instruction page.
After connecting it worked at once.
It was around midnight I did this, and the display went dark after a minute or so (remember this from others who had the same). Corrected this via:
Menu > Place > LED & Display > Display Brightness: Night 100%
I have to get used to the new look of the display after being used to the old one for about a year.

Integration into Home Assistant also works.
Thanks for all this work.