This looks like an interesting board. May be a good upgrade for the 8266
2 Likes
Yes I saw that too. Apparently, pin compatible. I will try and get a board and see how it works.
I have gotten the sketch working on ESP32. So it should be pretty simple to get working.
I have a new board on the way that uses a smaller form factor MCU. It will support either Seeed XIAO RP2040 or Adafruit QT Py ESP32-S2.
I haven’t yet worked on running the sketch on the Seeed XIAO, but as it’s pin compatible with the QT Py and runs Ardiuno code, it should be trivial to get working. I like these boards as they are the size of a postage stamp and as powerful, maybe more so than the Wemos boards.
1 Like
Apparently there’s a hardware issue with V1.0.0
Currently testing V2.1.0 (received it yesterday) and it’s great so far.
Any news about compatibility with airgradient board? I’m waiting mine to arrive from JLCPCB
We are working on making the AirGradient Arduino library compatible with ESP32 boards.
The current library does not work with these chips.
I’m really interested in this. Using esphome, it should be possible to use it for not just airgradient, but adding bluetooth_proxy which could be handy given airgradients are likely scattered around. 2 tasks with one device.
I received by Pro (non soldered) kit very recently and have been having trouble uploading firmware with ESPHome as it times out very often. I have absolutely no time out issues with any of my other ~30 ESP boards. The board that came with the kit is a Lolin D1 ‘Mimi’ which is based on the 8266 so I figured I’d try to replace it with a pin compatible ESP32 S2 Mini or an ESP32-WROOM-32 ESP Mini 32 (no idea on brand or proper name…).
ESP32 S2:
The OLED display, PMS5003 and SHT3X all worked fine but I just could not get UART1 for the CO2 sensor to work.
ESP32 WROOM 32 (Mini)
Everything works perfectly and it is pin compatible so no mods necessary.
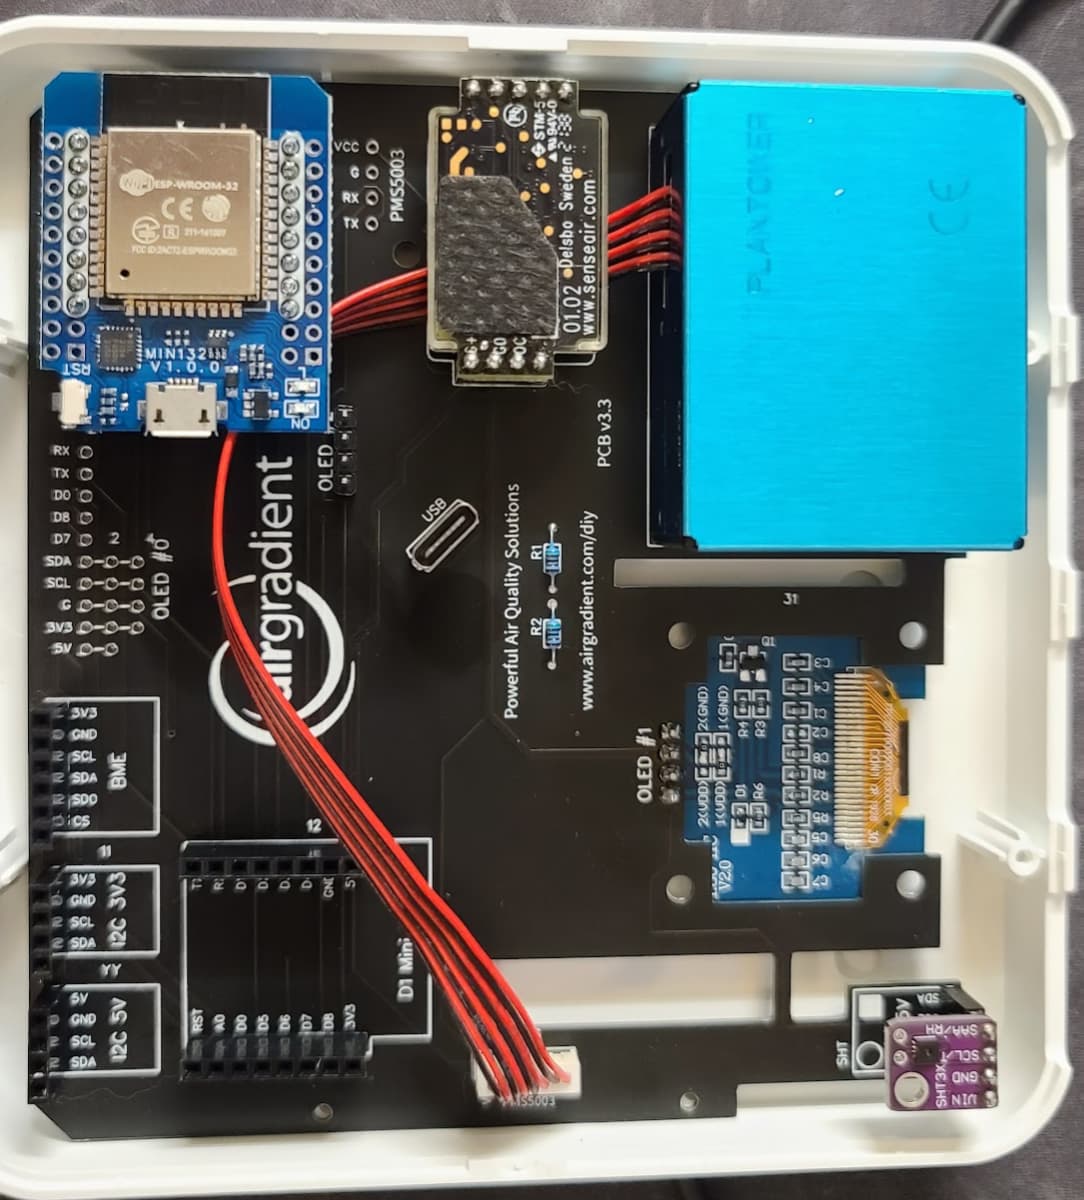
Note: Sorry for terrible pic… camera on my S20Ultra is awful.
Edit:
Nevermind… it works but now I cannot close the enclosure without modifying it as the corner where the LEDs are interferes with the recessed part of the enclosure or removing the PCB corner where the power led is (likely not an issue to do so but I am not sure I want to). The ESP32 S2 fits perfectly but I can’t get the UART1 to work… 
Edit2: Creative and careful use of a Dremel on both the ESP32 board and the enclosure solved the problem.
This is very interesting as we want to make the board ESP32 compatible.
There are D1 ESP32 based modules that are smaller and should not have the problem that we need to adjust the enclosure, e.g.
S2 Mini

or
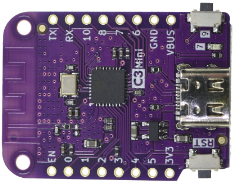
C3 Mini
Would you like to share the code adjustments you made?
@Achim_AirGradient - I have an ESP32 S2 Mini but I could not get UART1 to work as stated above. I did not see any errors so I did not know what else to try.
I do not have a C3 Mini and I did not find any on amazon so I can’t test that one.
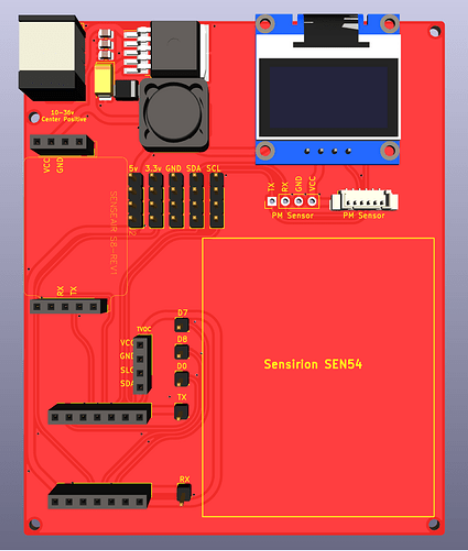
My ESPHome code is for the ESP32-WROOM-32 that is a bit too large to fit (I modified both the board and the case and it fits now):
Note: Code is still work in progress…
substitutions:
  devicename: "air-quality-sensor"
  devicename_no_dashes: "air_quality_sensor"
  friendly_devicename: "Air Quality Sensor"
  device_description: "Air Gradient Air Quality Sensor"
  update_interval_s: "2s"
  update_interval_wifi: "120s"

esphome:
  name: "${devicename}"
  comment: "${device_description}"
  # Automatically add the mac address to the name
  # so you can use a single firmware for all devices
  # name_add_mac_suffix: true

esp32:
  board: nodemcu-32s
  framework:
    type: arduino

# Enable logging
logger:


# Enable Home Assistant API
api:
  password: !secret api_pwd

ota:
  password: !secret ota_pwd

wifi:
  networks:
  - ssid: !secret iot_wifi_ssid
    password: !secret iot_wifi_password
  reboot_timeout: 15min

#Faster than DHCP. Also use if can't reach because of name change
  manual_ip:
    static_ip: 192.168.3.212
    gateway: 192.168.3.1
    subnet: 255.255.255.0
    dns1: 192.168.1.25
    dns2: 192.168.1.26

#Manually override what address to use to connect to the ESP.
#Defaults to auto-generated value. Example, if you have changed your
#static IP and want to flash OTA to the previously configured IP address.
#  use_address: 192.168.3.212

  # Enable fallback hotspot (captive portal) in case wifi connection fails
  ap:
    ssid: "${devicename}"
    password: !secret iot_wifi_password

web_server:
  port: 80
  include_internal: false

switch:
  - platform: restart
    name: "${friendly_devicename}: Restart"

  - platform: template
    name: "Calibrate CO2 Sensor"
    id : "calibrate_co2_sensor"
    disabled_by_default: true
    turn_on_action:
        - senseair.background_calibration: co2_sensor
        - logger.log: "CO2 Sensor Calibration Triggered! Must be done OUTDOORS!"

  - platform: template
    name: "CO2 Sensor Calibration Result"
    id : co2_sensor_calibration_result
    disabled_by_default: true
    turn_on_action:
        - senseair.background_calibration_result: co2_sensor

button:
  - platform: safe_mode
    name: "${friendly_devicename}: Restart (Safe Mode)"

captive_portal:

# Sync time with Home Assistant
time:
  - platform: homeassistant
    id: ha_time

text_sensor:
  - platform: wifi_info
    ip_address:
      name: "${friendly_devicename}: IP"
      icon: "mdi:ip-outline"
      update_interval: ${update_interval_wifi}
    ssid:
      name: "${friendly_devicename}: SSID"
      icon: "mdi:wifi-settings"
      update_interval: ${update_interval_wifi}
    bssid:
      name: "${friendly_devicename}: BSSID"
      icon: "mdi:wifi-settings"
      update_interval: ${update_interval_wifi}
    mac_address:
      name: "${friendly_devicename}: MAC"
      icon: "mdi:network-outline"
    scan_results:
      name: "${friendly_devicename}: Wifi Scan"
      icon: "mdi:wifi-refresh"
      disabled_by_default: true

#https://esphome.io/guides/automations.html?highlight=restore_value#bonus-2-global-variables
globals: ##to set default reboot behavior
  # Wifi variables
  - id: wifi_connection
    type: bool
    restore_value: no
    initial_value: "false"

i2c:
  sda: 21 #D2
  scl: 22 #D1

uart:
  - rx_pin: 18 #D5
    tx_pin: 19 #D6
    baud_rate: 9600
    id: uart1

  - rx_pin: 16 #D4
    tx_pin: 17 #D3
    baud_rate: 9600
    id: uart2

font:
  # gfonts://family[@weight]
  - file: "gfonts://Roboto"
    id: roboto
    size: 12

  - file: "gfonts://Roboto"
    id: roboto_symbols
    size: 12
    glyphs: [
      "\U000000B5", #µ
      "\U00000067"  #g
      ]

  - file: "gfonts://Roboto"
    id: roboto_medium
    size: 16

  - file: "gfonts://Roboto"
    id: roboto_large
    size: 32

  - file: "fonts/materialdesignicons-webfont.ttf"
    id: wifi_icon_font
    size: 12
    glyphs: [
      "\U000F05A9", #wifi
      "\U000F05AA"  #no wifi
      ]

  - file: "fonts/materialdesignicons-webfont.ttf"
    id: face_icon_font
    size: 48
    glyphs: [
      "\U000F01F5", #mdi-emoticon-happy-outline
      "\U000F01F6", #mdi-emoticon-neutral-outline
      "\U000F01F8"  #mdi-emoticon-sad-outline
      ]

# https://www.co2meter.com/blogs/news/co2-levels-at-home
# ~400 ppm 	background (normal) outdoor air levels
# 400- 1,000 ppm 	typical levels found in occupied spaces with good air exchange
# 1,000 – 2,000 ppm	levels associated with complaints of drowsiness and poor air
# 2,000 – 5,000 ppm	levels associated with headaches, sleepiness, and stagnant, stale, stuffy air,
# poor concentration, loss of attention, increased heart rate and slight nausea may also be present
# >5,000 ppm	Exposure may lead to serious oxygen deprivation symptoms

display:
  - platform: ssd1306_i2c
    id: device_display
    model: "SH1106 128x64"
    address: 0x3C
    rotation: 180
    flip_x: false
    flip_y: false
    offset_y: 0
    offset_x: 0
    external_vcc: true
    update_interval: 1s
    pages:
      - id: page1
        lambda: |-
          it.rectangle(0, 0, 128, 64);
          it.printf(  6,  8, id(roboto_medium), "CO2 ");
          it.printf( 92,  8, id(roboto_medium), TextAlign::TOP_RIGHT, "%5.0f", id(co2).state);
          it.printf(120, 11, id(roboto), TextAlign::TOP_RIGHT, "ppm");
          it.line( 0, 32, 128,  32);
          it.line(64, 32,  64, 128);
          it.printf(  4, 34, id(roboto), "C");
          it.printf( 68, 34, id(roboto), "RH");
          it.printf( 54, 40, id(roboto_medium), TextAlign::TOP_RIGHT, "%3.1f°", id(temp).state);
          it.printf(120, 40, id(roboto_medium), TextAlign::TOP_RIGHT, "%2.0f%%", id(humidity).state);
      - id: page2
        lambda: |-
          it.rectangle(0, 0, 128, 64);
          it.printf(4, 4, id(roboto_medium), "PM 1: ");
          it.printf(105, 4, id(roboto_medium), TextAlign::TOP_RIGHT, "%4.0f", id(pm1_0).state);
          it.printf(124, 7, id(roboto_symbols), TextAlign::TOP_RIGHT, "µg");
          it.printf(4, 23, id(roboto_medium), "PM 2.5: ");
          it.printf(105, 23, id(roboto_medium), TextAlign::TOP_RIGHT, "%4.0f", id(pm2_5).state);
          it.printf(124, 26, id(roboto_symbols), TextAlign::TOP_RIGHT, "µg");
          it.printf(4, 42, id(roboto_medium), "PM 10: ");
          it.printf(105, 42, id(roboto_medium), TextAlign::TOP_RIGHT, "%4.0f", id(pm10_0).state);
          it.printf(124, 45, id(roboto_symbols), TextAlign::TOP_RIGHT, "µg");
      - id: page3
        lambda: |-
          it.rectangle(0, 0, 128, 64);
          if (id(co2).state <= 1000.0 && id(pm2_5).state < 35 ) {
            it.printf(8, 8, id(face_icon_font), "%s", "\U000F01F5");   //mdi-emoticon-happy-outline
            it.printf(76, 14, id(roboto_medium), "ALL");
            it.printf(68, 34, id(roboto_medium), "GOOD");
          } else if (id(co2).state > 1000.0 && id(co2).state < 2000.0 || id(pm2_5).state >= 35 && id(pm2_5).state <= 50) {
            it.printf(8, 8, id(face_icon_font), "%s", "\U000F01F6");   //mdi-emoticon-neutral-outline
            it.printf(74, 14, id(roboto_medium), "NOT");
            it.printf(68, 34, id(roboto_medium), "GOOD");
          } else {
            it.printf(8, 8, id(face_icon_font), "%s", "\U000F01F8");   //mdi-emoticon-sad-outline
            it.printf(72, 14, id(roboto_medium), "NOT");
            it.printf(68, 34, id(roboto_medium), "SAFE");
          }

interval:
  - interval: 10s
    then:
      - display.page.show_next: device_display
      - component.update: device_display

  - interval: 20s
    then:
      if:
        condition:
          wifi.connected:
        then:
          - globals.set:
              id: wifi_connection
              value: 'true'
        else:
          - globals.set:
              id: wifi_connection
              value: 'false'

sensor:
  - platform: wifi_signal
    name: "${friendly_devicename}: WiFi Signal"
    update_interval: ${update_interval_wifi}
    device_class: signal_strength

  - platform: sht3xd
    temperature:
      id: temp
      name: ${friendly_devicename} Temperature
    humidity:
      id: humidity
      name: ${friendly_devicename} Humidity
    address: 0x44
    update_interval: 10s

  - platform: pmsx003
    type: PMSX003
    uart_id: uart1
    pm_1_0:
      id: pm1_0
      name: "${friendly_devicename}: Particulate <1.0µm"
    pm_2_5:
      id: pm2_5
      name: "${friendly_devicename}: Particulate <2.5µm"
    pm_10_0:
      id: pm10_0
      name: "${friendly_devicename}: Particulate <10.0µm"


  - platform: senseair
    id: co2_sensor
    uart_id: uart2
    co2:
      id: co2
      name: "${friendly_devicename} CO2"
    update_interval: 60s
1 Like
I certainly want to come back and try out your esphome code!
I bought a Lolin C3 mini v2.1.0. It was really tricky to find how to get it to run esphome for air gradient. I thought I should share the necessary changes, in case anyone else wants to try.
esphome:
  name: air-gradient
  platformio_options:
    board_build.flash_mode: dio

esp32:
  board: esp32-c3-devkitm-1
  framework:
    type: esp-idf
    version: recommended
  variant: esp32c3

logger:
  level: DEBUG
  hardware_uart: USB_SERIAL_JTAG
The last line is needed to get serial output. The flash mode was needed to allow me to flash it. Rest should be self explanatory, otherwise please ask.
With the Lolin C3 mini I have a bug. Most reads from the Co2 sensor fail with
17:04:16.100 > [E][uart:015]: Reading from UART timed out at byte 0!
17:04:16.102 > [W][senseair:024]: Reading data from SenseAir failed!
The problem reminds of S8 CO2 reading of -1 - #99 by AirGradient (but is subtly different). I did not find a solution to the issue and appreciate any advice one might have.
On the bright side: with the C3 I can run a esphome configuration with historic graphs which also forwards the data on mqtt. This solves one of the issues I had documented in Esphome with graphs
I picked up both a S2 mini and a C3 mini to test them as replacements for the included 8266 with esphome (like many others, I’ve been experiencing frequent/random reboots with the included D1 mini). After figuring out how to flash them and getting them working with esphome, I ran into the same SenseAir issues as @argafal. But interestingly - I found that if you flipped the order of the UARTs in the esphome config, then the senseair would start working properly and the PMS would stop. So that made it clear that this isn’t an issue with pin compatibility with the hardware UARTs or anything like that.
I figured out what was going on. Both the S2 and C3 boards have two hardware UARTs (unlike the full ESP32 which has three). In order to have hardware logging, esphome reserves the first (UART0) for the logger. Even if you disable hardware logging (by setting baud_rate to 0) or disable the logger entirely, it still won’t assign UART0 to anything else. The PMS sensor, first in the list, was assigned UART1, and the SenseAir was assigned UART2, which isn’t functional on these boards.
I just submitted a pull request to esphome that changes this behavior, and allows UART0 to be assigned if the logger isn’t using it. To use these boards on the AirGradient, you have to give up hardware serial logging, but all the sensors will work (and you can still get logs over wireless). And importantly, it works reliably and the reboot issue went away (yay!). I found that both the S2 and C3 worked well with this change.
If anyone wants to try it out, here’s my esphome config for the S2 mini:
esphome:
  name: airgradient
  friendly_name: AirGradient
  platformio_options:
    board_build.extra_flags:
      - "-DARDUINO_USB_CDC_ON_BOOT=0"  # Needed to compile

# Remove once this is merged: https://github.com/esphome/esphome/pull/4762
external_components:
  - source: github://spectrumjade/esphome@esp32s2_uart_fix
    components: [ uart ]
    refresh: 0s

esp32:
  variant: esp32s2
  board: lolin_s2_mini
  framework:
    type: arduino

# Enable logging
logger:
  level: DEBUG
  baud_rate: 0  # Disable hardware logging so that we can use both UARTs

# Enable Home Assistant API
api:

ota:
  password: !secret ota_update_password

wifi:
  ssid: !secret wifi_ssid
  password: !secret wifi_password

  # Enable fallback hotspot (captive portal) in case wifi connection fails
  ap:
    ssid: "airgradient"
    password: !secret ap_fallback_password

captive_portal:

i2c:
  sda: 33
  scl: 35
  frequency: 100kHz

font:
  - file: "gfonts://Roboto@light"
    id: roboto12
    size: 12

display:
  - platform: ssd1306_i2c
    id: oled
    address: 0x3c
    model: "SH1106 128x64"
    pages:
      - id: page1
        lambda: |-
          it.print(0, 0, id(roboto12), "Temperature");
          it.print(0, 15, id(roboto12), "Humidity");
          it.print(0, 30, id(roboto12), "PM2.5");
          it.print(0, 45, id(roboto12), "CO2");
          it.printf(it.get_width(), 0, id(roboto12), TextAlign::TOP_RIGHT, "%.1f °F", id(temp_f).state);
          it.printf(it.get_width(), 15, id(roboto12), TextAlign::TOP_RIGHT, "%.0f%%", id(humidity).state);
          it.printf(it.get_width(), 30, id(roboto12), TextAlign::TOP_RIGHT, "%.0f ug/m3", id(pm25).state);
          it.printf(it.get_width(), 45, id(roboto12), TextAlign::TOP_RIGHT, "%.0f ppm", id(co2).state);
      - id: page2
        lambda: |-
          it.print(0, 0, id(roboto12), "PM1");
          it.print(0, 15, id(roboto12), "PM2.5");
          it.print(0, 30, id(roboto12), "PM10");
          it.printf(it.get_width(), 0, id(roboto12), TextAlign::TOP_RIGHT, "%.0f ug/m3", id(pm10).state);
          it.printf(it.get_width(), 15, id(roboto12), TextAlign::TOP_RIGHT, "%.0f ug/m3", id(pm25).state);
          it.printf(it.get_width(), 30, id(roboto12), TextAlign::TOP_RIGHT, "%.0f ug/m3", id(pm100).state);

# Set an interval to loop through the OLED screens.
interval:
  - interval: 5s
    then:
      - display.page.show_next: oled
      - component.update: oled

switch:
  - platform: template
    name: Display
    id: display_enabled
    icon: "mdi:fit-to-screen"
    entity_category: config
    lambda: |-
      if (id(oled).is_on()) {
        return true;
      } else {
        return false;
      }
    turn_on_action:
      - lambda: id(oled).turn_on();
    turn_off_action:
      - lambda: id(oled).turn_off();

uart:
  - rx_pin: 7
    tx_pin: 9
    baud_rate: 9600
    id: pms_uart
  - rx_pin: 16
    tx_pin: 18
    baud_rate: 9600
    id: c02_uart

sensor:
  - platform: sht3xd
    temperature:
      id: temp
      name: "Temperature"
    humidity:
      id: humidity
      name: "Humidity"
    address: 0x44

  - platform: template
    id: temp_f
    lambda: return id(temp).state * 9/5+32;

  - platform: pmsx003
    type: PMSX003
    uart_id: pms_uart
    pm_1_0:
      id: pm10
      name: "Particulate Matter <1.0µm Concentration"
    pm_2_5:
      id: pm25
      name: "Particulate Matter <2.5µm Concentration"
    pm_10_0:
      id: pm100
      name: "Particulate Matter <10.0µm Concentration"
    update_interval: 120s

  - platform: senseair
    uart_id: c02_uart
    co2:
      id: co2
      name: "CO2 level"

  - platform: sgp4x
    voc:
      name: "VOC Index"
    nox:
      name: "NOx Index"
4 Likes
I’ve been playing around with trying to flash the S2 mini and S3 mini with Esphome to serve as an upgrade for the D1 Mini. Both are not fully supported in ESPHome yet.
For the S2/S3 Mini, beyond just having to specify bleeding edge framework versions and build options to enable double-UART, we cannot use bme680 with the bosch library if we want to add that to the device.
The “Wemos D1 Mini 32” is a non-standard but widely available knockoff, that has works natively with Esphome, without issues, but it has fitment issues. It might be good to design the next version of the shell with a footprint that supports the D1 Mini32.
I’ve nearly got this working - but I don’t have the OLED display nor the temperature sensor working which means I’ve got an I2C issue of some sort. The OLED display shows nothing and I get no readings from either.
My current config is a mashup of a few I’ve seen around and is below. Those who have the OLED working with the C3, any ideas? (The ESP32-C3 doesn’t crash regularly, hooray!)
substitutions:
  devicename: "esp32_c3_mini"
  upper_devicename: "ESP32-C3 Mini"

esphome:
  name: "${devicename}"
  friendly_name: "${upper_devicename}"
  platformio_options:
    board_build.flash_mode: dio
    board_build.flash_size: 4MB
    board_build.f_flash: 40000000L
    board_build.mcu: esp32c3
    board_build.variant: esp32c3
  on_boot:
    priority: 250
    then:
      - delay: 15s
      - lambda: |-
          id(ble_tracker).set_scan_continuous(true);
          id(ble_tracker).start_scan();

esp32:
  board: esp32-c3-devkitm-1
  variant: esp32c3
  framework:
    type: esp-idf
    version: recommended
    sdkconfig_options:
      COMPILER_OPTIMIZATION_SIZE: y
      CONFIG_BT_BLE_50_FEATURES_SUPPORTED: y
      CONFIG_BT_BLE_42_FEATURES_SUPPORTED: y
      CONFIG_ESP_TASK_WDT_TIMEOUT_S: "10"

#external_components:
#  - source: github://spectrumjade/esphome@esp32s2_uart_fix
#    components: [ uart ]
#    refresh: 0s

# Enable logging
logger:
  level: DEBUG
  baud_rate: 0

# Enable Home Assistant API
api:
  encryption:
    key: ""

ota:
  password: ""

wifi:
  ssid: !secret wifi_ssid
  password: !secret wifi_password
  # Required for 1.0.0 board - no wifi without this setting
  output_power: 8.5
  reboot_timeout: 15min

  # Enable fallback hotspot (captive portal) in case wifi connection fails
  ap:
    ssid: ${upper_devicename} Fallback Hotspot
    password: "1234567890"

captive_portal:

#http_request:
  # Used to support POST request to send data to AirGradient
  # https://esphome.io/components/http_request.html
  # Currently incompatible with esp-idf

esp32_ble_tracker:
  id: ble_tracker
  scan_parameters:
# Adjust timing if the defaults do not work in your environment
#    interval: 1100ms
#    window: 1100ms
    active: true
    continuous: false

bluetooth_proxy:
  active: true

# Begin AirGradient Config
# https://forum.airgradient.com/t/new-wemos-board/251/12

i2c:
  # Pins 4,5 stated here
  # https://esp32.com/viewtopic.php?t=27987
  # Pin compatible maps to pins 10 and 8
  sda: 10
  scl: 8
  scan: true
  frequency: 100kHz

uart:
  - rx_pin: 2
    tx_pin: 3
    baud_rate: 9600
    id: pms_uart
  - rx_pin: 6
    tx_pin: 7
    baud_rate: 9600
    id: c02_uart

sensor:
  - platform: sht3xd
    temperature:
      id: temp
      name: ${upper_devicename} Temperature
    humidity:
      id: humidity
      name: ${upper_devicename} Humidity
    address: 0x44
    update_interval: 5s
    heater_enabled: false

  - platform: pmsx003
    type: PMSX003
    uart_id: pms_uart
    pm_1_0:
      id: pm10
      name: "${upper_devicename} Particulate Matter <1.0µm Concentration"
    pm_2_5:
      id: pm25
      name: "${upper_devicename} Particulate Matter <2.5µm Concentration"
    pm_10_0:
      id: pm100
      name: "${upper_devicename} Particulate Matter <10.0µm Concentration"
    update_interval: 30s
    #formaldehyde:
    #  id: hcho
    #  name: "${upper_devicename} Formaldehyde (HCHO) concentration in µg per cubic meter"

  - platform: senseair
    uart_id: c02_uart
    co2:
      id: co2
      name: "${upper_devicename} SenseAir CO2 Value"
    update_interval: 60s

  - platform: wifi_signal
    name: "${upper_devicename} WiFi Signal"
    update_interval: 30s
    id: ${devicename}_wifi_signal

  - platform: uptime
    name: "Uptime Sensor"
    id: uptime_raw
    update_interval: 1s

button:
  - platform: restart
    name: "${upper_devicename} Restart"

switch:
  - platform: safe_mode
    name: "Flash Mode (Safe Mode)"

font:
  - file: "font/LiberationSans-Regular.ttf"
    id: opensans_14
    size: 14
  - file: "font/LiberationSans-Regular.ttf"
    id: opensans_22
    size: 22

display:
  - platform: ssd1306_i2c
    id: oled
    # reset_pin: D0
    address: 0x3c
    rotation: 180°
    model: "SH1106 128x64"
    contrast: 50%
    pages:
      - id: pageFront
        lambda: |-
          it.printf(0, 0, id(opensans_22), "%.1f°F  %.0f%%", id(temp).state*9/5+32, id(humidity).state);
          it.printf(0, 30, id(opensans_14), "CO2: %.0f ppm", id(co2).state);
          it.printf(0, 47, id(opensans_14), "PM: %.0f %.0f %.0f ug/m3", id(pm10).state, id(pm25).state, id(pm100).state);
      - id: page3
        lambda: |-
          it.graph(0, 0, id(single_temperature_graph));
          it.printf(0, 47, id(opensans_14), "Temp: %.1f°F", id(temp).state*9/5+34);
      - id: page4
        lambda: |-
          it.graph(0, 0, id(single_humidity_graph));
          it.printf(0, 47, id(opensans_14), "Humidity: %.0f%%", id(humidity).state);
      - id: page5
        lambda: |-
          it.graph(0, 0, id(single_co2_graph));
          it.printf(0, 47, id(opensans_14), "CO2: %.0f ppm", id(co2).state);
      - id: page6
        lambda: |-
          it.graph(0, 0, id(multi_pm_graph));
          it.printf(0, 47, id(opensans_14), "PM: %.0f %.0f %.0f ug/m3", id(pm10).state, id(pm25).state, id(pm100).state);

graph:
  - id: single_temperature_graph
    duration: 12h
    width: 128
    height: 48
    y_grid: 1.0
    x_grid: 60min
    sensor: temp
  - id: single_humidity_graph
    duration: 12h
    width: 128
    height: 48
    y_grid: 10.0
    x_grid: 60min
    sensor: humidity
  - id: single_co2_graph
    duration: 12h
    width: 128
    height: 48
    y_grid: 100.0
    x_grid: 60min
    sensor: co2
  - id: multi_pm_graph
    duration: 12h
    width: 128
    height: 48
    y_grid: 10.0
    x_grid: 60min
    traces:
    - sensor: pm25
    - sensor: pm10
    - sensor: pm100

interval:
  - interval: 5s
    then:
      - display.page.show_next: oled
      - component.update: oled
  # - interval: 60s
  #   # Send data to AirGradient API server
  #   then:
  #     - http_request.post:
  #         # AirGradient URL with the last 3 bytes of the MAC address in Hex format all lower case
  #         url: !lambda |-
  #           return "http://hw.airgradient.com/sensors/airgradient:" + get_mac_address().substr(6,11) + "/measures";
  #         headers:
  #             Content-Type: application/json
  #         # "!lambda return to_string(id(pm25).state);" Converts sensor output from double to string
  #         json:
  #           wifi: id(${devicename}_wifi_signal).state
  #           pm02: !lambda return to_string(id(pm25).state);
  #           rco2: !lambda return to_string(id(co2).state);
  #           atmp: !lambda return to_string(id(temp).state);
  #           rhum: !lambda return to_string(id(humidity).state);
  #           # tvoc: !lambda return to_string(id(tvoc).state);
  #         verify_ssl: false
Edit: Returning to add some clarification. I have Wemos v1.0.0 ESP32-C3 Mini. A hardware mod is not required to make the antenna work, just the callout for tx power. But I’m still stuck unable to find pin combinations that work for the I2C bus.
On the D1 Mini, I’m using
i2c:
  sda: D2
  scl: D1
  frequency: 200kHz
Looking at the pinout of the D1 Mini, I see sda on D2 is the 4th pin down from the TX side
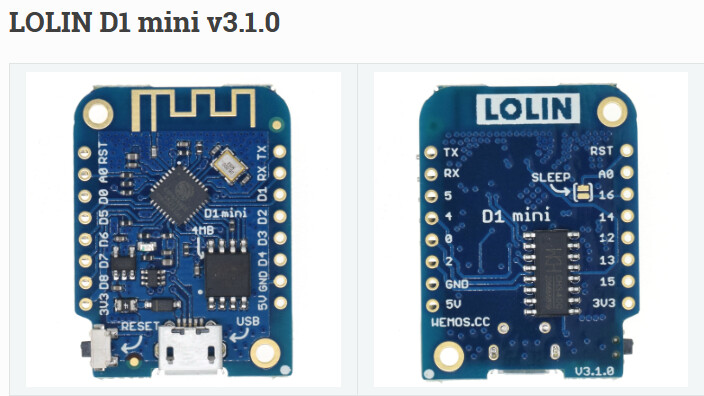
Compare that to the pinout of the C3 Mini, and we see that the 4th pin down is labeled 8

So I think you have your pins backwards, with sda needing to be pin 8 and scl being pin 10
You may also need to call them GPIO8 or GPIO10
i2c:
  # https://esphome.io/components/i2c.html
  sda: GPIO8
  scl: GPIO10
  frequency: 200kHz
Yep this was exactly it. Don’t know how I managed to map those backwards but I was indeed tired at the time. That has it up and running for anyone else who wants to try one.
100% working now on a 1.0.0 board with no issues. It’s BLE tracking devices for me as well and working flawlessly at that task too, with surprising range. Sooooo much nicer than the D1 mini.
Wemos ESP32-C3 mini works!
Editing this message to bring it back. For some reason this post got flagged as spam but noting that the C3 works is constructive to the discussion.
1 Like
Thanks for this thread, I was really getting sick of my ESP8266-based board locking up. So far, so good, with an ESP32-C3 from Wemos.
Putting together a few data points above, and this silly named website - with ESPHome, I had to change
uart:
  - rx_pin: D4
    tx_pin: D3
    baud_rate: 9600
    id: senseair_s8_uart

  - rx_pin: D5
    tx_pin: D6
    baud_rate: 9600
    id: pms5003_uart

i2c:
  sda: D2
  scl: D1
to
uart:
  - rx_pin: GPIO6
    tx_pin: GPIO7
    baud_rate: 9600
    id: senseair_s8_uart

  - rx_pin: GPIO1
    tx_pin: GPIO0
    baud_rate: 9600
    id: pms5003_uart

i2c:
  scl: GPIO10
  sda: GPIO8
Edit: I had a hell of a time getting WiFi working. Had to go through a bunch of troubleshooting, but now fixed I think - Unable to connect to wifi: Auth Expired and Association Expired - #2 by k-d - ESPHome - Home Assistant Community documents it. tl;dr - try lowering WiFi output_power, among other settings (I2C bus frequency, display update interval)
Can confirm this. Just to add what I also got from using an S2 mini, I had to:
- Set I2C scan to false
- Limit I2C freq. to 100khz
- Set wifi output power to 10. Although I did see something related to reducing tx output power for the S2 mini in one of the ESP-IDF updates, so I’m wondering if the newer version fixes this.
Without the output power setting, mine would just freeze and I’d have to unplug and plug it again. I also noticed that the wifi signal sensor output was just stuck at -34, even when changing the output power.
1 Like
Wow, I wish I saw this earlier post 3 hours ago.
Something must have changed in a recent release of ESPHome (2024.5.x or 2024.6.x) because I did not need baud_rate: 0 under logger: before a recent update, and I was getting all kinds of crashes and UART issues. Consecutive failed boots into safe mode eventually let me narrow down the issue, but it took me pretty much all night. I had to actually remove power after reflashing to get things to work - a soft reset wasn’t hard enough.
BTW, if anyone is interested in a full working example… I have one here
I have seen random issues until a full power cycle in the past.
With the ESP32-C3 chip soldered to the AirGradient boards, I’ve always has to have baud_rate: 0, but if you are using a different form factor, the pinout is different so all bets are off as to what is needed. I also saw you are using esp-idf, which I plan to explore in the near future, so going to keep your config handy for reference.