AirGradient Forum

Unable to flash BLINK

I’ve attempted to upload both the PRO and Outdoor versions with Blink following the documentation on the website. I’ve attempted this with Arduino IDE on both Mac and Windows. I’ve used the USB cables that are included with the Airgradient kit and my own cables. Uploading always fails with the same issue. Here’s a paste from my latest attempt on Windows:

. Variables and constants in RAM (global, static), used 28104 / 80192 bytes (35%)
║   SEGMENT  BYTES    DESCRIPTION
╠══ DATA     1496     initialized variables
╠══ RODATA   920      constants       
╚══ BSS      25688    zeroed variables
. Instruction RAM (IRAM_ATTR, ICACHE_RAM_ATTR), used 59667 / 65536 bytes (91%)
║   SEGMENT  BYTES    DESCRIPTION
╠══ ICACHE   32768    reserved space for flash instruction cache
╚══ IRAM     26899    code in IRAM    
. Code in flash (default, ICACHE_FLASH_ATTR), used 232148 / 1048576 bytes (22%)
║   SEGMENT  BYTES    DESCRIPTION
╚══ IROM     232148   code in flash   
esptool.py v3.0
Serial port COM3
Connecting........_____....._____....._____....._____....._____....._____....._____

A fatal esptool.py error occurred: Failed to connect to ESP8266: Timed out waiting for packet header

I must be doing something obvious wrong here.

I’ve tried holding down the button on the device and uploading. I get the same result.
In my port list on Windows I see COM3 (ESP32S3 Dev Module) and use it to upload.
I’m using LOLIN(WEMOS) D1 R2 & Mini as the selected board.
1 Like

Do you see the COM port appear and disappear as you connect/disconnect the actual devices?

The Outdoor board uses ESP32, but the current Pro version uses the D1 Mini, which is ESP8266 based. So you would need to change the configured board between the two devices.

Was your Pro a pre-soldered kit? You could try removing the D1 from the board and connect it directly to the computer, so no other devices are connected to it and see if that help. On the Pro board, you can’t flash it from the USB port on the board, you have to connect directly to the D1’s port

thanks, super helpful. It is a pre-soldered pro. I don’t see the port when connecting directly to the D1 though. I’ll try drivers maybe? I would have thought Arduino Studio would install them when I installed the board.

I would check drivers, but also double check that the cable you are using is able to pass data. Some cables do power only. If you have a phone or other device that would transfer data, try them with the same cable to ensure it works

I just recieved my Pro pre-soldered kit. I’m having the same issue. It seems like it does actually start blinking, but I still get the error.

ESP8266 driver is installed. But I haven’t tried plugging directly into the D1 Mini board itself.

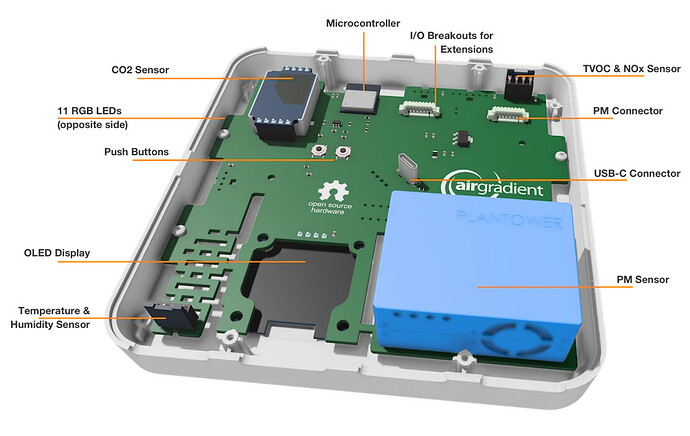
You have to plug directly into the ESP board, as the USB-C port on the AirGradient board only provides power with this version.

When the v9 board is available with the integrated ESP chip, you’ll be able to flash with the USB port on the board.

1 Like

Thank you! That seems an oversight in design. It’s not the most convenient case to open.

1 Like

It is just the reality of this PCB layout. The instructions do say to connect the D1 Mini to your computer, but it could be clarified a bit that the USB on the board will not work
The AirGradient DIY Air Quality Sensor (Pro Version PCB Version 4.2)

1 Like

Just posting this here for anyone else who pops in. I had the same issue, while plugged straight into the D1 Mini with the Mini attached to the board.

Just trying to connect it would error out:

$ esptool.py -p /dev/tty.usbserial-310 chip_id
esptool.py v3.3.1
Serial port /dev/tty.usbserial-310
Connecting......................................

A fatal error occurred: Failed to connect to Espressif device: No serial data received.
For troubleshooting steps visit: https://docs.espressif.com/projects/esptool/en/latest/troubleshooting.html

I unplugged (unsocketed) the D1 Mini and plugged straight into it from my computer, and it suddenly worked fine. So something about having the other devices hanging off the D1 Mini caused the flashing to not work.

And I agree the screws for the current case aren’t wonderful for easy removal of the back cover!

The new version 9 that we have just launched has now an ESP-C3 right on the board.

So it can be flashed through the regular USB C port on the back of the enclosure. So no more opening required.

We have also upgraded the screws a few months ago. These are now custom made torx T6 screws out of stainless steel.

We found out that you can actually custom make screws. 10.000 units for less than USD 100. Will probably write a blog post about it sometime…

Yes, the reason is that the voltage regulator of the D1 mini seems to draw a lot of power during flashing and if other sensors are connected it can’t keep up.
This is also fixed with the new version we are just rolling out.

1 Like

Indeed! I just tested that new version and it works a treat.