New AirGradient Indoor Kit & Monitor Available Now

I am happy to let you know that finally we have the new version of the indoor board available as a kit and fully tested monitor! It is now available in our online shop and will ship in the first half of November.

It took a bit longer than expected but we are very happy with the results. The new board (and complete monitor) passed all chemical and EMC tests and thus is fully CE, REACH, ROHS and FCC compliant.
We also tested it quite extensively and it runs very stable.

We will offer the board as an upgrade option for existing customers and I will send out an email for this in the coming days.

Here is the link to the new product page: Indoor Air Quality Monitor

Here are the links to the new build instructions: The AirGradient ONE Air Quality Sensor (Presoldered-Version, PCB Version 9)

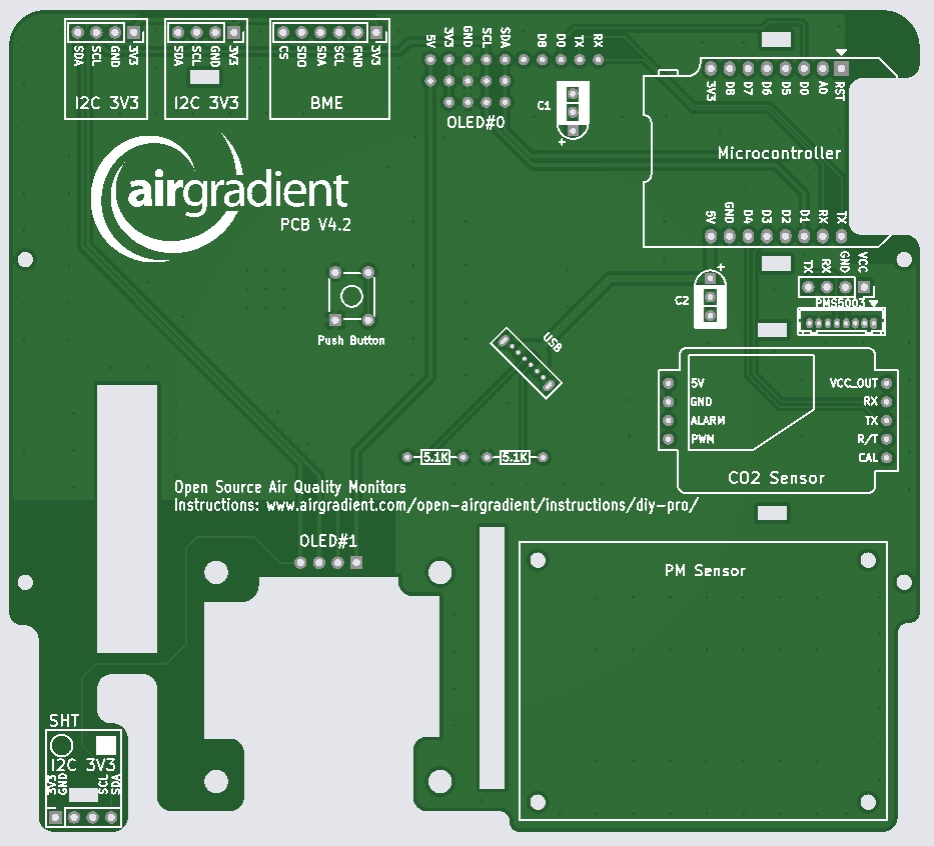
The design files (Ki-Cad etc) are available here: The AirGradient Instructions Overview

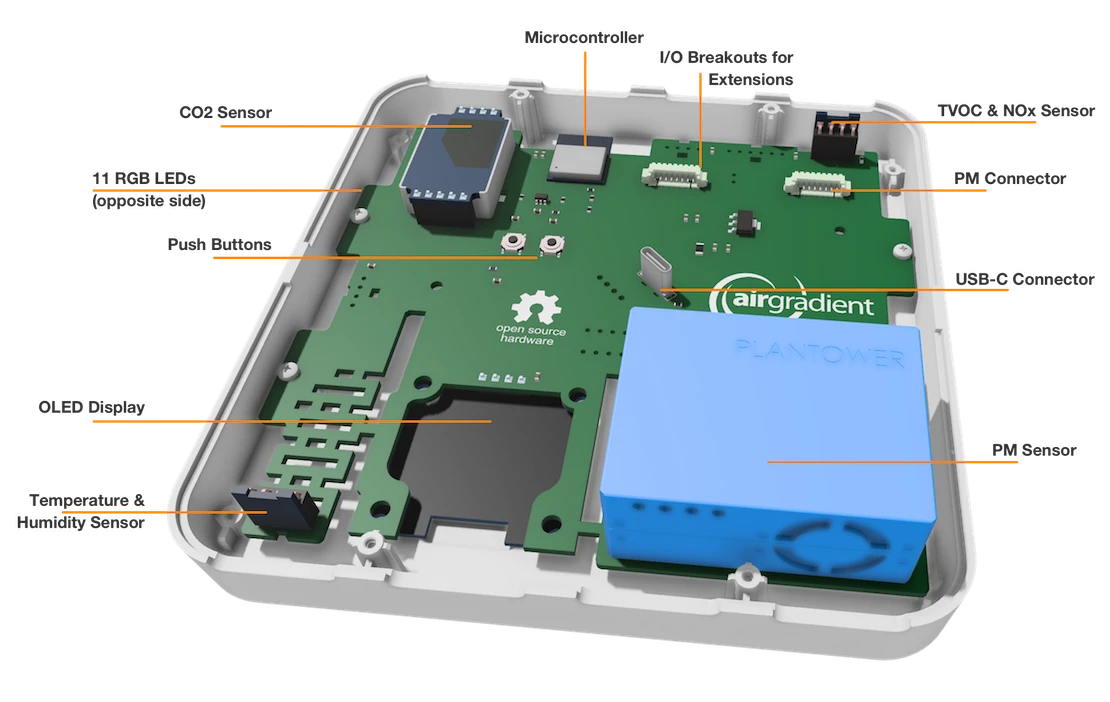
Here is an overview of the new PCB:

I am especially happy with this new version as it merges our old closed-source monitor AirGradient ONE with the open-hardware DIY Pro kits into one new product that combines the best of both versions:

  • Open source / open hardware
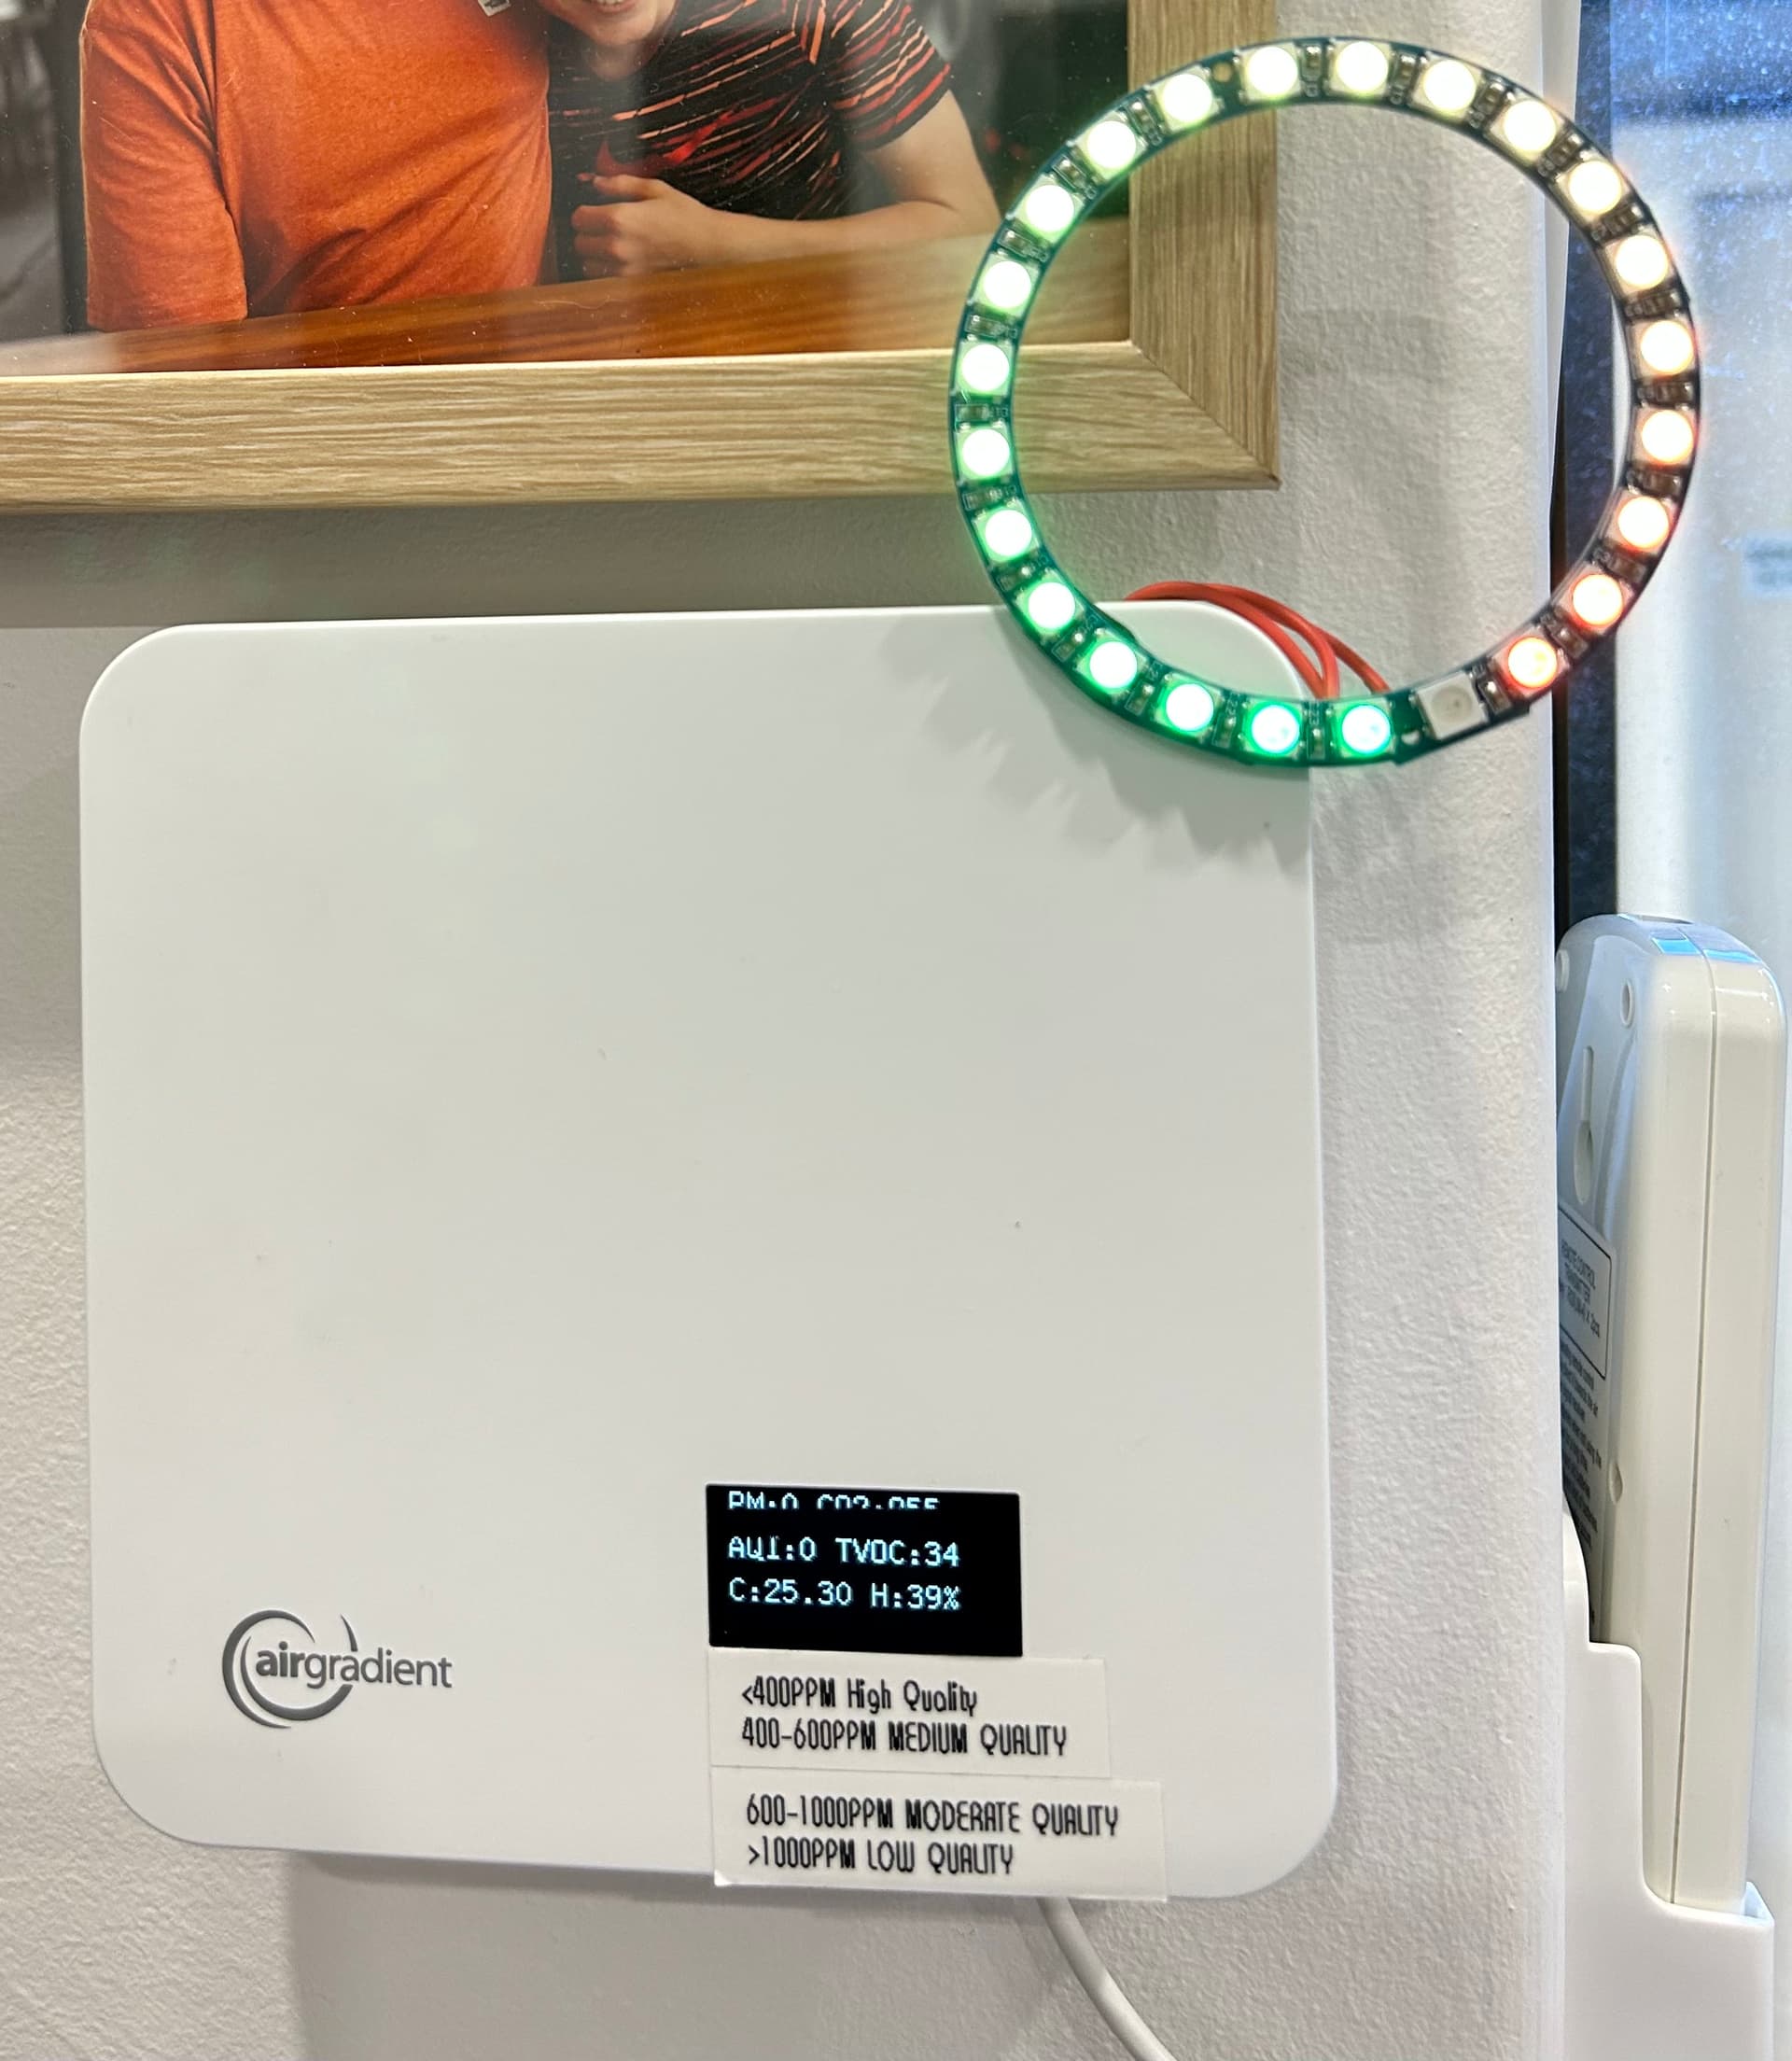
  • RGB LEDs that shine through the enclosure
  • Modern MCU (ESP32-C3)
  • Professonally designed PCB with external hardware watchdog
  • Fully tested and certified (CE, REACH, ROHS and FCC compliant)

We call this new version now AirGradient ONE (Version 9). With this transition both of our main products the outdoor monitor Open Air as well as this new version of the AirGradient ONE are now fully open-source and open-hardware.

Let me know if there are any questions.

5 Likes

This is great news! Having struggled to build around the existing LED port spacing this will be great.

Is the lighting based around WS2812B modules?

I love your design!

Yes exactly. Addressable RGBLeds and can use neopixel library.

Do we have any exposed IO to experiment with other air sensors on this revision board?

Great to see the v9 board update is already on GitHub

Yes, A few I2Cs and also a JST plug with 5v, 3v3, G, SCL, SDK, and 3 IOs.

Very exciting. Congratulations Achim, to you and your team!!!

My initial release of an ESPHome config for the new AirGradient One with the v9 board is now available:

airgradient_esphome/airgradient-one.yaml at main · MallocArray/airgradient_esphome (github.com)

Supports all included sensors and the LED bar, based on CO2 values, as well as sending data to AirGradient’s dashboard in addition to your own HomeAssistant

3 Likes

Great. Thank You @MallocArray!

@MallocArray

Beyond LED bar what is the other improvements according to your understanding?

@Achim_AirGradient

Any plans for POI version with LAN connection:
T-ETH-Lite – LILYGO®

All of the same sensors as the Pro model, but in addition to the LED bar, the main chip has been upgraded from a separate ESP8266 to a soldered on ESP32-C3-mini which is more powerful. Since it is soldered on, it also allow you to flash the chip using the USB port exposed in the back of the enclosure, where the previous one only provided power and if you needed to flash the chip you had to open it up to plug directly into the chip
Indoor Air Quality Monitor (airgradient.com)

I’m thinking a POE model isn’t in the roadmap, especially with the move to a soldered SMD chip, but I’ll let @Achim_AirGradient address that

Yes a PoE is not on the roadmap. If people need a wired connection, I think the usb cable could now be interesting as it could also transfer data. So you could plug it into a pi for example and read the data through the usb serial.

I am planning to have at least 5-6 sensors in my new house, so directly connecting to hub is not an option and I already have all 4 USB ports occupied in my odroid n2+

I contacted “awair” for this: AwairNet
…but no response whatsoever

Another question - any plans to switch to SEN50 (by Sensirion) instead of Plantower?
I am testing 3 Vindstryka sensors with ESP32 microcontroller connected and it is less noisy (IMO).

PoE to USB adapters exist (and have for a long time). They are widely used to power tablet and smart phones being used as signage in offices for things like conference rooms. They’re also pretty cheap.

IMHO essentially putting that hardware on board just increases cost, and makes thermal management more complicated. It’s better left offloaded to something else.

I think Achim has mentioned that he really likes the Plantower in his testing. But the beauty of this being an open source project is you can do much of what you want to it.

Looks like the SEN50/55 is I2C connected, so you could remove the Plantower and try to fit one of these into the same spot to see if the case will fit. Then connect the cables to one of the open areas for I2C connectivity, a bit of software update, and boom, you are good to go!

Yes it is

If it can physically fit. I need to check

Are there any unused i2C sockets in the board?

# I2C config as SEN54 is connected on that bus
i2c:
  scl: GPIO21
  sda: GPIO22
  scan: true
  id: bus_a

# Example configuration entry
sensor:
  - platform: sen5x
    id: sen54
    pm_1_0:
      name: " PM <1µm Weight concentration"
      id: pm_1_0
      accuracy_decimals: 1
    pm_2_5:
      name: " PM <2.5µm Weight concentration"
      id: pm_2_5
      accuracy_decimals: 1
    pm_4_0:
      name: " PM <4µm Weight concentration"
      id: pm_4_0
      accuracy_decimals: 1
    pm_10_0:
      name: " PM <10µm Weight concentration"
      id: pm_10_0
      accuracy_decimals: 1
    temperature:
      name: "Temperature"
      id: Sen54_T
      accuracy_decimals: 1
    humidity:
      name: "Humidity"
      id: Sen54_H
      accuracy_decimals: 0
    voc:
      name: "VOC"
      id: tVOC
      algorithm_tuning:
        index_offset: 100
        learning_time_offset_hours: 12
        learning_time_gain_hours: 12
        gating_max_duration_minutes: 180
        std_initial: 50
        gain_factor: 230
    temperature_compensation:
      offset: -5.0
      normalized_offset_slope: 0
      time_constant: 0
    acceleration_mode: low
    store_baseline: true
    address: 0x69
    update_interval: 10s

  - platform: wifi_signal
    name: "WiFi Signal Sensor"
    update_interval: 60s

captive_portal:

# bluetooth_proxy:

esp32_ble_tracker:
  scan_parameters:
    duration: 30s
    active: false

# esp32_ble_tracker:
#   scan_parameters:
#     interval: 1100ms
#     window: 1100ms
#     active: true

bluetooth_proxy:
  active: true

This is what I used for code

Which board are you considering?
If the Pro 4.2, there is an unused I2C port at the top of the board, although it doesn’t come with headers soldered on, but since the SEN54 isn’t a 4 pin connector, you would be doing some cutting/soldering anyway
pro_v4.2.jpg (934Ă—846) (airgradient.com)

I can confirm the newest ONE v9 board also has an unused port at the top.

Plus, it does Temp/humidity/tvoc, so you wouldn’t be using the existing ports that have SGP4x and SHT4x installed, so easy enough to unplug those and use the same port.

Then use the base of an ESPHome config you can find on the Integrations page and replace it with your config as desired

Thanks
I am planning to use newest ONE v9 board.
I would not use Temp/humidity. It is pretty off. and offset is not helping (at least before)
I probably will go with SEN50 and continue using SGP4x and SHT4x

I am more concerned about physical fit