AirGradient Integrations

I am planning to setup a page about integration of the AirGradient monitor to data platforms like home assistant, home kit, Grafana etc.

If you wrote an integration or are using one that you can recommend, can you please post the links here together with a small description?

Many thanks!

5 Likes

I’m a Hubitat user, so it would be nice to include support for that. mavrrick58 on the Hubitat forums has started this thread: https://community.hubitat.com/t/air-gradient-integration-with-maker-api/100928

I made some simple changes for prometheus/ha support. Here’s what my setup looks like:

On my AirGradient I have this modified software flashed that adds a couple of http endpoints that respond with current readings: AirGradientUpgrades/air_gradient.ino at master · Themis3000/AirGradientUpgrades · GitHub. It adds a /metrics endpoint formatted for prometheus and a /metricsjson endpoint formatted for any other application such as ha.

I pull the data into home assistant using the rest integration. It’s built into ha, so there’s no need for hacs or any installation. I use the file editor addon to edit my config.yml, and wrote the following to get my air gradient’s data pulled into ha:

rest:
  - scan_interval: 30
    resource: http://10.0.0.68:8080/metricsjson
    sensor:
      - value_template: "{{ value_json.temp }}"
        name: "Temperature AG"
        unique_id: "tempAG"
        unit_of_measurement: "°F"
        device_class: "temperature"

      - value_template: "{{ value_json.rhum }}"
        name: "Humidity AG"
        unique_id: "rhumAG"
        unit_of_measurement: "%"
        device_class: "humidity"

      - value_template: "{{ value_json.nox }}"
        name: "NOX AG"
        unique_id: "noxAG"
        unit_of_measurement: "index level"

      - value_template: "{{ value_json.pm02 }}"
        name: "PM02 AG"
        unique_id: "pm02AG"
        unit_of_measurement: "µg/m³"
        device_class: "pm25"

      - value_template: "{{ value_json.rco2 }}"
        name: "CO AG"
        unique_id: "rco2AG"
        unit_of_measurement: "ppm"
        device_class: "carbon_dioxide"

      - value_template: "{{ value_json.tvoc }}"
        name: "TVOC AG"
        unique_id: "tvocAG"
        unit_of_measurement: "index level"
        device_class: "volatile_organic_compounds"

You can just paste that into your config.yml no other setup required in ha and it just works.

It’s a pretty simple setup. Not sure if it really qualifies as an “integration” or not like you are looking for, but thought I’d throw it out there just in case it’s useful in any way. My personal requirement for smart home devices is for them to have no dependency on services existing outside my local network (infact I block all internet traffic from smart devices on my wifi network), and this was the best/easiest way I could get together to get things hooked into ha with no external dependencies.

Thanks for your work on this! I’m a really big fan of air gradient. I’ll be glad to see official setup pages for this stuff, more offical guides will certainly make air gradient an easier thing to recommend

4 Likes

I’m not sure what exactly you are after. But I am happy to share my esphome file with graphs, even though maybe this isn’t what you were looking for. I use it to get data from the airgradient monitor into node-red, and then display it in domoticz. I’ll paste it below either way, maybe someone finds it useful.

This version has graphs with 12 hours of historic data shown on the OLED display. It uploads all data via mqtt, has a button to cycle the display pages, and turns off the display at night automatically. Feedback and improvements are most welcome.

Edit: Updated the yaml to my most recent version

# esphome on AirGradient Pro
# 05 March 2023, ArgafĂĄl
#
# Features:
# - The front page summarizes the current values.
# - The second page is a blank/dark page in order to disable the display.
# - The last 12 hours of measurements are displayed in graphs alongside their current value.
# - The display switches off automatically at night. 
# - The button (v3.7 of the AirGradient Pro board) flips through the
#   different pages/graphs.
# - For configurations without a button there is a commented code block that
#   shows how the display pages can be changed automatically every 5 seconds.
#
# Known issues:
# - None.
#
# Helpful hints and suggestions for improvement are most appreciated. Email:
# airgradient@argafal.de, or use the AirGradient forum.

esphome:
  name: air-gradient
  platform: ESP8266
  board: d1_mini
  libraries:
    - uart=https://github.com/plerup/espsoftwareserial.git#6.17.1

  project:
    name: argafal.ESPHome-AirGradient
    version: "1.0"

# Disable logging
logger:
  baud_rate: 0

# Home Assistant API
#api:

# https://github.com/esphome/issues/issues/3187
external_components:
  - source: github://pr#3384
    components: [ json ]

# If you have problem flashing the device over wifi, look at ajfriesen's solution here:
# https://community.home-assistant.io/t/esphome-flashing-over-wifi-does-not-work/357352/1
ota:
  password: !secret ota_password

wifi:
  networks:
  - ssid: !secret wifi_ssid
    password: !secret wifi_password
  reboot_timeout: 15min

  # Enable fallback hotspot (captive portal) in case wifi connection fails
  ap:
    ssid: "Air-Gradient Fallback Hotspot"
    password: !secret fallback_ssid_password

captive_portal:

i2c:
  sda: D2
  scl: D1

uart:
  - rx_pin: D5
    tx_pin: D6
    baud_rate: 9600
    id: uart1
    
  - rx_pin: D4
    tx_pin: D3
    baud_rate: 9600
    id: uart2

font:
  - file: "liberation_sans/LiberationSans-Regular.ttf"
    id: opensans_14
    size: 14
  - file: "liberation_sans/LiberationSans-Regular.ttf"
    id: opensans_22
    size: 22

display:
  - platform: ssd1306_i2c
    id: oled
    model: "SH1106 128x64"
    contrast: 50%
    pages:
      - id: pageFront
        lambda: |-
          it.printf(0, 0, id(opensans_22), "%.1f°C  %.0f%%", id(temp).state, id(humidity).state);
          it.printf(0, 30, id(opensans_14), "CO2: %.0f ppm", id(co2).state);
          it.printf(0, 47, id(opensans_14), "PM: %.0f %.0f %.0f ug/m3", id(pm10).state, id(pm25).state, id(pm100).state);
      - id: pageDark
        # Blank page for night time
        lambda: |-
          it.printf(0, 0, id(opensans_22), " ");
      - id: page3
        lambda: |-
          it.graph(0, 0, id(single_temperature_graph));
          it.printf(0, 47, id(opensans_14), "Temp: %.1f°C", id(temp).state);
      - id: page4
        lambda: |-
          it.graph(0, 0, id(single_humidity_graph));
          it.printf(0, 47, id(opensans_14), "Humidity: %.0f%%", id(humidity).state);
      - id: page5
        lambda: |-
          it.graph(0, 0, id(single_co2_graph));
          it.printf(0, 47, id(opensans_14), "CO2: %.0f ppm", id(co2).state);
      - id: page6
        lambda: |-
          it.graph(0, 0, id(multi_pm_graph));
          it.printf(0, 47, id(opensans_14), "PM: %.0f %.0f %.0f ug/m3", id(pm10).state, id(pm25).state, id(pm100).state);


# Automatically switch to the next page every five seconds. Disabled, we now have a button
#interval:
#  - interval: 5s
#    then:
#      - display.page.show_next: oled
#      - component.update: oled

# Button
binary_sensor:
  - platform: gpio
    pin: D7
    name: "Button D7"
    filters:
      - delayed_on: 10ms
    on_press:
      - display.page.show_next: oled
      - component.update: oled

sensor:
  - platform: uptime
    name: "Uptime Sensor"
    id: uptime_raw
    update_interval: 1s

  - platform: sht3xd
    temperature:
      id: temp
      name: "Temperature"
    humidity:
      id: humidity
      name: "Humidity"
    address: 0x44
    update_interval: 5s

  - platform: pmsx003
    # type can be PMSX003, PMS5003S, PMS5003T, PMS5003ST
    # https://esphome.io/components/sensor/pmsx003.html
    type: PMSX003
    uart_id: uart1
    update_interval: 30s
    pm_1_0:
      id: pm10
      name: "Particulate Matter <1.0µm Concentration"
    pm_2_5:
      id: pm25
      name: "Particulate Matter <2.5µm Concentration"
    pm_10_0:
      id: pm100
      name: "Particulate Matter <10.0µm Concentration"
# No hcho sensor in the air gradient package.
#    formaldehyde:
#      id: hcho
#      name: "Formaldehyde (HCHO) concentration in µg per cubic meter"

  - platform: senseair
    uart_id: uart2
    co2:
      id: co2
      name: "SenseAir CO2 Value"
    update_interval: 60s

mqtt:
   broker: 192.168.1.42
   discovery: false
   topic_prefix: air-gradient

# Not enough memory for graphs and web_server together on ESP8266 :(
#web_server:

graph:
  - id: single_temperature_graph
    duration: 12h
    width: 128
    height: 48 
    y_grid: 1.0
    x_grid: 60min
    sensor: temp
  - id: single_humidity_graph
    duration: 12h
    width: 128
    height: 48 
    y_grid: 10.0
    x_grid: 60min
    sensor: humidity
  - id: single_co2_graph
    duration: 12h
    width: 128
    height: 48 
    y_grid: 100.0
    x_grid: 60min
    sensor: co2
  - id: multi_pm_graph
    duration: 12h
    width: 128
    height: 48 
    y_grid: 10.0
    x_grid: 60min
    traces:
    - sensor: pm25
    - sensor: pm10
    - sensor: pm100


# Turn display off at night and on again in the morning
time:
   - platform: sntp
     timezone: Europe/Amsterdam
     id: esptime
     on_time:
       # Every evening
       - seconds: 0
         minutes: 30
         hours: 23
         days_of_week: MON-SUN
         then: 
              - display.page.show: pageDark
       # Every morning
       - seconds: 0
         minutes: 30
         hours: 8
         days_of_week: MON-SUN
         then: 
              - display.page.show: pageFront


1 Like

:wave: 
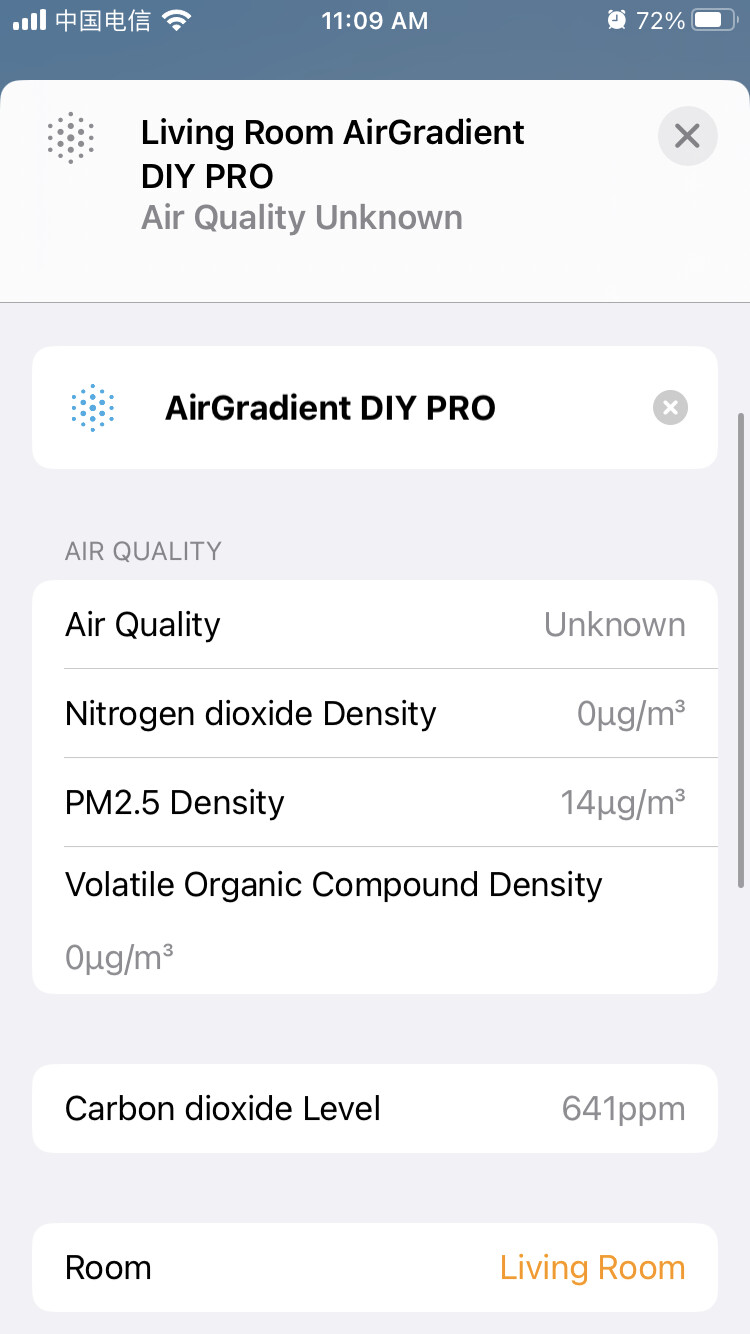
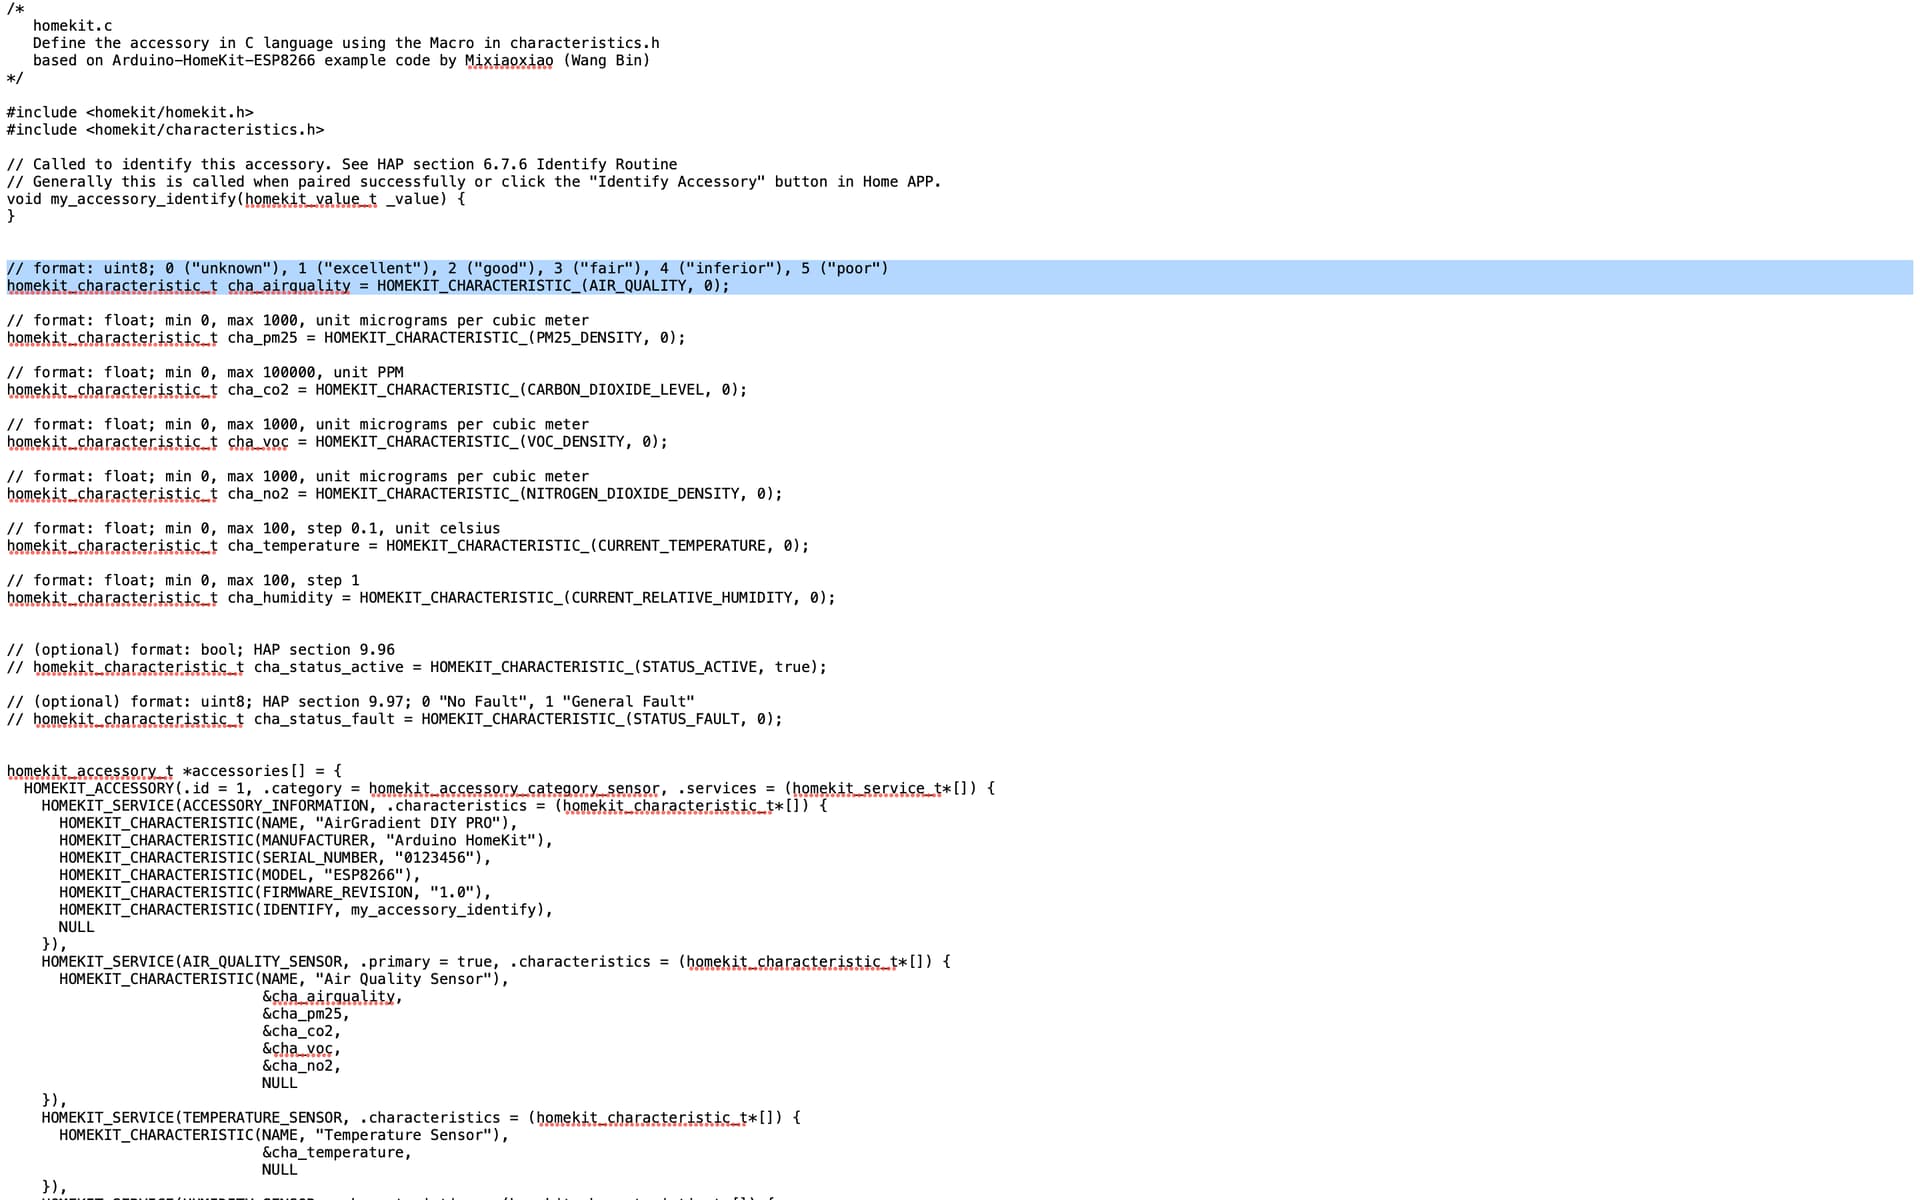
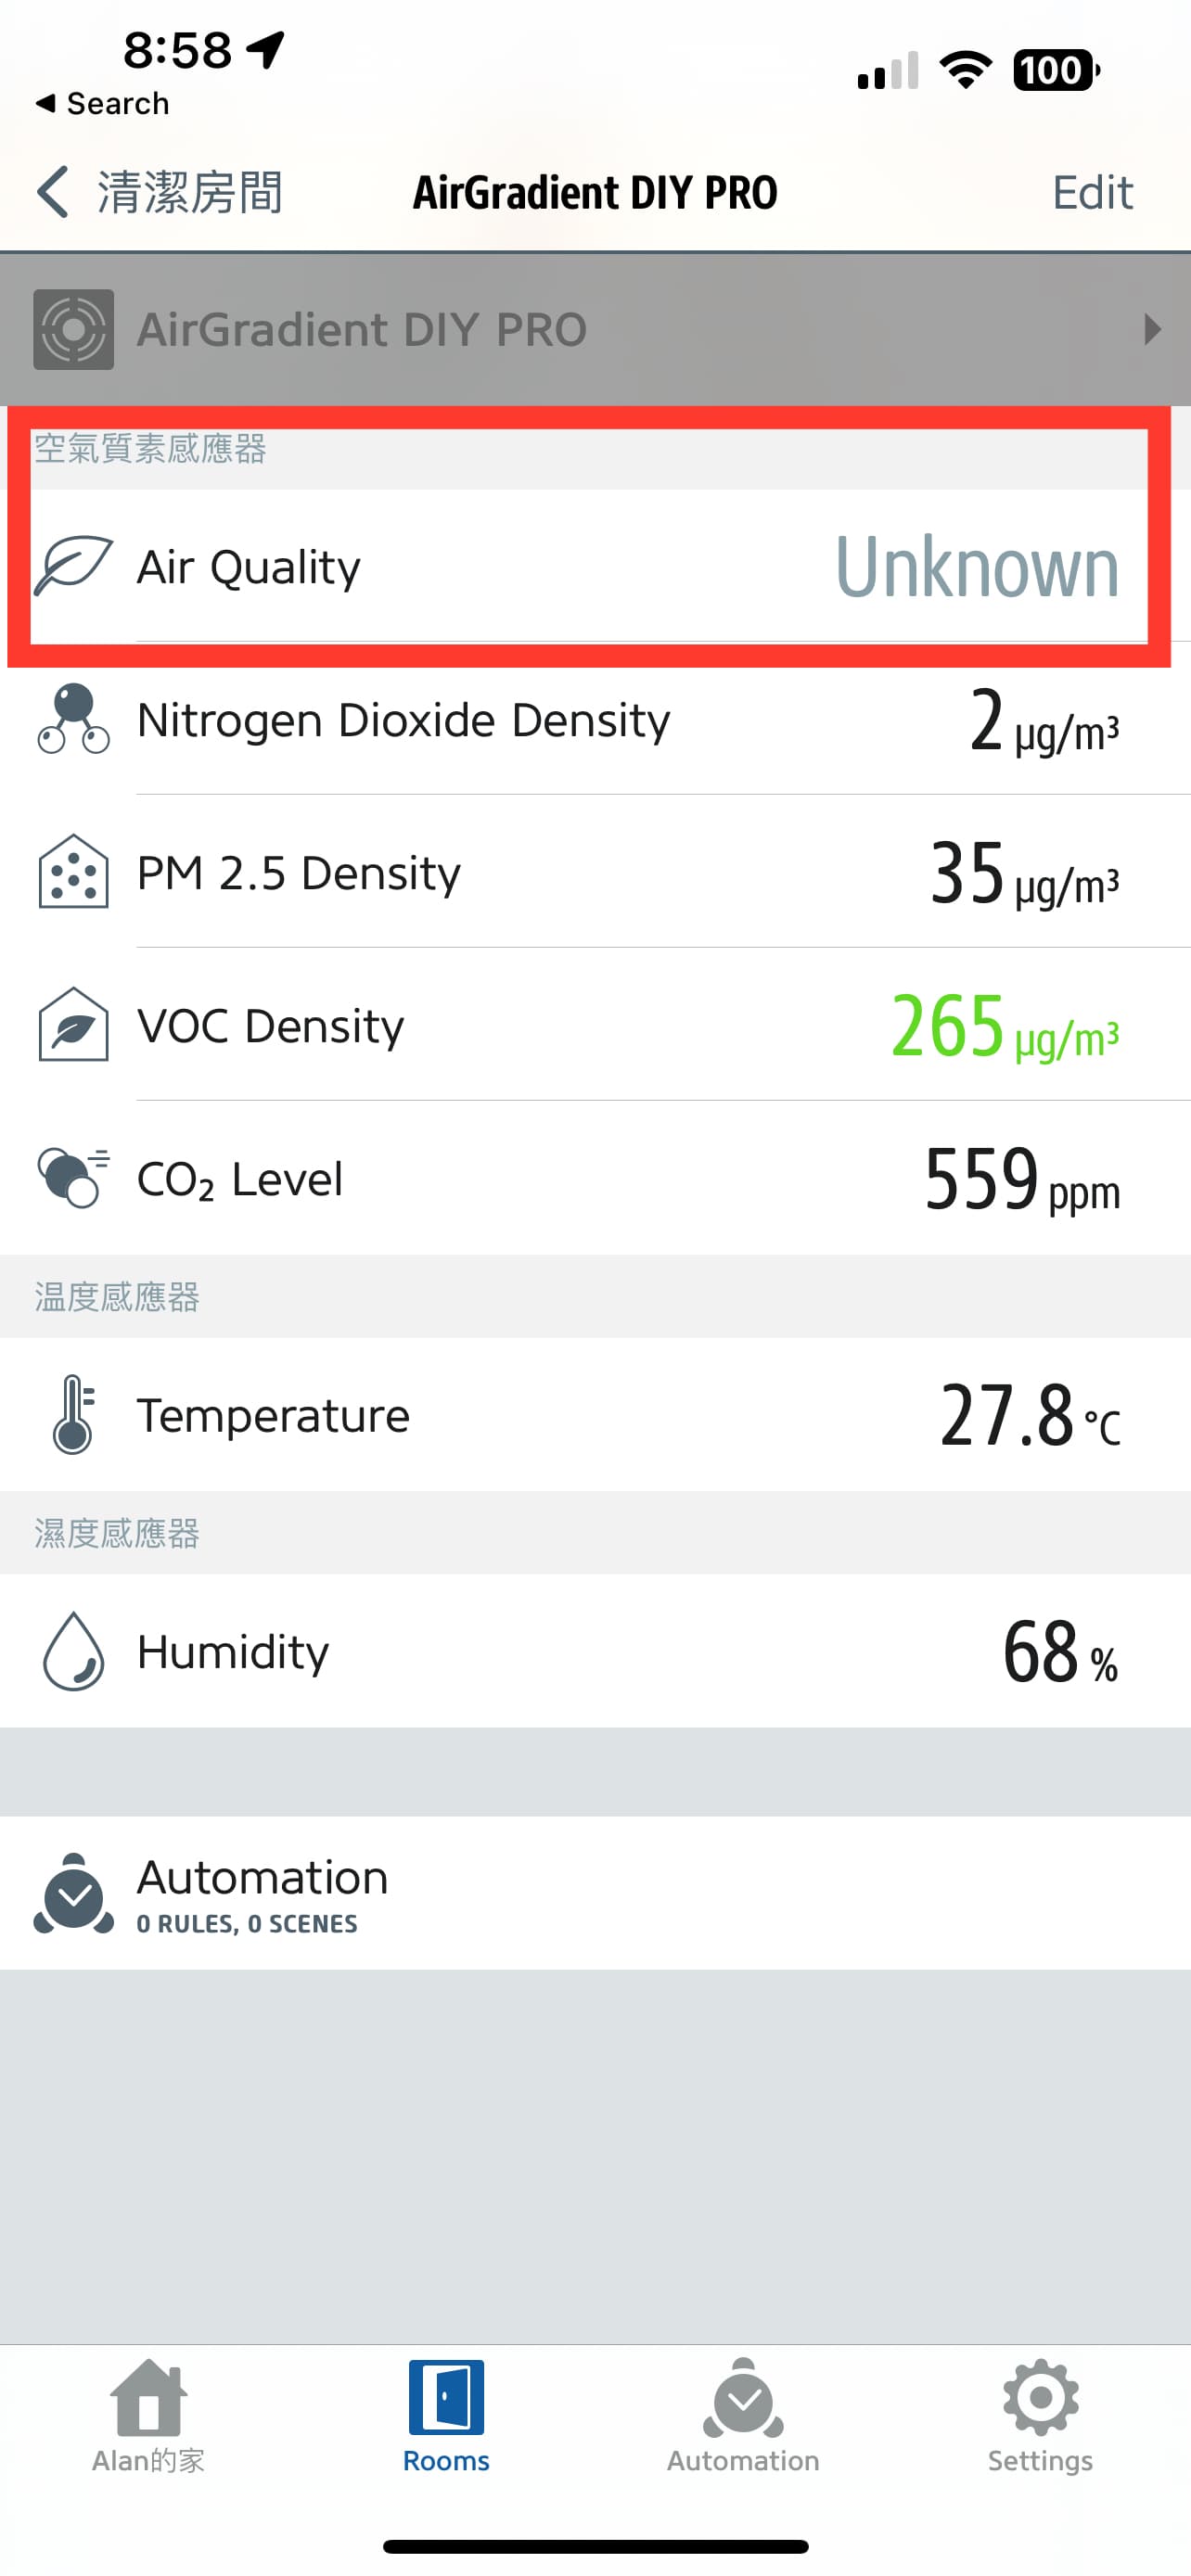
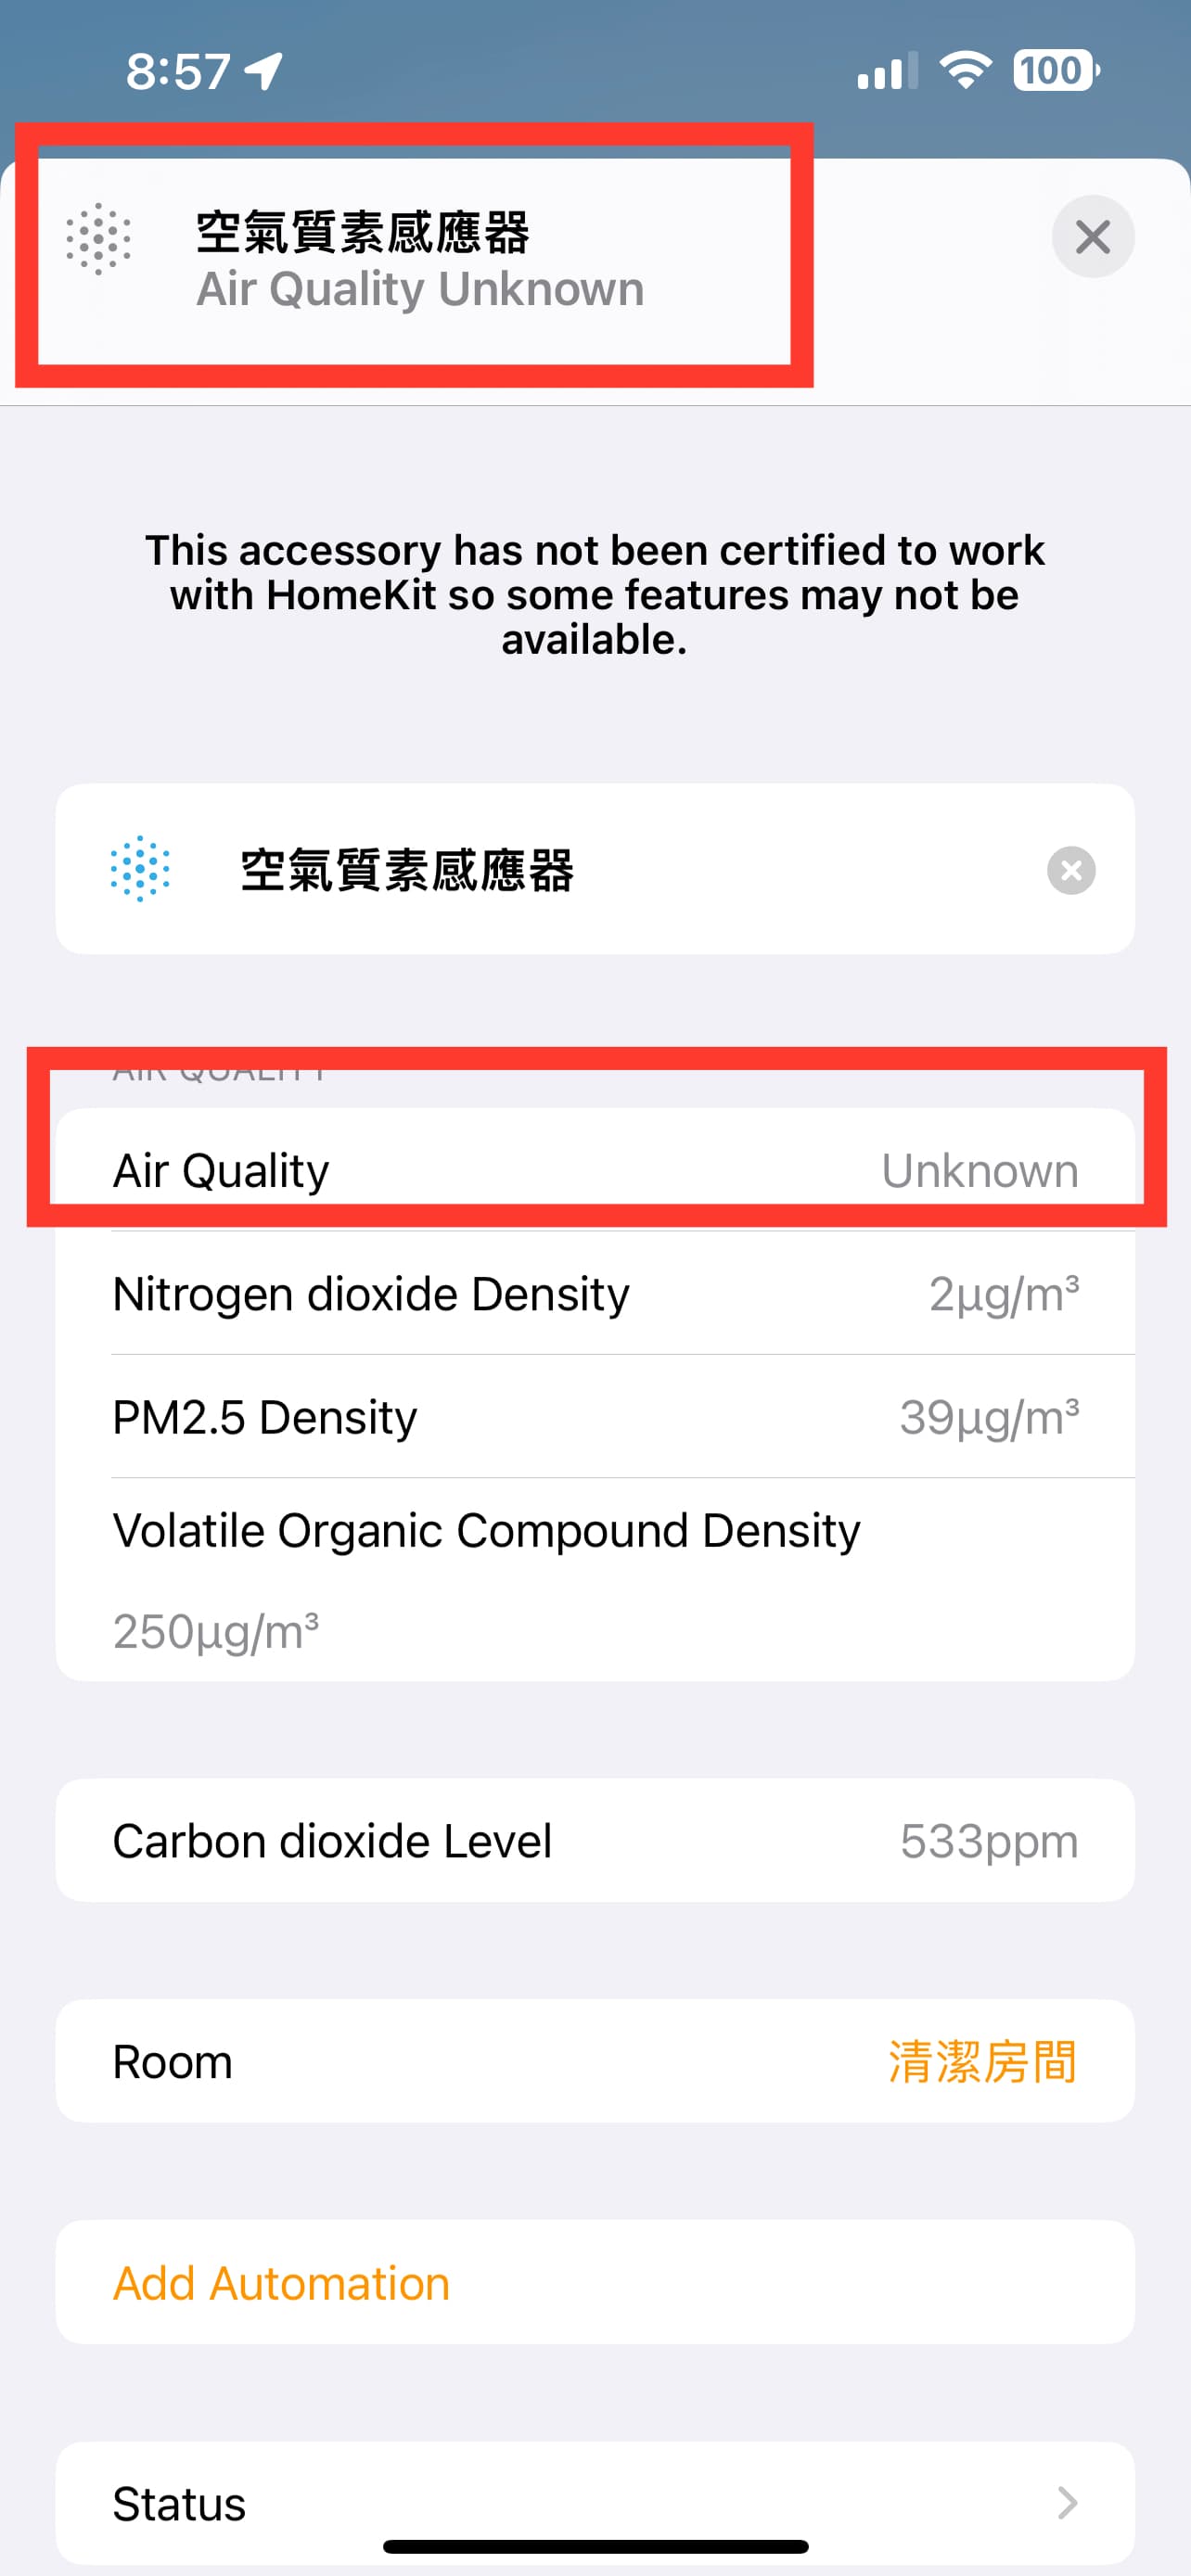
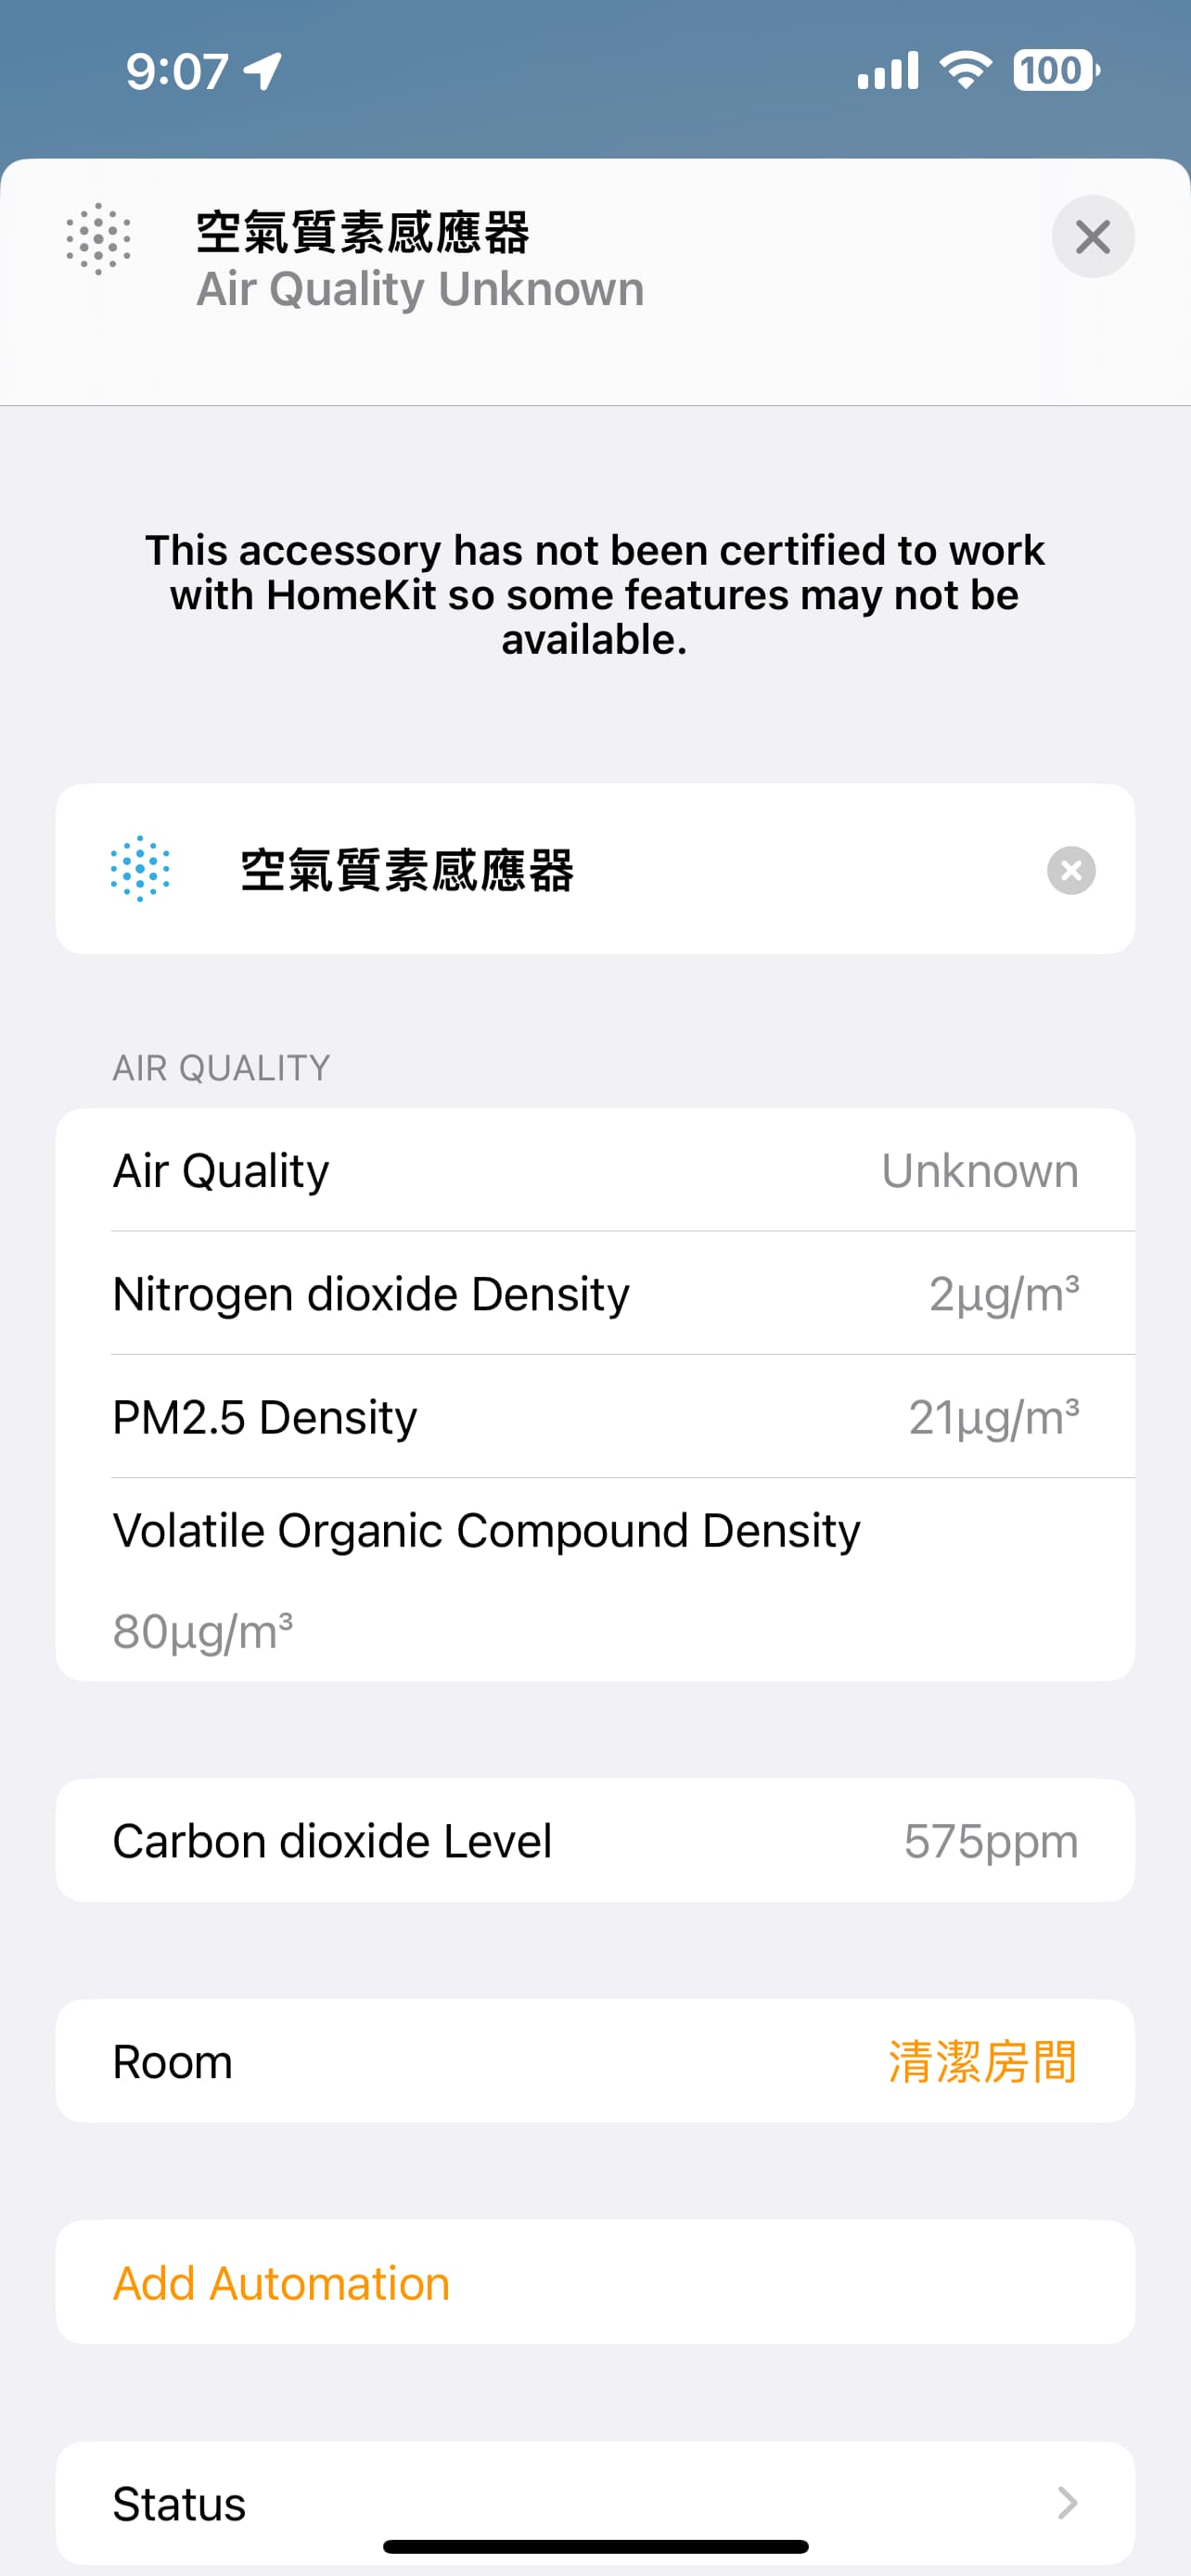
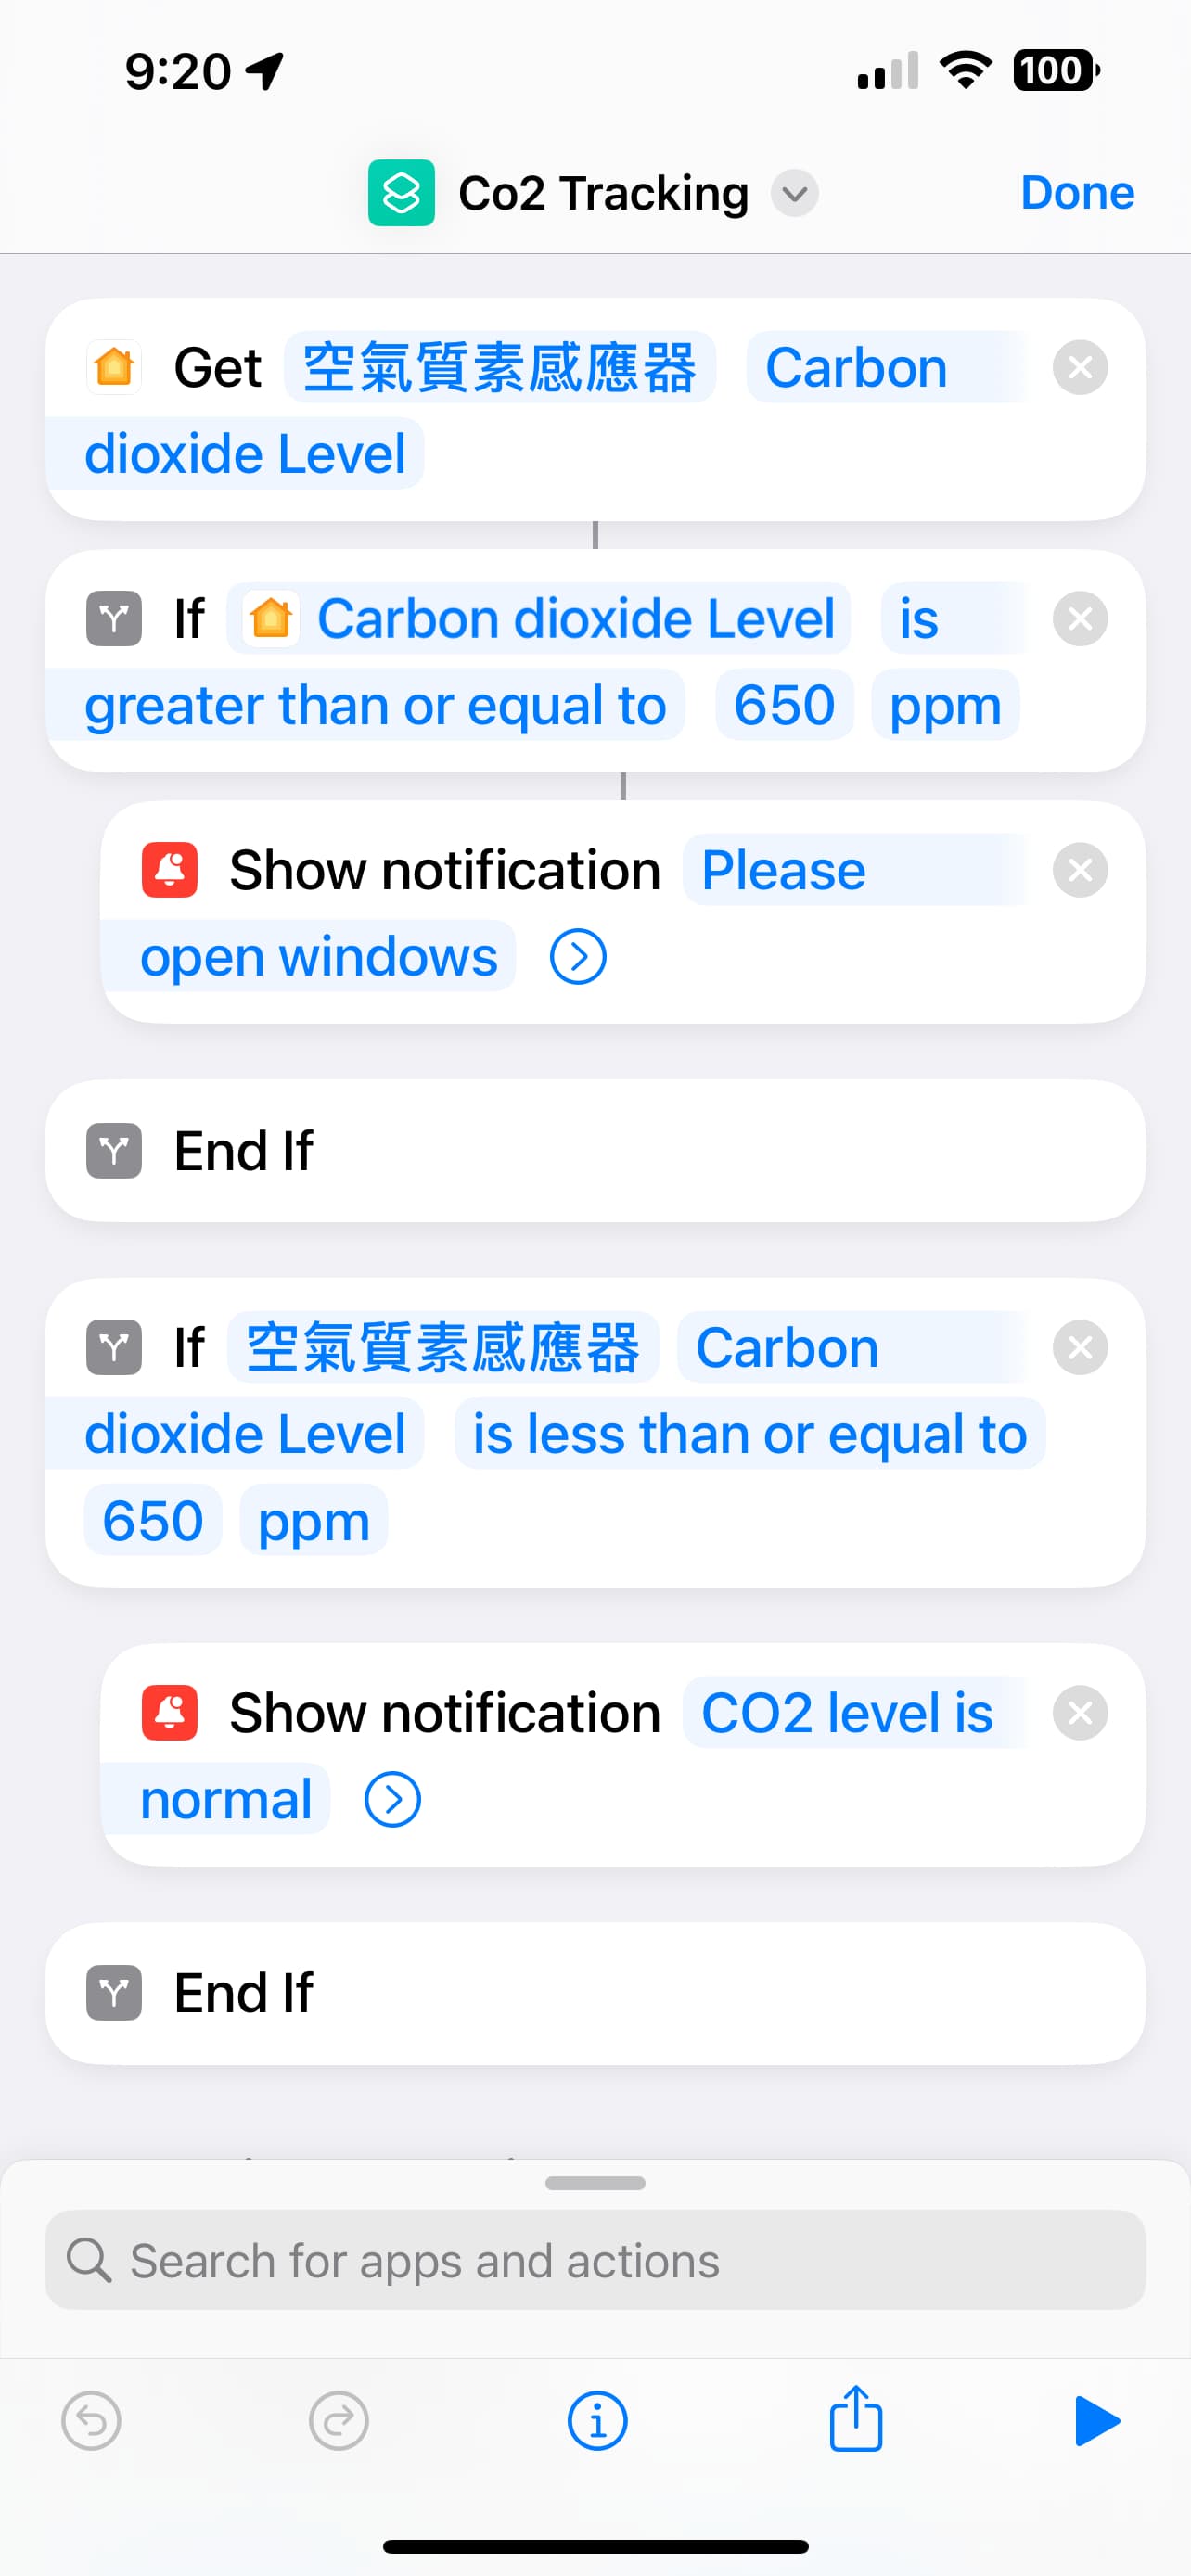
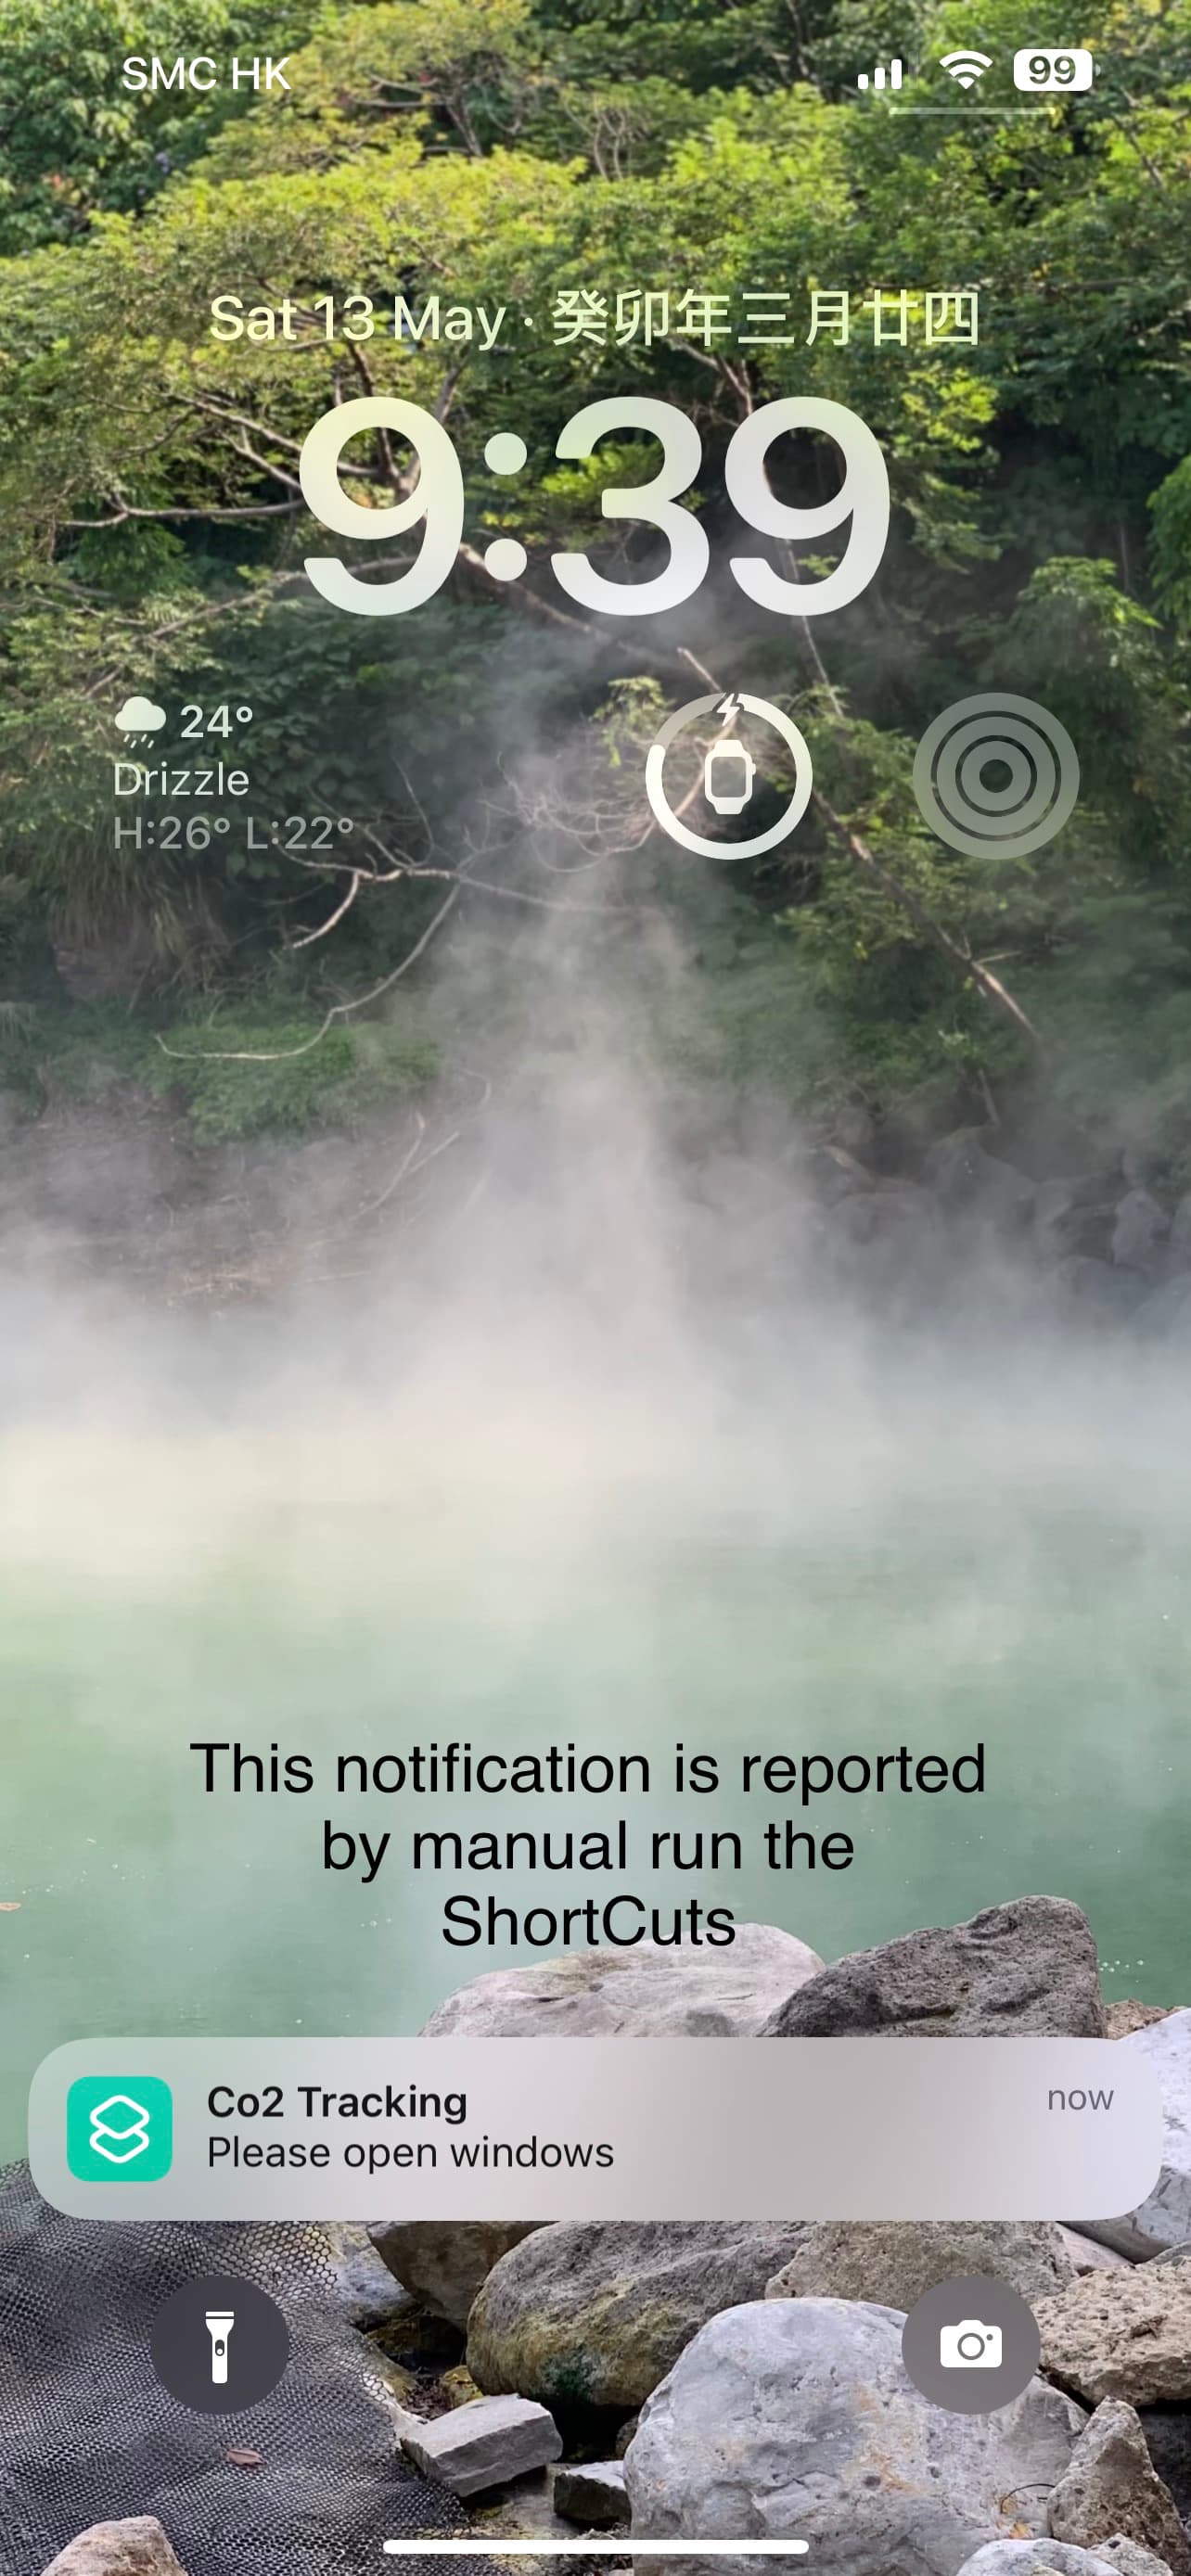
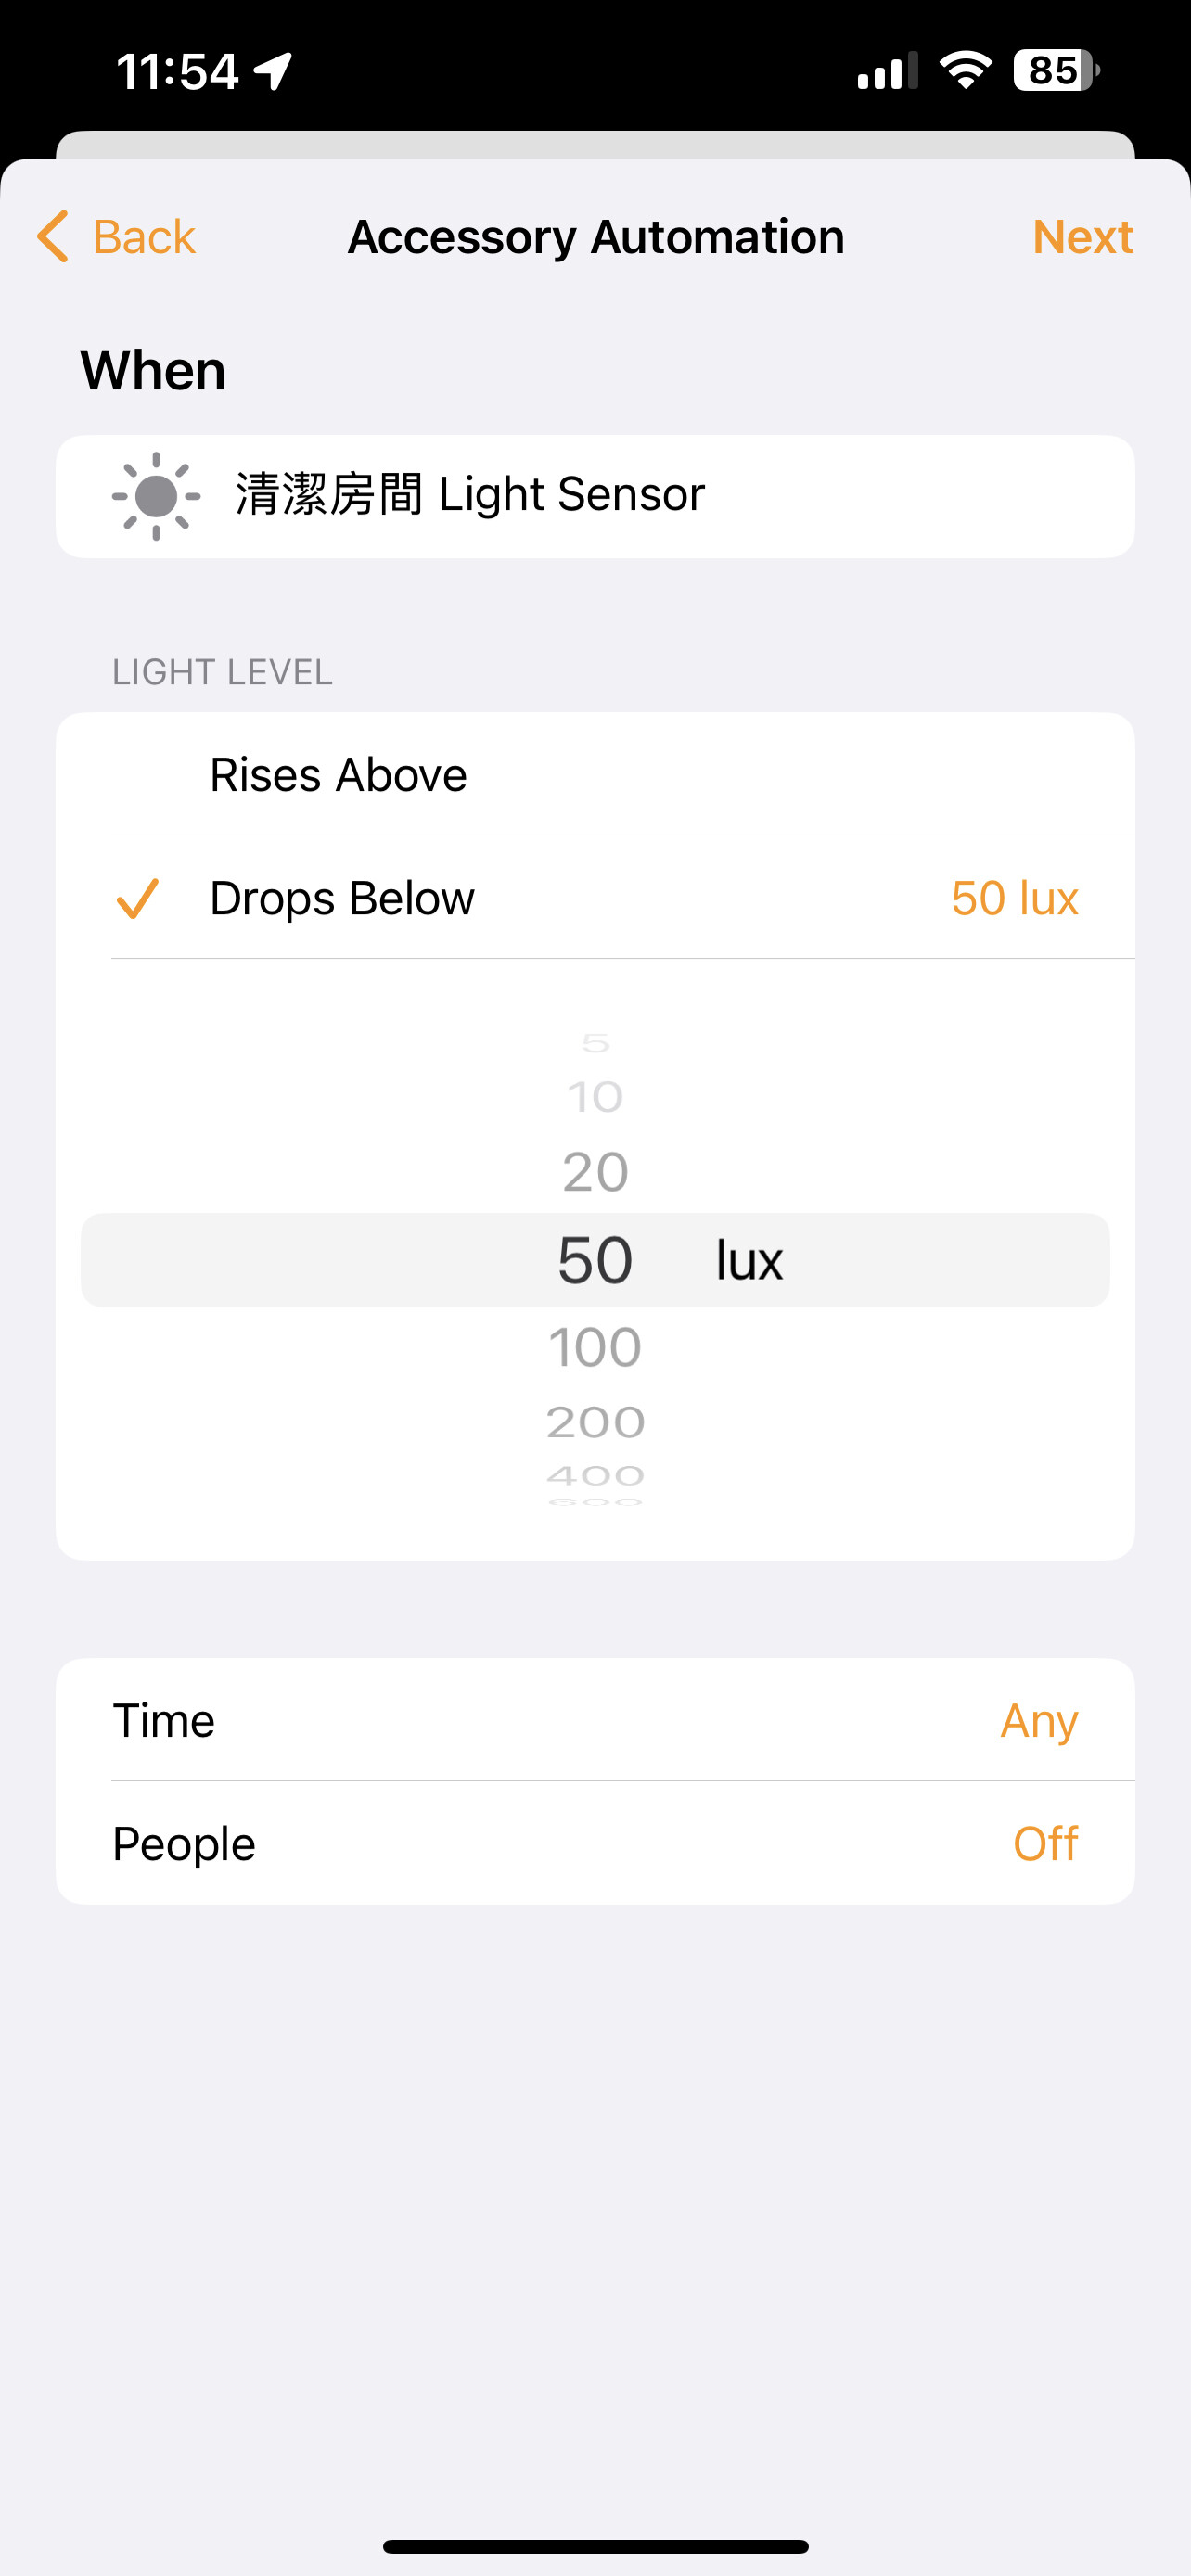
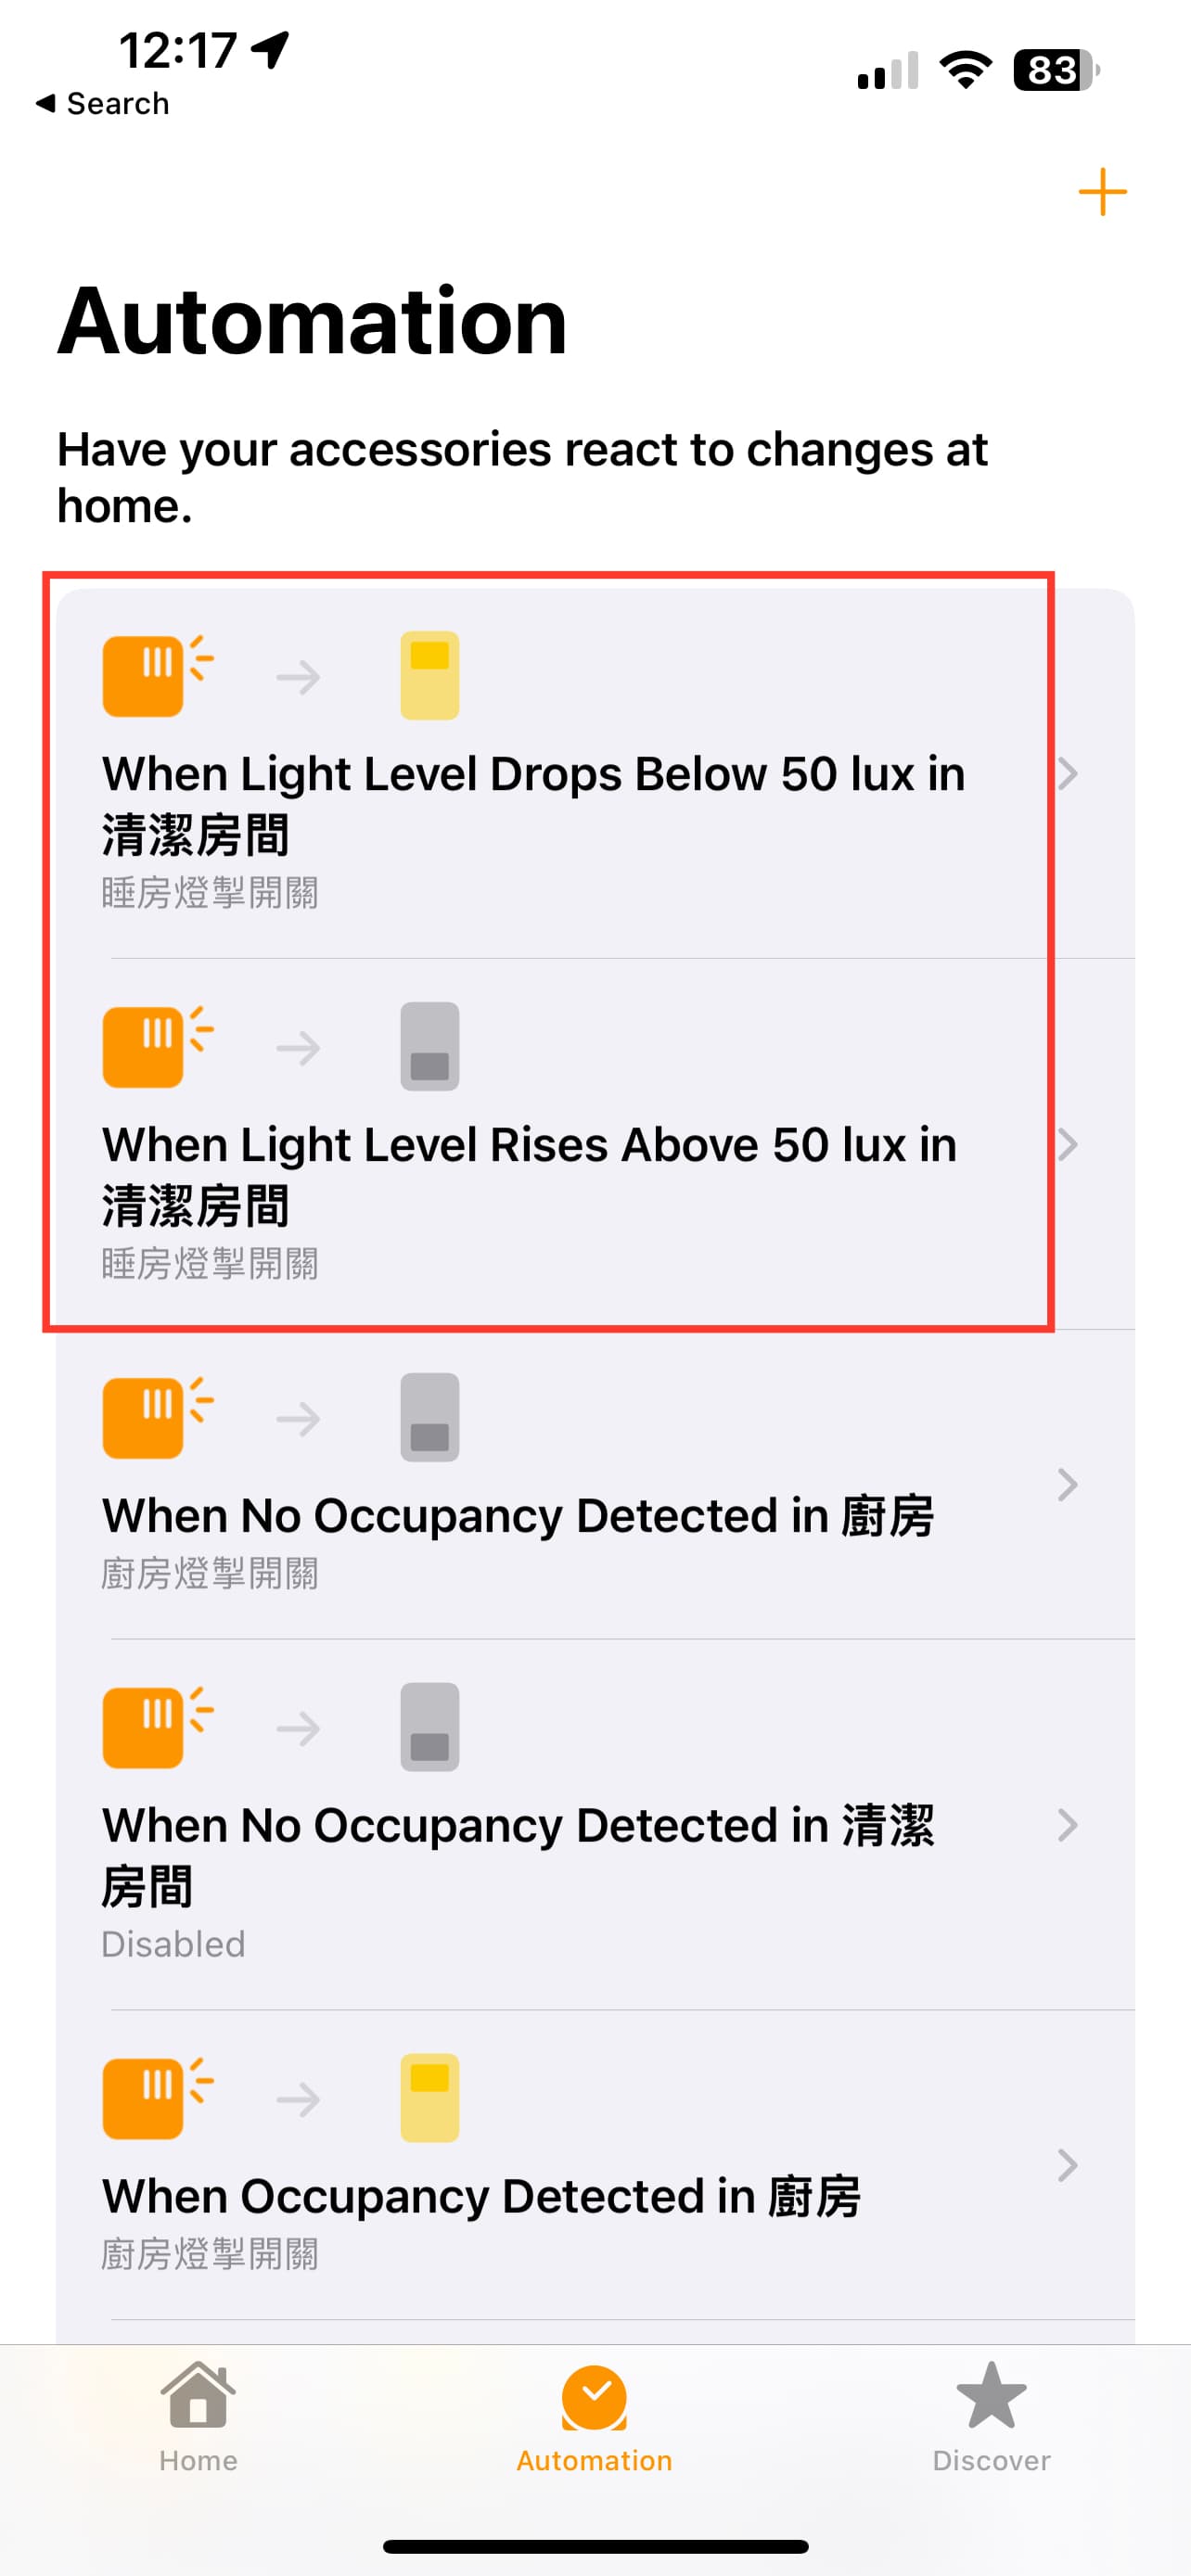
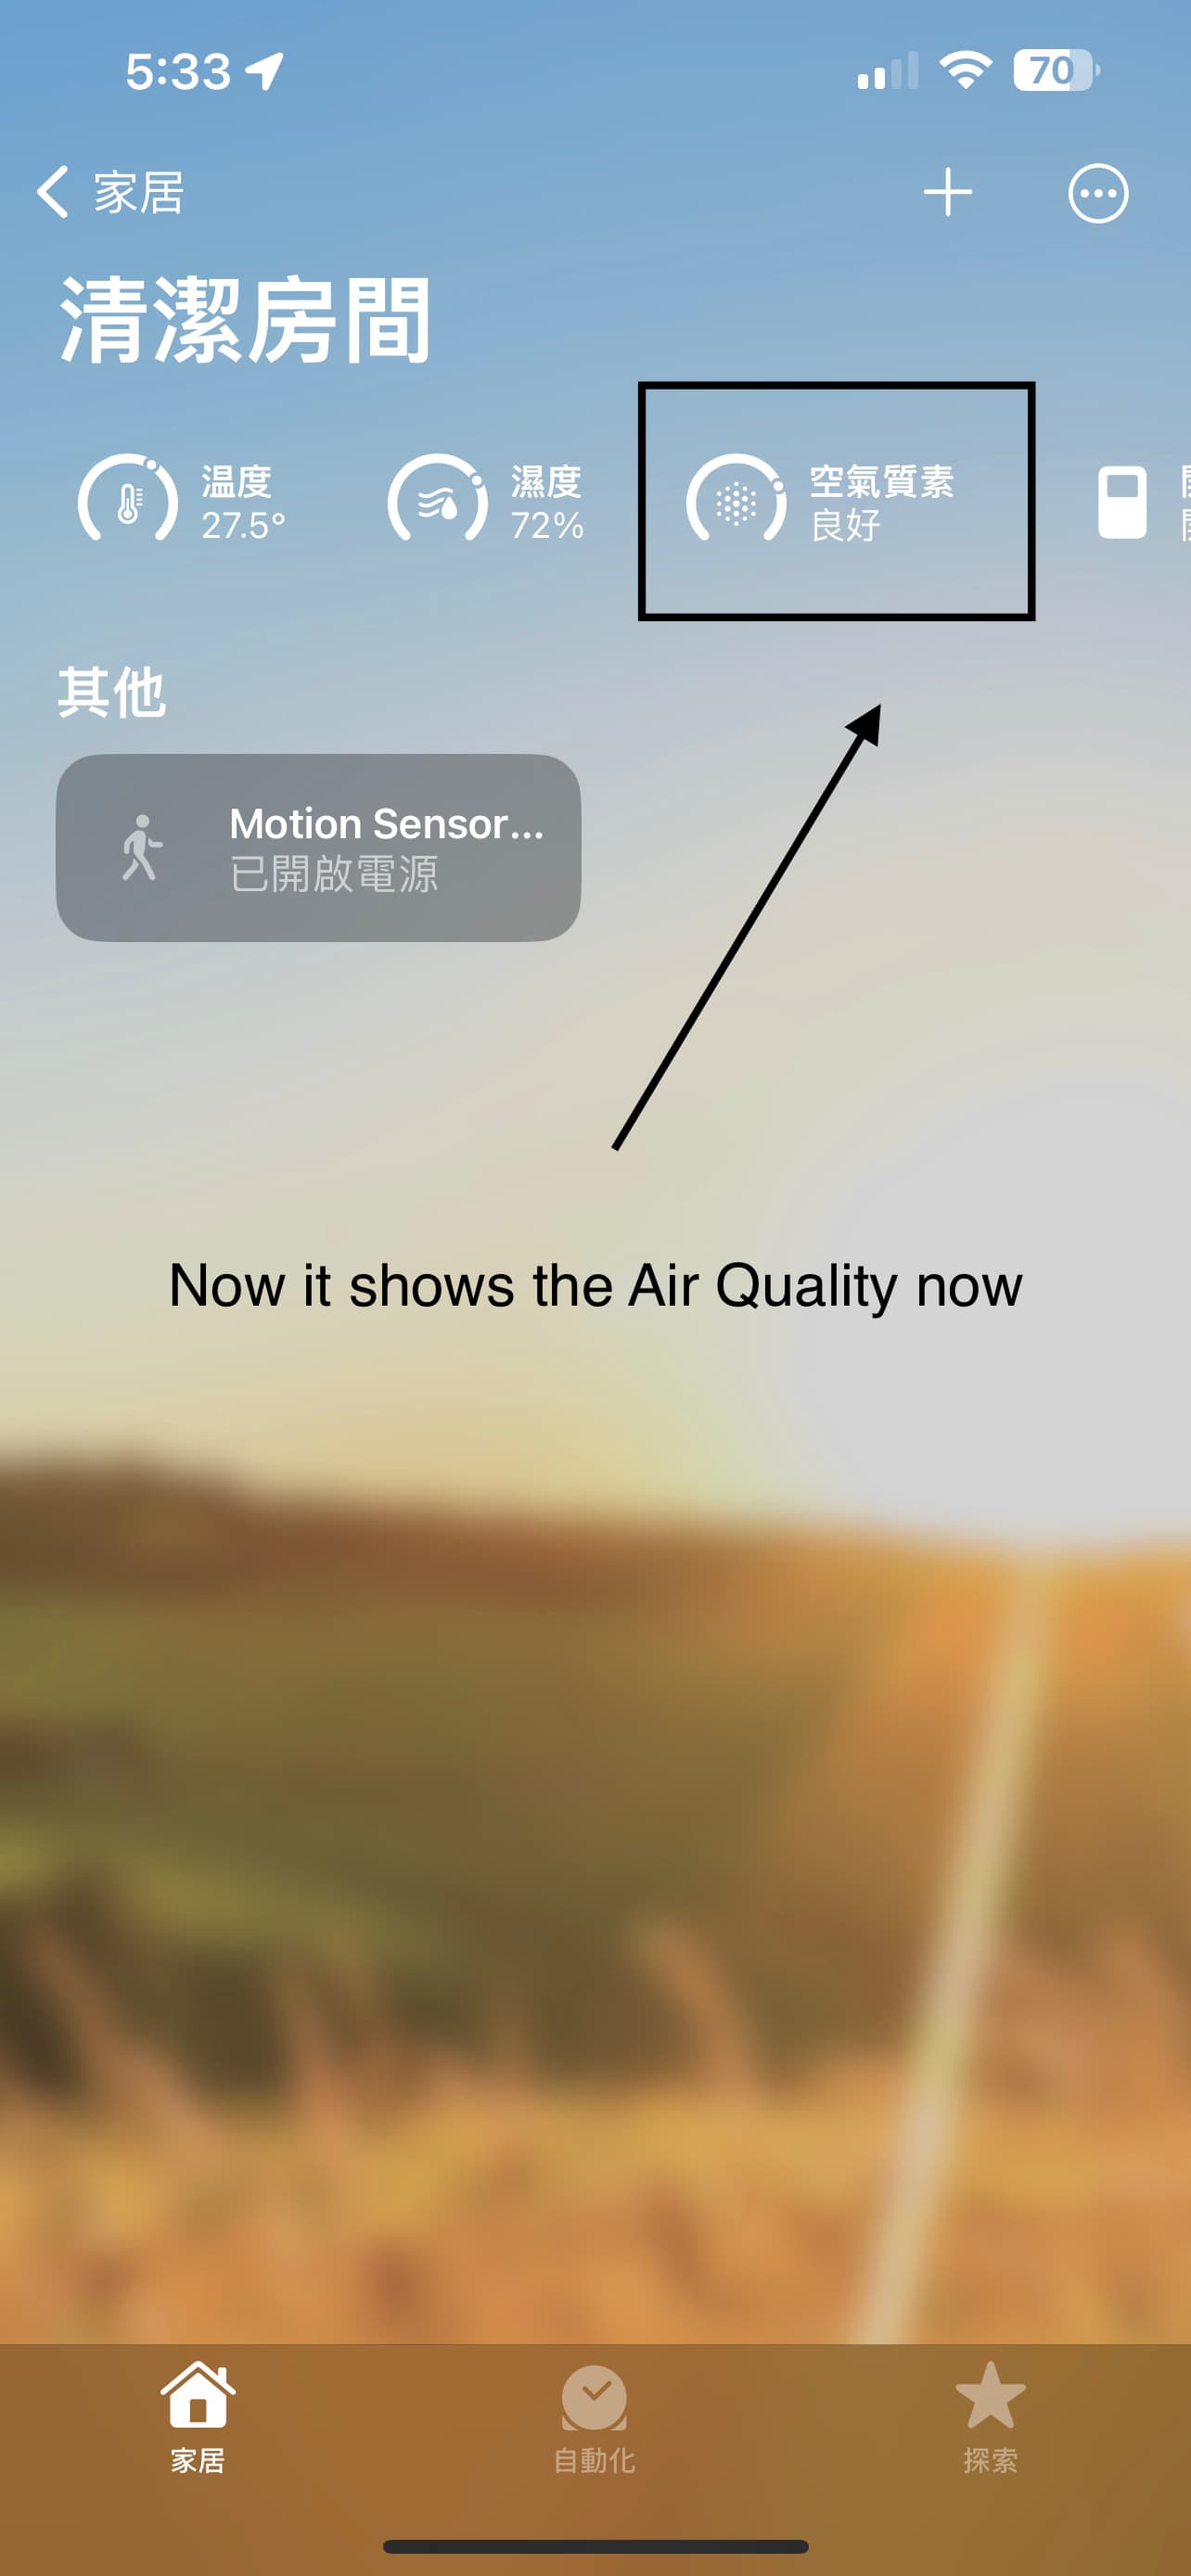
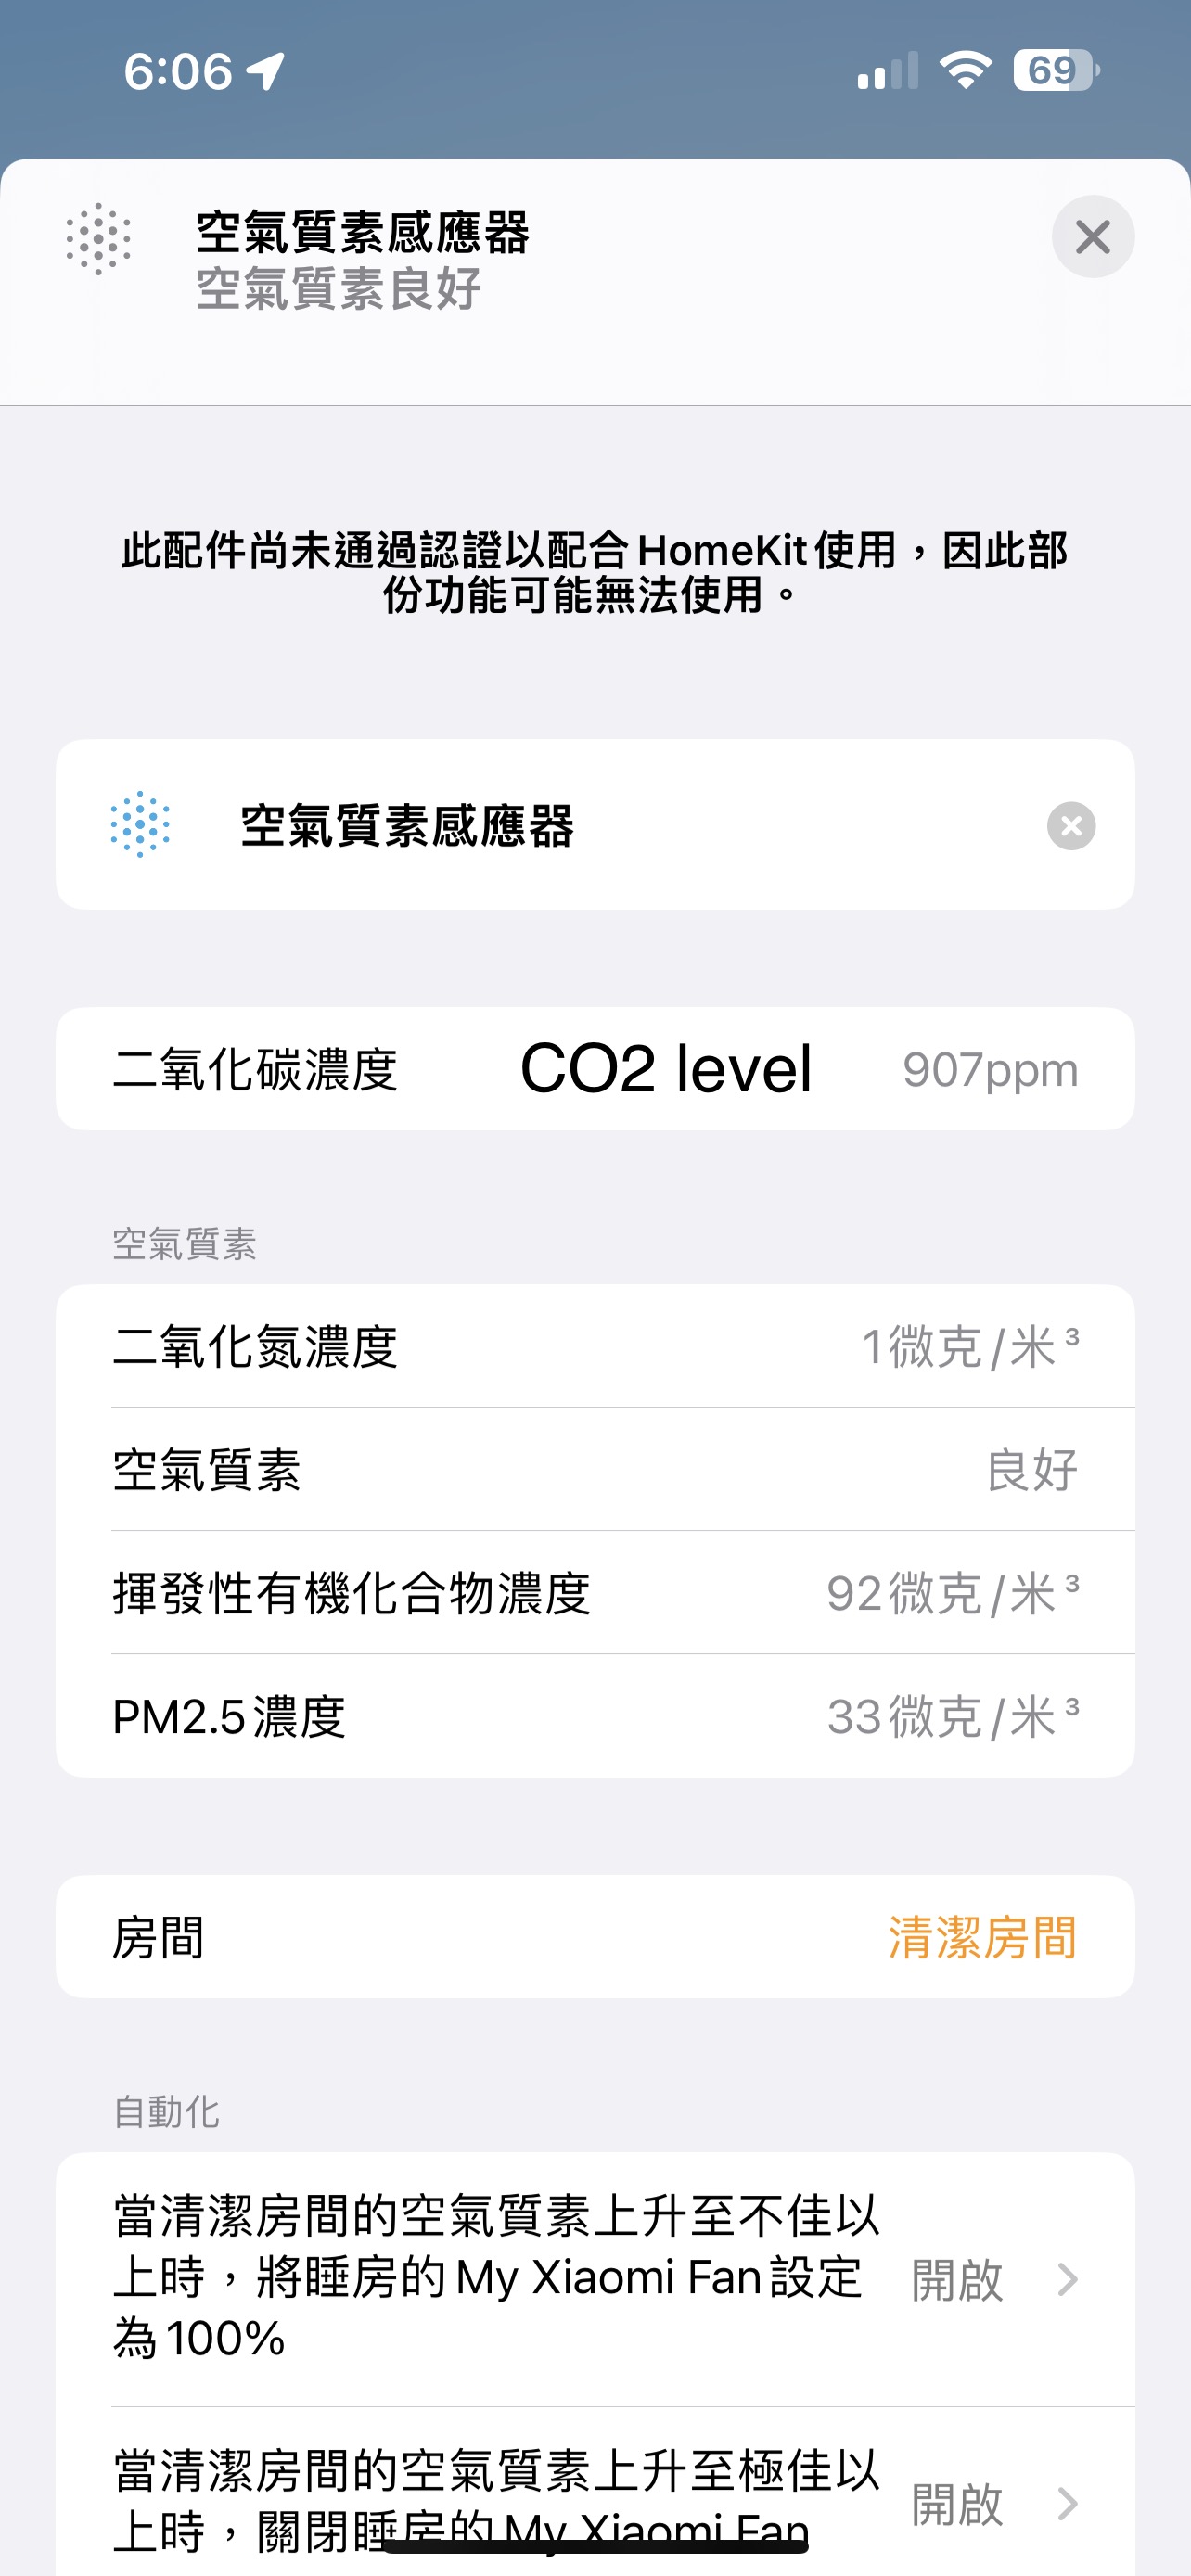
Hi all. I put together a firmware that exposes all sensors on Apple’s HomeKit. You can use it check the current readings on the “Home” app, or build some automations in “Shortcuts”.

Repo (incl. instructions and screenshots) is here: GitHub - gohai/airgradient-homekit: Experimental Apple HomeKit-compatible firmware for AirGradient DIY PRO air quality monitor

Thank you @Achim_AirGradient for pointing me the source of the “Exception 0” issue… running an older version of the ESP8266 core makes it work very reliably!

I also use esphome to integrate my DIY kit to Home Assistant. Here is my yaml file. Seems to work great and I just update it once in a while when there is a new esphome release. I do calculate a 24 hour average CO2 using a template in Home Assistant that I would like to change to calculated by esphome but I haven’t had the time to figure that out yet.

Using Home Assistant and the Nabu Casa Home Assistant Cloud service I can share the sensors to Alexa and Google Home and using the Homekit bridge integration I can share them to my wife’s iPhone. Took a bit of work to get it all going but now that it is setup everything works great.

# filename was "esphome-web-51d4ba.yaml"
esphome:
  name: airgradient
  friendly_name: Airgradient DIY 01

esp8266:
  board: d1_mini

# Enable logging
logger:

# Enable Home Assistant API
api:
  encryption:
    key: REDACTED

ota:
  password: REDACTED

# https://esphome.io/components/wifi.html
wifi:
  ssid: !secret wifi_ssid
  password: !secret wifi_password
  fast_connect: true
  
  ap:
    ssid: "Airgradient-01 Fallback Hotspot"
    password: !secret hotspot_password

captive_portal:

# Configuration for AirGradient DIY v2 device
# https://www.esphome-devices.com/devices/AirGradient-DIY/

# https://esphome.io/components/uart.html#uart
uart:
  - rx_pin: D4
    tx_pin: D3
    baud_rate: 9600
    id: senseair_s8_uart

  - rx_pin: D5
    tx_pin: D6
    baud_rate: 9600
    id: pms5003_uart

i2c:
  sda: D2
  scl: D1
  
sensor:
    # https://esphome.io/components/sensor/pmsx003.html?highlight=pms5003
  - platform: pmsx003
    type: PMSX003
    uart_id: pms5003_uart
    pm_1_0:
      name: "PM <1.0µm"
      id: pm1
      filters:
        - sliding_window_moving_average:
            window_size: 30
            send_every: 30
    pm_2_5:
      name: "PM <2.5µm"
      id: pm2_5
      filters:
        - sliding_window_moving_average:
            window_size: 30
            send_every: 30
    pm_10_0:
      name: "PM <10.0µm"
      id: pm10
      filters:
        - sliding_window_moving_average:
            window_size: 30
            send_every: 30

    # https://esphome.io/components/sensor/senseair.html
  - platform: senseair
    co2:
      name: "CO2"
      id: co2
    update_interval: 60s
    uart_id: senseair_s8_uart

    # https://esphome.io/components/sensor/sht3xd.html?highlight=sht31
  - platform: sht3xd
    temperature:
      name: "Temperature"
      id: temp
      filters:
        - offset: -1.5
    humidity:
      name: "Humidity"
      id: humidity
      filters:
        - offset: +3
    address: 0x44
    update_interval: 60s
    
    # The WHO guidelines work with 24-hour averages of the PM2.5 and PM10 sensors
  - platform: template
    name: "PM <2.5µm 24h average"
    id: pm2_5_avg_24h
    icon: mdi:chemical-weapon
    unit_of_measurement: µg/m³
    lambda: |-
      return id(pm2_5).state;
    update_interval: 60s
    filters:
      - sliding_window_moving_average:
          window_size: 1440  # = 24 hours x 60 minutes
          send_every: 1
    on_value:
      then:
        - script.execute: update_aqi
  - platform: template
    name: "PM <10.0µm 24h average"
    id: pm10_avg_24h
    icon: mdi:chemical-weapon
    unit_of_measurement: µg/m³
    lambda: |-
      return id(pm10).state;
    update_interval: 60s
    filters:
      - sliding_window_moving_average:
          window_size: 1440  # = 24 hours x 60 minutes
          send_every: 1
    on_value:
      then:
        - script.execute: update_aqi

# A textual presentation of the AQI
text_sensor:
  - platform: template
    name: "Air Quality Index"
    id: aqi
    icon: mdi:air-filter
    
# This script is called on every update of the relevant sensor values.
script:
  - id: update_aqi
    mode: restart
    then:
      # Bad if at least one of the sensor values is bad
      - if:
          condition:
            or:
              - sensor.in_range:
                  id: co2
                  above: 1199
              - sensor.in_range:
                  id: pm2_5_avg_24h
                  above: 25
              - sensor.in_range:
                  id: pm10_avg_24h
                  above: 50
          then:
            - text_sensor.template.publish:
                id: aqi
                state: Bad
          else:
            # Acceptable if at least one of the sensor values is acceptable
            - if:
                condition:
                  or:
                    - sensor.in_range:
                        id: co2
                        above: 899
                    - sensor.in_range:
                        id: pm2_5_avg_24h
                        above: 12
                    - sensor.in_range:
                        id: pm10_avg_24h
                        above: 25
                then:
                  - text_sensor.template.publish:
                      id: aqi
                      state: Acceptable
                else:
                  # Otherwise good (all of the sensor values are good)
                  - text_sensor.template.publish:
                      id: aqi
                      state: Good

display:
  - platform: ssd1306_i2c
    # https://esphome.io/components/display/ssd1306.html?highlight=display
    model: "SSD1306 64x48"
    id: oled_display
    reset_pin: D0
    address: 0x3C
    rotation: 180 # Enable to 180 to flip screen around
    pages:
      - id: display_pm2
        lambda: |-
          it.print(0, 0, id(font1), "PM2.5");
          it.printf(64, 24, id(font1), TextAlign::TOP_RIGHT, "%.0f",id(pm2_5).state);
      - id: display_pm10
        lambda: |-
          it.print(0, 0, id(font1), "PM10");
          it.printf(64, 24, id(font1), TextAlign::TOP_RIGHT, "%.0f",id(pm10).state);    
      - id: display_co2
        lambda: |-
          it.print(0, 0, id(font1), "CO2");
          it.printf(64, 24, id(font1), TextAlign::TOP_RIGHT, "%.0f",id(co2).state);
      # Display temp and humidity on the same page
      # it.printf(0, 0, id(font1), "%.1f°F",(id(temp).state * 1.8) + 32);
      - id: display_temp_humidity
        lambda: |-
          it.printf(0, 0, id(font1), "%.1f°C",id(temp).state);
          it.printf(64, 24, id(font1), TextAlign::TOP_RIGHT, "%.0f%%",id(humidity).state);

font:
    # Font to use on the display
    # Open Source font Liberation Sans by Red Hat
    # https://www.dafont.com/liberation-sans.font
  - file: './fonts/liberation_sans/LiberationSans-Regular.ttf'
    id: font1
    size: 22
    
interval:
  - interval: 3s
    # Cycle through page on display
    then:
      - display.page.show_next: oled_display
      - component.update: oled_display
  - interval: 180s
    # Two-minute interval to extend the life span of the PMS5003 sensor
    then:
      - switch.turn_on: pms_switch
      - delay: 45s
      - switch.turn_off: pms_switch

# Source: https://github.com/airgradienthq/arduino/blob/master/AirGradient.cpp#L123
switch:
  - platform: template
    name: "PMS5003"
    id: pms_switch
    optimistic: true
    turn_on_action:
      - uart.write:
          id: pms5003_uart
          data: [0x42, 0x4D, 0xE4, 0x00, 0x01, 0x01, 0x74]
    turn_off_action:
      - uart.write:
          id: pms5003_uart
          data: [0x42, 0x4D, 0xE4, 0x00, 0x00, 0x01, 0x73]

Not really an integration but i do send the measurements to an InfluxDB2 and later visualize it with Grafana.

It’s a simple http call and can be found here: airgradient/C02_PM_SHT_OLED_WIFI_INFLUXDB.ino at master · dtrumpfheller/airgradient · GitHub

I think an MQTT integration would be very useful.

Here is an updated version that includes an 24hr average of the CO2 readings.

# filename was "esphome-web-51d4ba.yaml"
esphome:
  name: airgradient
  friendly_name: Airgradient DIY 01

esp8266:
  board: d1_mini

# Enable logging
logger:

# Enable Home Assistant API
api:
  encryption:
    key: "REDACTED"

ota:
  password: "REDACTED"

# https://esphome.io/components/wifi.html
wifi:
  ssid: !secret wifi_ssid
  password: !secret wifi_password
  fast_connect: true
  
  ap:
    ssid: "Airgradient-01 Fallback Hotspot"
    password: !secret hotspot_password

captive_portal:

# Configuration for AirGradient DIY v2 device
# https://www.esphome-devices.com/devices/AirGradient-DIY/

# https://esphome.io/components/uart.html#uart
uart:
  - rx_pin: D4
    tx_pin: D3
    baud_rate: 9600
    id: senseair_s8_uart

  - rx_pin: D5
    tx_pin: D6
    baud_rate: 9600
    id: pms5003_uart

i2c:
  sda: D2
  scl: D1
  
sensor:
    # https://esphome.io/components/sensor/pmsx003.html?highlight=pms5003
  - platform: pmsx003
    type: PMSX003
    uart_id: pms5003_uart
    pm_1_0:
      name: "PM <1.0µm"
      id: pm1
      filters:
        - sliding_window_moving_average:
            window_size: 30
            send_every: 30
    pm_2_5:
      name: "PM <2.5µm"
      id: pm2_5
      filters:
        - sliding_window_moving_average:
            window_size: 30
            send_every: 30
    pm_10_0:
      name: "PM <10.0µm"
      id: pm10
      filters:
        - sliding_window_moving_average:
            window_size: 30
            send_every: 30

    # https://esphome.io/components/sensor/senseair.html
  - platform: senseair
    co2:
      name: "CO2"
      id: co2
    update_interval: 60s
    uart_id: senseair_s8_uart

  - platform: template
    name: "CO2 24h average"
    id: co2_avg_24h
    icon: mdi:molecule-co2
    unit_of_measurement: ppm
    lambda: |-
      return id(co2).state;
    update_interval: 60s
    filters:
      - sliding_window_moving_average:
          window_size: 1440  # = 24 hours x 60 minutes
          send_every: 1

    # https://esphome.io/components/sensor/sht3xd.html?highlight=sht31
  - platform: sht3xd
    temperature:
      name: "Temperature"
      id: temp
      filters:
        - offset: -1.5
    humidity:
      name: "Humidity"
      id: humidity
      filters:
        - offset: +3
    address: 0x44
    update_interval: 60s

    # The WHO guidelines work with 24-hour averages of the PM2.5 and PM10 sensors
  - platform: template
    name: "PM <2.5µm 24h average"
    id: pm2_5_avg_24h
    icon: mdi:chemical-weapon
    unit_of_measurement: µg/m³
    lambda: |-
      return id(pm2_5).state;
    update_interval: 60s
    filters:
      - sliding_window_moving_average:
          window_size: 1440  # = 24 hours x 60 minutes
          send_every: 1
    on_value:
      then:
        - script.execute: update_aqi
  - platform: template
    name: "PM <10.0µm 24h average"
    id: pm10_avg_24h
    icon: mdi:chemical-weapon
    unit_of_measurement: µg/m³
    lambda: |-
      return id(pm10).state;
    update_interval: 60s
    filters:
      - sliding_window_moving_average:
          window_size: 1440  # = 24 hours x 60 minutes
          send_every: 1
    on_value:
      then:
        - script.execute: update_aqi

# A textual presentation of the AQI
text_sensor:
  - platform: template
    name: "Air Quality Index"
    id: aqi
    icon: mdi:air-filter
    
# This script is called on every update of the relevant sensor values.
script:
  - id: update_aqi
    mode: restart
    then:
      # Bad if at least one of the sensor values is bad
      - if:
          condition:
            or:
              - sensor.in_range:
                  id: co2
                  above: 1199
              - sensor.in_range:
                  id: pm2_5_avg_24h
                  above: 25
              - sensor.in_range:
                  id: pm10_avg_24h
                  above: 50
          then:
            - text_sensor.template.publish:
                id: aqi
                state: Bad
          else:
            # Acceptable if at least one of the sensor values is acceptable
            - if:
                condition:
                  or:
                    - sensor.in_range:
                        id: co2
                        above: 899
                    - sensor.in_range:
                        id: pm2_5_avg_24h
                        above: 12
                    - sensor.in_range:
                        id: pm10_avg_24h
                        above: 25
                then:
                  - text_sensor.template.publish:
                      id: aqi
                      state: Acceptable
                else:
                  # Otherwise good (all of the sensor values are good)
                  - text_sensor.template.publish:
                      id: aqi
                      state: Good

display:
  - platform: ssd1306_i2c
    # https://esphome.io/components/display/ssd1306.html?highlight=display
    model: "SSD1306 64x48"
    id: oled_display
    reset_pin: D0
    address: 0x3C
    rotation: 180 # Enable to 180 to flip screen around
    pages:
      - id: display_pm2
        lambda: |-
          it.print(0, 0, id(font1), "PM2.5");
          it.printf(64, 24, id(font1), TextAlign::TOP_RIGHT, "%.0f",id(pm2_5).state);
      - id: display_pm10
        lambda: |-
          it.print(0, 0, id(font1), "PM10");
          it.printf(64, 24, id(font1), TextAlign::TOP_RIGHT, "%.0f",id(pm10).state);    
      - id: display_co2
        lambda: |-
          it.print(0, 0, id(font1), "CO2");
          it.printf(64, 24, id(font1), TextAlign::TOP_RIGHT, "%.0f",id(co2).state);
      # Display temp and humidity on the same page
      # it.printf(0, 0, id(font1), "%.1f°F",(id(temp).state * 1.8) + 32);
      - id: display_temp_humidity
        lambda: |-
          it.printf(0, 0, id(font1), "%.1f°C",id(temp).state);
          it.printf(64, 24, id(font1), TextAlign::TOP_RIGHT, "%.0f%%",id(humidity).state);

font:
    # Font to use on the display
    # Open Source font Liberation Sans by Red Hat
    # https://www.dafont.com/liberation-sans.font
  - file: './fonts/liberation_sans/LiberationSans-Regular.ttf'
    id: font1
    size: 22
    
interval:
  - interval: 3s
    # Cycle through page on display
    then:
      - display.page.show_next: oled_display
      - component.update: oled_display
  - interval: 180s
    # Two-minute interval to extend the life span of the PMS5003 sensor
    then:
      - switch.turn_on: pms_switch
      - delay: 45s
      - switch.turn_off: pms_switch

# Source: https://github.com/airgradienthq/arduino/blob/master/AirGradient.cpp#L123
switch:
  - platform: template
    name: "PMS5003"
    id: pms_switch
    optimistic: true
    turn_on_action:
      - uart.write:
          id: pms5003_uart
          data: [0x42, 0x4D, 0xE4, 0x00, 0x01, 0x01, 0x74]
    turn_off_action:
      - uart.write:
          id: pms5003_uart
          data: [0x42, 0x4D, 0xE4, 0x00, 0x00, 0x01, 0x73]

It is good to hear that AirGradient will add support of HomeKit, I am looking for that solution for a long time.

@gohai I have try your HomeKit firmware and DIY Kit Pro 3.7 can be added to my Home app, but I found the CO2 air quality level is shown as unknown level. Is it normal or there is something wrong?
I am not a software engineer so I do not know how to resolve it. I have created shortcut to send a notification when CO2 level is higher than 600 ppm.
Any comments for me?
Thanks!

Do you have the correct CO2 levels on the display?

@AirGradient,
The PM 2.5 and CO2 level is okay on the dashboard and HomeKit app, but the Homekit page is not shown any Air quality status.
I am not sure the Air Quality status is refer to PM2.5 value or CO2 value?
I checked the Arduino Sketch named “DIY_PRO_V3_7.ino” and “homekit.c” file which shared from gohai distribution, it is a line of Air Quality check and reported to HomeKit app in Homekit.C
Please refer to the attached photo for your reference.
Since the Air quality is reported unknown then I cannot setup an Automation in HomeKit app to control my air purifier in Apple Home app automation.
Any suggestion for me?


@Alan_Ng Thanks for trying this out!

The “Air Quality” in HomeKit is just either “excellent”, “good”, “fair”, “inferior”, “poor”. Given that the device measures a range of different quantities, I didn’t feel comfortable coming up with my own algorithm to spit out one of these labels. So I made the device just report “Unknown”. Perhaps someone with more insight into air quality indices can point me to how this is best calculated from all of the AirGradient’s sensor values?

However - @Alan_Ng, even without this label absent, you can still totally create an Automation that triggers based on one of the sensor values exceeding a certain threshold etc. (e.g. “CO2 Level above …”). I have done this myself.

Hope this helps!

@gohai Thanks for your response for explaining of my issue!
I am understand now that it is your own design purpose and needs, I am total agree of your point of view.

I have try to setup a ShortCuts with reference of your ShortCuts, the trigger level of CO2 is 650 ppm
I try the ShortCut and it is follow the design as expected in manual method but I find there is no automation notification when I try to raise the CO2 level over 650 ppm or lower the CO2 level below 650 ppm.
It only works on manual method only. Do I need to enable any setting of that ShortCuts in system first?

I attach my ShortCuts for your reference, could you help me to resolve the ShortCuts issue?
I am a newbies of ShortCuts, sorry for trouble you again!

I do not know the Homekit air Quality status is related to PM 2.5 or CO2 level status of your design, could you tell what it is refer to (PM2.5 or Co2 level)? If this air quality is related to PM2.5 level then I need to resolve the ShortCut issue to alert me to open windows or fans.

Do you mind to share how to enable the Air Quality statue on Arduino sketch, so I can try by myself?

Thanks for your great help on that !!


Hi @Alan_Ng:

Unfortunately this seems to be a bit of a limitation with Shortcuts on iPhone… they need a trigger to be executed, and Apple really wants this to be a user-inited action unfortunately. There seem to be some ways around it, if you search for it (e.g. “run iPhone shortcut at certain time of day”), but they all seem to be a hack at best.

What Apple wants us to use in this scenario is their Apple HomePod Hub, which means turning one of these devices into a dedicated home-control unit (kept stationary within the home): Apple TV, HomePod, or iPad.
With of these in place and set up, one is supposed to be able to set up automations, as described in this guide: Create scenes and automations with the Home app - Apple Support

I have not personally gotten around to setting this up and trying this out, but if you make any headway, please let us know!

@gohai Thanks for your comments.
I use Apple HomeKit and HOOBS at my Home automation mainly, I have HomPod mini and Apple TV as Home Hub. I also have build Home Assistant a few months ago due to it support ESP chip and I have build some others Air Quality monitor which support Home Assistant.
The issue is that the AirGradient DIY Pro HomeKit firmware only support Air Quality status unknown that HomeKit automation cannot be trigger by others Air quality level to control the devices. That is the problem I need to resolve. First I do not know the Air Quality status is included all the Air quality sensor such PM 2.5 and CO2 sensor, I may be try again to confirm it first.
I have a friend he is using another commercial product of PM2.5 sensor which he can run Homekit automation to turn on Air purifier when PM2.5 level status is high (not PM2.5 designed value).

Yesterday, I build an Occupancy Sensor with Light sensor that I find HomeKit automation can be trigger by the designed light level to control my bed room lighting. it is working perfect in automatically.
If I can get the Air Quality status then I guess it can be trigger in the designed.
Let me do some research and confirm my findings then I will let you know then.

Thanks again!

Here I attach my setup for reference.


@Alan_Ng Too bad Apple isn’t exposing the individual values in the automation section of the Home app… Have you tried in the Shortcuts app as well? Supposedly it is possible to create custom shortcuts for HomeKit hubs…

I’ve quickly implemented the air quality status in the repository - please try it out (I haven’t tested it myself).
Here is a commit taking PM2.5 into consideration (this one’s rather straightforward), and another one that includes CO2 (much more hand-wavy).

Another option might be to rearchitect the code to expose each sensor as separate device over the HomeKit protocol. It seemed less elegant when I wrote it, but if there is no other way to do automation based on specific user-defined thresholds…

@gohai Thanks for your quick response and the solution of the Air Quality unknown Status Sketch updates.
I have updated the firmware with PM2.5 option that you suggested, now HomeKit can report the status of Air Quality. I also try both PM2.5 and CO2 option to update firmware with both PM2.5 and CO2 Air Quality status.
But under HomeKit it only shown one Air Quality status, so I do not confirm this status is refer to both PM and CO2 level or just PM level.
Since the definition of PM2.5 level and CO2 level have a big difference in value, for example the PM2.5 is below 33 and CO2 is over 2000, it still shows Air Quality is Good. I guess it is due to PM2.5 level is low then CO2 level.

The HomeKit automation could not be define which sensor (PM2.5 or CO2) to be as the trigger then I may be need to delete PM2.5 session, if I need to have CO2 level for trigger the automation.
I also found the PM2.5 real time value and CO2 real time value updates is having delay with refer to AG Pro DIY kit screen, so the automation is not trigger correct or sometime the automation is not function.
I need more time to configure how to setup the automation.
Now the automation is not function as expected.
I will updates you when I get the final conclusion.

Thanks a lot for your help!


Hello @Alan_Ng Glad that it works for you.

Yes, the Air Quality index (status) will always only be one number. And that makes it not so straightforward: some people might only be interested in PM2.5, others in CO2, others in both.

I tried to make it handle both, with the rule that the worst of the two results should determine the index. If PM2.5 is 33 (= 2) and CO2 is over 2000 (=4), then the result should have been 4. If it isn’t, then there might be a bug in my code. I might need to test.

The sensor values are only being reported over HomeKit every 10 seconds. The screen will update more often. This should be no problem - but you can easily change it to a shorter interval.

Hi @gohai it is great to hear that you understand what I am talking of my needs and explained the reason of the updates of HomeKit index delay. How to changed the updates timing from 10 sec to 5 sec?

if I wanted to change the HomeKit report timing from 10 sec to 5 sec, the below line is correct?

const uint32_t now = millis();
if (now > next_report_millis) {
// report sensor values every 5seconds
next_report_millis = now + 5 * 1000;

I am interested in CO2 more than PM2.5 as that moment but if both options available is the best for me.
Do you mean you will modify the sketch to be display both PM2.5 and CO2 as the index later?

I have build a 3in 1 sensors for HomeKit included a Presence sensor, IR movement sensor and light sensor.
When I added it to HomeKit, it shows as 3 difference sensors during the setup process. I guess it may be a new feature of iOS 16.4.1 with new features updates of Home App.

Do you mean it can be modified the sketch to add AG DIY Pro sensor to be separated as PM2.5, CO2, Temperature sensor then I can be select the designed sensor value to be trigger for the automation?

I am looking forward of your new sketch for share. I am still checking your sketch to understand how it works.

Thanks again for your share and help.

Alan