Greig,
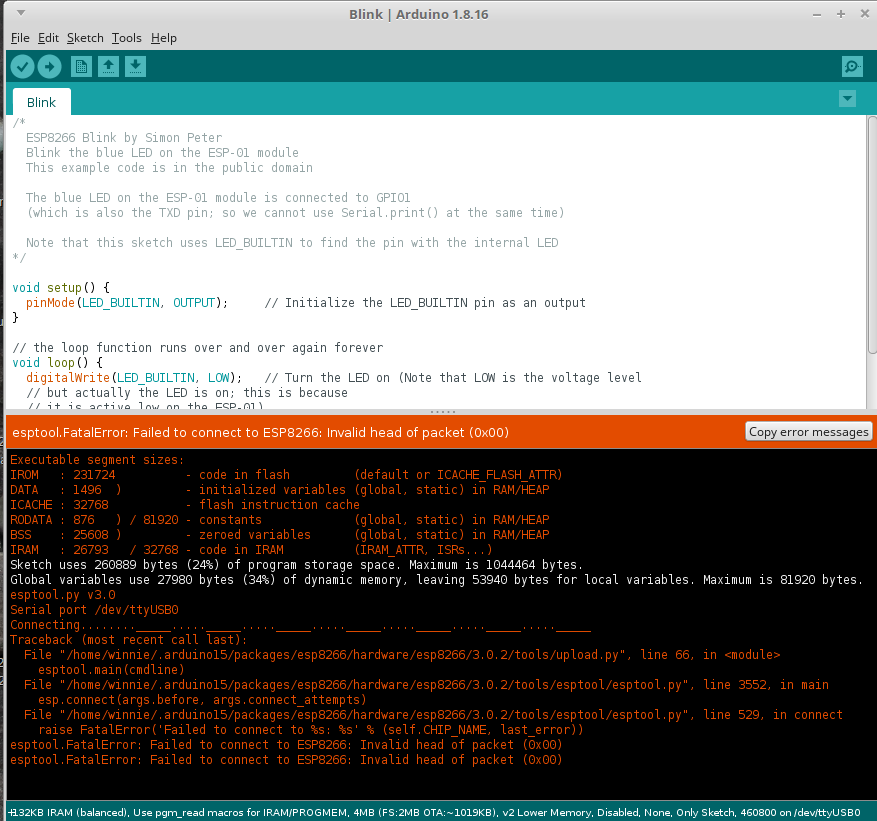
I’ve tried many of the boards in the ESP8266 Boards (3.0.2) list. Here is the output when I try the LOLIN(WEMOS) D1 R2 & mini as recommended: I hope it uploads an image…
The drivers did change from “ch341” to “ch34x”, and everything so far works like before. I am getting the same results as before where the devices fail to connect. I’ll go back to cycling through usb cables and upload speeds tomorrow.
I suspect I may be having issues with missing python dependencies. I tried some updates, however the problem may be more systemic than that. It will take me a while to remedy this. Meanwhile if anyone has any more helpful suggestions I’d love to try anything more simple than replacing my whole OS.
Greig,
I’m running a flavor of Linux. It will take me a while to redo my computer, so I will try to commandeer a different computer in the house to see if Arduino is more self contained on another OS.
It will take me a while, however I will report back with results.
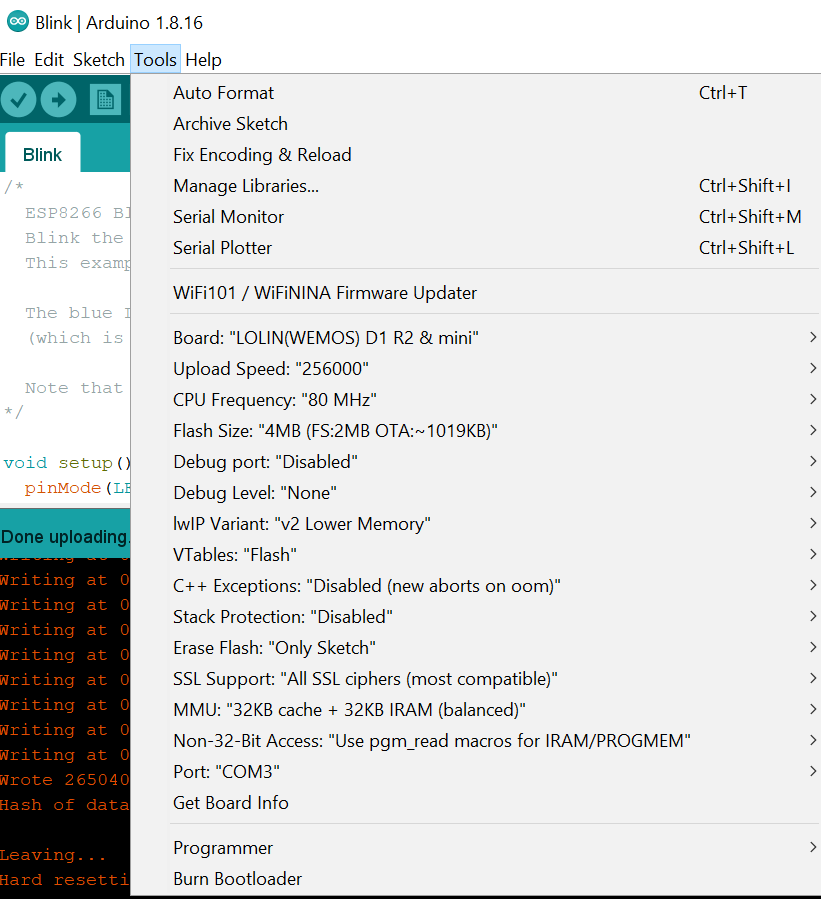
Ok, using windows I was able to upload the blink sketch. Step 0 complete. Now to flash the project code and warm up the soldering iron. For reference, below are the settings that were successful. I had to slow down the data rate until it worked. I’ll also bump this thread with an update when I get the Arduino part working on a Linux box. Thanks all!
jairbj,
Try lowering speed two more notches to 256k. Maybe even lower?
After I got blink to work, I had to install a few more header files to get he airgradient software to compile (it looks like you made it past this part). Then I hit the packet timeout again. Reducing the speed worked and I stopped investigating. Me not being a programmer is difficult, because I feel like I’m stabbing at the dark until something starts working.
I wish you the best of luck and success,
derek
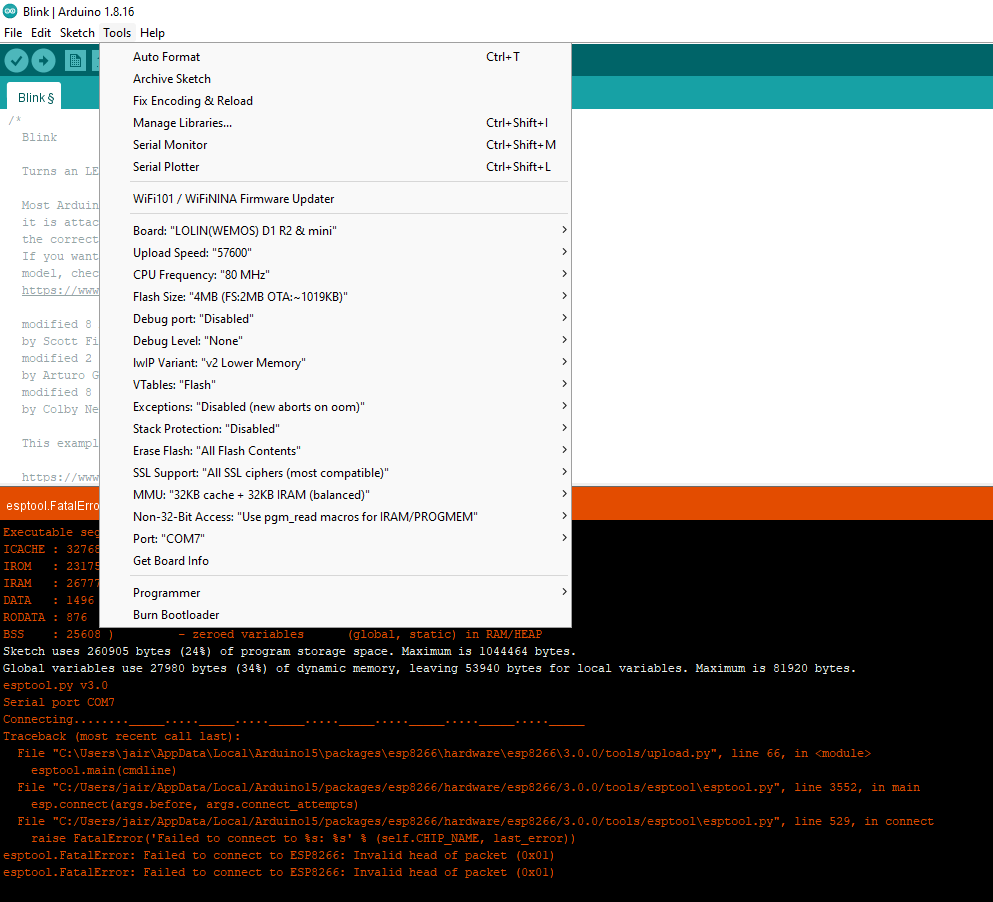
@Achim_AirGradient, tried what you suggested but got the same error. Tried it with all flashing speeds more than once and also pressed the reset button.
a) The D1 is broken
b) Sometimes the USB drivers on the Wemos D1 are fiddly and it could make sense to try and flash it on a completely different computer. What OS do you currently use?
Not all D1 minis are exactly the same.
The D1s use slightly different USB chips across the range and I had some that were tricky to flash and get the driver installed.
I was also nearing the point of ordering new hardware. Since new parts would be a while in shipping and it was the weekend, I decided to continue stabbing into the dark trying to find success flashing the microcontroller. So here’s my story about how I got the airgradient microcontroller (MC) flashed. I don’t fully understand how the whole process works and my debugging is primitive. I really can’t comment any more than the narrative below.
I asked my wife if I could use her windows 10 laptop computer. Authorization granted, I completed the following on her computer:
Install arduino from the website. Whatever the current version is.
This was a clean install since the computer didn’t have any previous versions.
Restart the computer.
Open the arduino program.
Change the settings in arduino to use an alternate ESP8266 board manager. Look for the pink URL to copy and paste as per the instructions:
Close out arduino and restart the program.
Install the ESP8266 board manager following the instructions on this page:
Close out arduino and restart the program. I am paranoid at this point and I want to make sure all of my changes have been fully implemented.
Select the ESP8266 board manager, and select the board to use.
“LOLIN(WEMOS) D1 R2 & mini”
Open arduino and go looking for the ESP8266 version of the blink sketch.
Check the board: “LOLIN(WEMOS) D1 R2 & mini”
Confirm the MC is plugged in and I have the right COM port selected.
Take a deep breath and try uploading the blink sketch.
It fails, but I know it’s trying. While trying to connect the light on the MC blinks rhythmically. I get the familiar timeout or header errors. Starting at the top I run down the speeds. At 256k it magically works. I have some fun altering the blinky sketch to make sure it wasn’t a fluke.
Close and restart Arduino.
Save the airgradient sketch to the arduino folder.
In the upper right hand corner click the green code drop down menu, select download zip. Extract the zip and move the “arduino-master” folder to the “libraries” folder.
\Documents\Arduino\libraries\arduino-master
Restart arduino if it’s open.
Open arduino and check to see if the library is there. To open the sketch you want to go to the examples folder and open the CO2_PM_SHT_OLED_WIFI folder and .ino sketch inside.
At the top of the sketch you will see all the headers that need to be included. If the <*.h> references are the same color as the preceding “include” text, you need to go find those header libraries and install them.
WIFIManager.h
drop the header folder into the \Documents\Arduino\libraries\ folder
restart arduino
check to see if the <*.h> name is now orange text
SSD1306Wire.h
drop the header folder into the \Documents\Arduino\libraries\ folder
restart arduino
check to see if the <*.h> name is now orange text
I was getting ready to go find the source for the <ESP8266HTTPClient.h> file but stopped, and tried instead to compile and load the sketch. The sketch compiled without errors this time, but the dreaded timeout and headers errors were back. Sigh.
My next stab in the dark was to run through the upload speeds, again. Starting at the top and running down one by one. I found that the sketch finally loaded at the 256k Upload Speed setting.
Success. Make sure you have edited the variables needed for your particular project. These are the boolean variables for the different sensors and wifi.
If you haven’t assembled the board or installed the screen, success looks like nothing (actually it looks like the absence of errors). No more blinks, no happy tune, no movement. You need to go assembled the board now to be sure you have flashed the MC.
Since I can now program the MC I am no longer trying to find out what is wrong. Sorry I can’t help with your specific situation, however maybe the method I used will help you with your setup.